Set up a New Budget View
Background
In Procore, a budget view is a customizable layout that allows teams to display their project's budget data in a way that suits their company's specific needs. It acts as a tailored visual arrangement of your budget information. Here are some key benefits of using budget views:
-
Customization: Present the most relevant budget data for different stakeholders or purposes.
-
Insights: Gain better insights into your project's financial status.
-
Reporting: Use these views as data sources for custom budget reports.
A Procore Administrator can set up new budget views in the Company Admin tool. Once its columns are configured, users with 'Admin' level permissions on the Budget tool can access the view directly from the Budget tool.
Things to Consider
-
Required User Permissions:
-
'Admin' on the Company Admin tool.
-
-
Additional Information:
-
To set up a budget view for real-time labor productivity, see Resource Tracking and Project Financials: Setup Guide.
-
To set up a labor productivity cost budget view, see Set Up the Procore Labor Productivity Cost Budget View.
-
Any user with 'Read Only' permission or higher on the Budget tool has access permission to apply the view to a project's budget. See Apply the View, Snapshot, Group, and Filter Options on a Budget or Forecasting View.
-
-
For companies using the
 ERP Integrations tool: Show/Hide
-
If your company account is using the ERP Integrations tool, Procore automatically provides you with a budget view for your Integrated ERP System. See Which ERP integrations are supported by Procore? for details about your specific ERP connector.
-
Any custom budget views that you create for an ERP Integration must contain all of the required ERP data columns. This ensures that Procore can send the required budget data to the company's ERP Integrations tool for acceptance for export to the integrated ERP system by an Accounting Approver. See Send a Budget to ERP Integrations for Accounting Acceptance.
-
Demo
Steps
-
Navigate to the company's Admin tool.
-
Under 'Tool Settings', click Budget.
Tip
Did you know you can also launch the 'Budget Views' page directly from the project's Budget tool? A Procore Administrator can open the 'Budget Views' page in the Company Admin tool directly from a project's budget. To do this, maximize the right sidebar in the Budget tool when viewing the 'Budget' tab. Under the 'Configurations' section, click the Configure Budgeting Views link. -
Click Set Up New Budget View.
-
Complete the following steps in the recommended order:
-
Set Up a Standard Budget View
-
Name a Budget View
-
Configure the Columns for a Budget View
-
Preview a Budget View
-
Set Up a Standard Budget View
Note
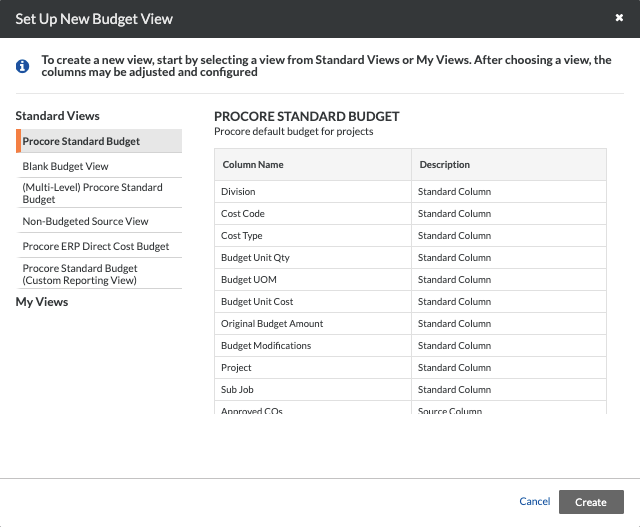
Procore provides new customers with several standard budget views that contain different columns. This example shows you how to set up the view named 'Procore Standard Budget'. However, you can use any Standard Budget View as a starting point for customizing a budget view to fit your specific business need.-
In the 'Set Up New Budget View' window, under 'Standard Views', highlight one of these options:
-
Procore Standard Budget
This is the default view for the Budget tool on all Procore projects. Your new view will inherit all of these columns and you can add or remove columns later: Division, Projected over Under, Category, Original Budget Amount Budget Modifications, Project, Sub Job, Approved COs, Direct Costs, Cost Code, Revised Budget, Projected Budget, Committed Costs, Pending Cost Changes, Projected Costs, Forecast to Complete, Estimated Cost at Completion, and Pending Budget Changes. -
Blank Budget View
This view includes a minimal set of columns. Your new view will inherit these columns and you can add or remove columns later. This view includes these columns: Division, Cost Code, Category, Original Budget Amount, Budget Modifications, Project, Sub Job, and Forecast To Complete. -
Non-Budgeted Source View.
This view shows all financial sources that are connected to a cost code and cost type and allows users to easily locate unbudgeted items. -
(Multi-Level) Procore Standard Budget
This view supports up to five (5) cost code levels (a.k.a., tiers, levels of detail, codes, and so on). This hierarchical structure provides Procore's clients with a significant amount of flexibility for defining company and project cost code structure(s).On the right side of the Set Up New Budget View window, note that each Cost Code Level in Procore has a corresponding Column Name. -
Procore ERP Direct Cost Budget
If your company has enabled the ERP Integrations tool, you can set up a view that includes these columns: Division, Job to Date Costs, Category, Original Budget Amount, Budget Modifications, Project, Sub Job, Approved COs, Direct Costs, Cost Code, Revised Budget, Projected Budget, Committed Costs, Pending Cost Changes, Projected Costs, Forecast to Complete, Estimated Cost at Completion, Projected over Under, and Pending Budget Changes.
Note: If your company is using the Procore + Sage 300 CRE® integration or Integration by Procore and you want to sync your project's job cost transactions from ERP to Procore, you should add the columns described in Add the Columns for Job Cost Transaction Syncing to a Budget View for ERP Integrations to your budget view. -
Procore Standard Budget (Custom Reporting View)
This view allows you to run a budget report at the Company level, thus enabling data to populate in budget reports like the Health Dashboard in the Company level Portfolio tool. It will also enable the Budget as a tool in the Company level Reports tool.Note
After you create a new budget view, please note:
- The budget view cannot be deleted.
- The name and description of the view in the Budget tool correspond to the name and description in the My Views area of the 'Set Up New Budget View' window.
- The new budget view is available to use as a starting point for creating additional budget views.
- If you create custom reports using a budget view as a source, users who want to run the report or view its data must be granted the permissions to Set Up a Budget View for Custom Reporting.
-
-
Click Create.
This opens an [Untitled #] budget view window. -
Continue with the next step.
Name a Budget View
-
Name the budget view as follows:
-
View Name. Type a name for the new view.
-
View Description. Type a description for the new view.
Note
You can assign the budget view to one (1) or more projects now using the checkboxes in the Assign to Projects drop-down list. You can also wait to assign it after you have configured the columns. In this tutorial, we will assign it to a project after the column configuration is complete.
-
-
Continue with the next step.
Configure the Columns for a Budget View
You have several options when configuring the columns that appear in your budget view. These options are described below.
-
Show and Hide Columns
-
Create a Calculated Column
-
Create a Source Column
-
Edit a Column
-
Delete a Column
-
Complete the Column Configuration
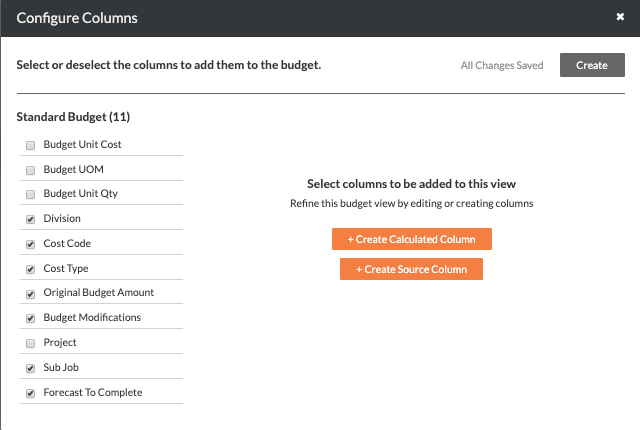
Show and Hide Columns
There are three types of columns available for use in budget views: Standard Budget, Calculated, and Source.
-
In the new budget view's window, click Configure Columns.
This opens the Configure Columns window. -
Under Standard Budget, Calculated, and Source, you have these options:
-
To show a column in the budget view, place a checkmark in a box to include the column in the budget view's display.
-
To hide a column from the budget view, remove the checkmark from a box to exclude the column from displaying in the budget view.
-
-
Choose from these options:
-
To save your changes and quit configuring columns, click close (x) in the top-right corner of the Configure Columns window.
-
To continue configuring columns, continue with the sections below.
Note
The Budget Notes feature allows users to create editable notes for budget line items, making it easier to track and manage financial details. This is done by adding the Budget Notes column to your budget view.
Users can filter their Budget to show line items with notes, and export them in PDF or CSV formats for comprehensive reporting and collaboration. Additionally, the Budget Notes feature is supported by the 360 Reporting tool.
-
Create a Calculated Column
A calculated column lets you use two (2) or more columns lets you choose a value format (for example, Currency, Number, or Percent). It also lets you write simple expressions to perform operations using two or more values from the available data columns. The operations you can perform are to add (+), subtract (-), multiply (*), or divide (/).
-
Choose one of these options:
-
Click + Create Calculated Column.
-
Click Create in the top-right and choose Calculated.
-
-
Under New Column Name, do the following:
-
Column Name. Enter a name for your new calculated column.
-
Format. Choose a format for your new calculated column's result. Your choices include:
-
Currency. Formats the new column's value so it shows two decimal points of numbers in a column. For example: $2,400,999.00
-
Number. Formats the new column's value as a whole number. For example: 2,400,000
-
Percent. Formats the new column's value as a percentage. For example: 240,000,000.00%
-
-
-
In the first Pick a Column list, select one of the available columns.
-
In the operations list, choose the operator that you want to apply:
Note
Calculations always follow the mathematical order of operations, which is to multiple and divide before it will add or subtract.-
Add (+)
-
Subtract (-)
-
Multiply (*)
-
Divide (/)
-
-
Select the second column in the calculation from the next Pick a Column list.
-
Continue adding operators and columns until your calculation is complete.
-
Click Create to save the new calculated column.
Note
- The new calculation appears at the bottom of the Calculated list on the left.
- The new column is highlighted and a checkmark appears in its box so it is shown by default in your view. You can turn it ON/OFF as needed.
- The new column will appear on the far-right of the view in the project's Budget tool.
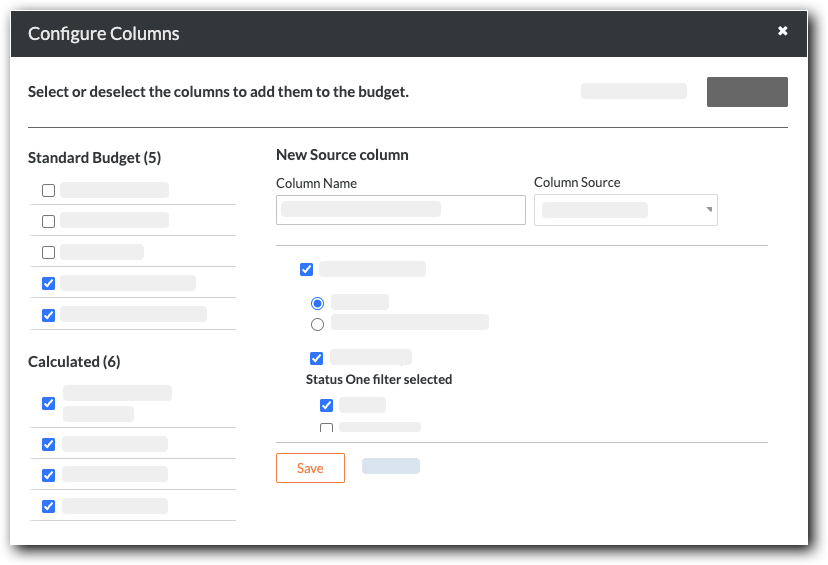
Create a Source Column
In a Procore budget view, a source column pulls source data from corresponding columns in the Financial Management tools. Some Source Columns also have Advanced Options.
-
Click Create in the top-right and choose Source.
-
Under New Source Column, do the following:
-
Enter a Column Name.
-
Choose a Column Source from the drop-down list.
Tip
Why do source columns have different options? Source columns pull source data from different Financial Management tools, and each field is a unique data type. To learn about each source column and its group and filter options, see What source columns are available in custom budget views? -
Marking the corresponding check box. If multiple options are available, mark only the check boxes you want.
-
(Optional) When available, apply group and filter options as follows:
-
Choose a radio button to group the data by that option.
-
-
Mark any available filter check boxes as you want.
Generally Available
The new RFQ Status filter for the Budget's Change Event ROM is now generally available. You can use this filter to specify when an RFQ amount should replace a ROM value. This helps you configure how potential costs appear in your budget, ensuring forecasts reflect only the most reliable cost estimates while keeping committed costs separate.
-
Click Save to save your source column configuration.
Edit a Column
-
In the Configure Columns window, click the Standard Budget, Calculated, or Source column that you want to edit.
-
When the column details appear, click Edit.
-
Depending on the column type, you can update the details as needed:
-
Standard Budget Columns. You can change the Column Name.
-
Calculated Columns. You can change the Column Name, Format, and Calculations.
-
Source Columns. You can change the Column Name, Column Source, and other advanced options as available for the selection.
-
-
Choose from these options:
-
To update the existing column, click Update.
-
To keep the existing column and save your changes as a new column, click Save as New.
-
Delete a Column
You can delete any columns that you want to permanently remove from a budget view. However, if you simply don't want a column to show, it is recommended that you hide the column as described in Show and Hide Columns.
-
In the Configure Columns window, highlight the Standard Budget, Calculated, or Source column that you want to remove.
Note
A column cannot be deleted if it is used in another column's calculation. A warning message appears to inform you of any conditions that exist that would prevent you from deleting a column. -
Click Delete.
-
In the confirmation message that appears, click Delete Column.
Complete the Column Configuration
The Column Configuration window automatically saves the show/hide setting and any arrangement that you set for the Standard Budget, Calculated, and Source columns. When you are ready to close out of the column configuration window, simply click the close (x) symbol in top-right corner.
Preview a Budget View
After closing the Configure Columns window, the system returns you to the new budget view's window. Under Column Configuration, you can get an idea of how your budget view will look in Procore by selecting a project from the Preview with Project drop-down list.
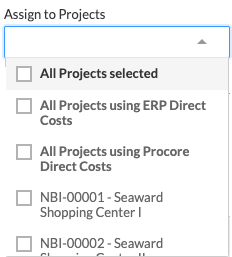
Assign a Budget View to Projects
-
In the 'Procore Labor Productivity Cost' view window, place checkmarks next to project boxes of your choice in the Assign to Projects list.
-
To assign the budget view to all of your company's Procore projects, place a checkmark in the All Projects Selected box.
Notes:-
For companies using the ERP Integrations tool, you will see the 'All Project Using ERP Direct Costs' checkbox.
-
You may also see the 'All Projects Using Procore Direct Costs' checkbox. However, it only appears when the Direct Costs tool is enabled on the project.
-
-
To assign the budget view to one (1) or more projects, place a checkmark next to the desired projects.
Note: Select project templates to carry over the budget view to new projects created using those templates. See Carry Over Budget Views from a Project Template.
-
-
Click Done.