Create a Change Event from an RFI (iOS)
Objective
To create a change event from an RFI using the Procore app on an iOS mobile device.
Background
Things to Consider
- Required User Permissions:
- 'Standard' or 'Admin' on the project's Change Events AND RFIs tools.
- Additional Information:
- This asset or item can be viewed or edited in offline mode provided that the asset or item was previously viewed and cached on your mobile device.
Steps
- Navigate to the RFIs tool using the Procore app on an iOS mobile device.
- Tap the RFI you want to create a change event from.
- Tap the ellipsis icon.
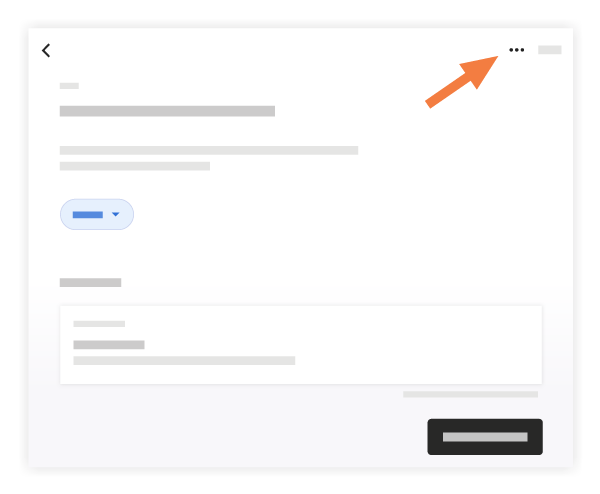
- Tap Create Change Event.
- Tap into a field to enter the appropriate information:
- Origin: This field automatically populates with the name of the RFI.
- Title: Provide a title for the change event.
- Status: Select Open, Closed, Pending, or Void to indicate the status of the change event.
- Scope: Select TBD, In Scope, or Out of Scope to indicate whether the cost is covered in the original contract.
- Type: Select TBD, Allowance, Contingency, Owner Change, or Transfer to indicate the type of cost you are preparing for.
- Change Reason: Select a change reason from the drop-down menu.
- Description: Describe the event that may result in a change in costs.
- Add Attachment: To add a photo or file, tap to select from one of the following options:
- Take Photo: This will open your camera application so you can take a photo and directly add it to the item.
- Choose from Library: This will take you to the photos in your device's library. You can then select an image to add to the item.
- Files: This will take you to files that have been saved to your device.
-
- Prime Contract (For Markup Estimates): Select a prime contract to indicate which prime contract’s markup settings should be used to calculate the markup on ROMs.
- Origin: Select one of the project tools to link the item from which the change event originated.
- Tap Create.
- Tap Create.
See Also
If you would like to learn more about Procore's RFI software and how it can help your business, please visit our request for information (RFI) construction software product page  .
.