Create a Correspondence Item (Android)
Objective
To create a correspondence item in a project's Correspondence tool using an Android mobile device.
Background
You can use the Correspondence tool to create a correspondence item that is based on a specific correspondence type, such as a General Correspondence or Notice of Delay. This article will use Notice of Delay (NOD) as the correspondence type for the correspondence item creation tutorial, however you can replace the 'Notice of Delay' name throughout this tutorial with any other correspondence type you create to learn how to create a correspondence item for that correspondence type. Additionally, you can set a correspondence to private to limit the amount of collaborators who have access to a correspondence.
Things to Consider
- Required User Permissions:
- 'Standard' level permissions or higher on the item's correspondence type.
- Differences for items with a workflow applied:
- The following fields behave differently when a workflow is applied and the item is issued because the workflow automatically populates and controls them: Status, Due Date, Assignees, and Distribution Member.
Steps
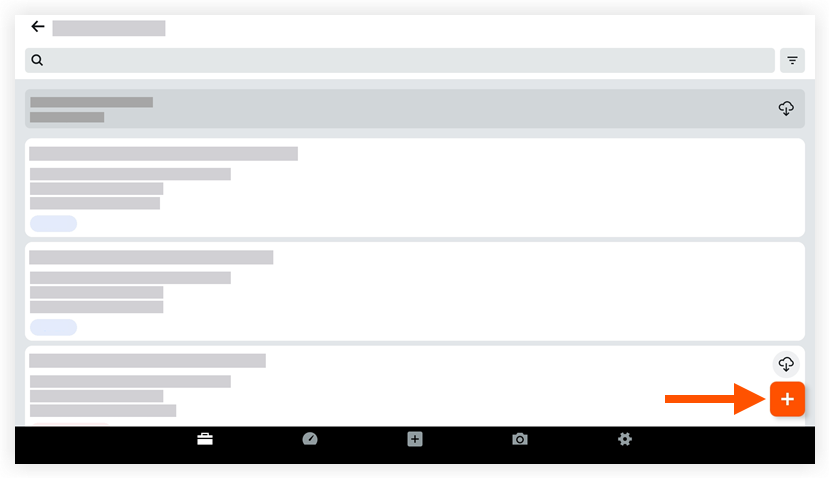
- Navigate to the project's Correspondence tool using an Android mobile device.
- Tap the plus
 icon.
icon.
- On the Select Type screen, tap the radio button for the correspondence type you want to create.
- Fill out the following fields:
- Subject: Provide a descriptive subject for the correspondence item.
- Status: Select 'Draft,' 'Open,' or 'Closed,' or to indicate the status of the correspondence.
Note: If a workflow is applied to the correspondence item, the workflow template controls the status once the item is created and issued.- Draft: Select Draft if you want the correspondence item to be saved as a draft so that it is not yet sent out to recipients.
- Open: Select this status if you want the correspondence item to be sent to the specified recipients.
- Closed: Set the correspondence item to this status once all related tasks have been completed and the correspondence is considered complete.
- Description: Provide details about the correspondence item you want to communicate.
- Optional: Attach one or more files to the correspondence using the following options.
 Camera: Tap to open your device's camera and take a photo.
 Library: Tap to select an image from your device's library.
 Files: Tap to select a saved file from your device's files.
-
 Document Management: If your Procore account has the Document Management tool, select a file from that tool's repository.
- Private:
- Tap the toggle ON
 to set the correspondence item to Private so that it can only be viewed by 'Admin' level users and those selected in the 'Assignees' and 'Distribution List' fields.
 - Tap the toggle OFF
 if you want the correspondence item to be visible to all users with 'Read Only' or higher permissions to the project's Correspondence tool.
- Tap the toggle ON
-
Due Date: Enter or select a date from the calendar for the response to be due.
Note: If a workflow is applied to the correspondence item, this field changes to 'Current Step Due Date' and is read-only. -
Received From: Add people who are not directly responsible, but should be aware of this correspondence item. Add users with 'Read Only' level permissions or higher to the distribution list. Depending on the user's permission level, they can respond to the correspondence.
-
Assignees: Assign responsibility for responding to the correspondence item to one or more project team members from the users in the Directory. Add users with 'Read Only' level permissions or higher to the distribution list. Depending on the user's permission level, they can respond to the correspondence item.
Note: If a workflow is applied to the correspondence item, this field is replaced with 'Current Step Assignee' and is read-only. -
Location: Select the location pertaining to the correspondence item from the drop-down list.
Note: If Procore is configured to allow users to create locations (see Allow or Disallow Users to Create Locations Within a Tool), you can click the Create a New Location button at the bottom of the list. -
Distribution List: Add users with 'Read Only' level permissions or higher to the distribution list. Depending on the user's permission level, they can respond to the correspondence.
Note: If a workflow is applied, once the correspondence item is Issued, any distribution members in the workflow template automatically populate here and cannot be removed. -
Quantity: Enter a number and then select a unit of measurement from the UOM drop-down menu.
-
Trade: Search for and select one or more trades to associate with the correspondence item.
-
Sub Job: Select a sub job to associate with the correspondence item.
-
Schedule Tasks: Search for and select one or more schedule tasks from the project's schedule to associate with the correspondence item.
-
Tap Save as Draft, if you want to save your work in a Draft version that can be issued out to the users listed on the correspondence item at a later date.
OR
Tap Create, if you want to issue the correspondence to the users listed on the correspondence item who will be notified via email.
Note: If a workflow is applied to the correspondence item, you are asked to confirm understanding that creating and issuing the item automatically triggers the start of the assigned workflow.