Precon - Estimate and Bid Tab
|
|
| ESTIMATE AND BID TAB |
|
THE WHY The following is an outline of the process to compile an estimate for projects at Brinkmann Constructors. The information will show, step-by-step, how the estimate and bid tab functions, what information within the spreadsheet is to be filled out, Do’s and Don’ts while working in the spreadsheet and tips-and-tricks to assist in navigating through the estimate and associated tabs within the spreadsheet.
THE SETUP Creating a P-File At Brinkmann, each potential project that comes in the door will be assigned a P-File number. To have a P-File created please contact:
They will create the P-File when requested and pull all provided plans and documents into the P-File folder. Each P-file will be structured the same, with folder structures and forms/templates pre-loaded into the file when it’s created. Once the P-File has been created, you will navigate to this through SharePoint. Within the P-file folder structure, select the ‘02. Precon folder’. Select the ‘a. Estimating’ folder and there you will find the Estimate Template to begin. |
IDENTIFICATION Naming Your Estimate/Bid Tab Upon opening the estimate file (Excel), Save-As and rename the file prior to entering any information. The name of the file should include the p-file number, the word “estimate” AND/OR “bid tab”, the project name, and the date of the estimate/bid. (We are aware of the character limits we have within Sharepoint and naming convention will slightly vary based upon this fact.) Naming the File: In order to stay consistent among offices the following is how you MUST name the document: P-File # Estimate/Bid Tab Project Name Date Estimate Example: P-0000 Estimate - Brinkmann Constructors Office - 02.26.21 Bid Example: P-0000 Bid - Brinkmann Constructors Office - 02.26.21
|
| ESTIMATE AND BID TAB: TAB EXPLANATION |
|
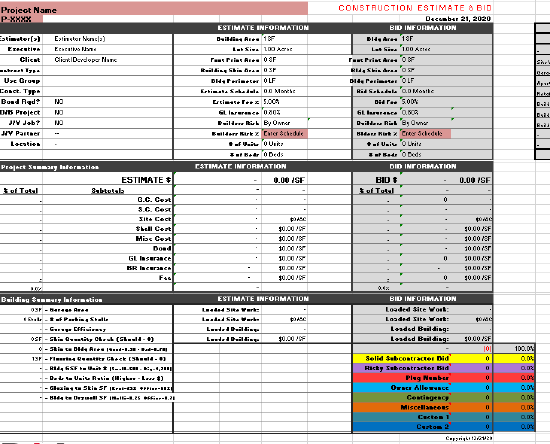
First, we will review the tabs within the spreadsheet. What they are, how they interact, and which tabs you will use and when on specific project types. TAB 1: ESTIMATE & BID Section Breakdown The Estimate & Bid Tab can be broken up into five basic sections. They are:
Column Breakdown This is where the majority of your data entry will take place. This tab is pre-loaded with lot of descriptive scope items by division (Column B). Utilizing your quantity take-off, building skin area, square footage, counts, etc.;
Adding Information & Changing Headings As you proceed through the divisions, you can add/remove or rename the line items to reflect applicable scopes for your specific project. Generally, the division headings in blue should remain, while the subsequent detailed scope information can be adjusted. Use pertinent information such as sizes, thicknesses, or types of material within your description as this will remind you of what you’ve priced, as well as provide immediate information to the rest of the team on what the line item unit cost is based upon. Additionally, you can use the notes column on the right (Columns H/I) for further description of assumptions you’ve made (IE: “6 foot O/X per Geotech”).
YOU SHOULD NEVER HIDE OR DELETE THE GRAY SUBTOTALS ROW FOR ANY SCOPE OF WORK. When you need to insert additional rows within the estimate, it’s best to select an adjacent row, then right-click “copy” and then “insert copied cells” instead of simply right-clicking and “insert”. By doing the copy-insert copied cells method, it will retain all the necessary formatting and formulas that you need. |
TAB 2: BUILDING INFO Once on-screen takeoff has been complete, project information can be entered on this tab. Utilizing this tab is not required, however, it can be a good tool for more complex estimates or to speed up warehouse estimates. If completed in detail and accurately, you can tie-out quantities from this tab to the estimate tab. In doing so, you can quickly and easily make changes or updates to the estimate in the future without going line-by-line on the estimate tab to update quantities when a plan changes or client request a modification to a specific area of the building. Completing this tab also helps you build a conceptual estimate, thinking about things like what type of construction materials are used in which locations or where a podium slab should be constructed. This tab is fully customizable to fit your project needs, and several common modifications are as follows:
TIPS & TRICKS **A good practice throughout the estimate is to tie-out to items such as the unit count, perimeter or square footage rather than hard enter the quantity. If you link the quantities to a specific cell, such as unit count or area that’s located on the Building Info tab, you will save yourself time when the quantity changes and you can update it in ONE spot vs. updating all of the hard entered locations throughout the estimate.**
TAB 3: UNIT QTO Similar to the Building Info tab, this tab can be utilized on more complex projects, specifically unit driven projects such as hotels, senior living, or multi-family. By completing this tab based upon your quantity takeoff, you can tie-out specific line items in the estimate tab here. Breaking down by unit type, size, etc. in as many columns as needed.
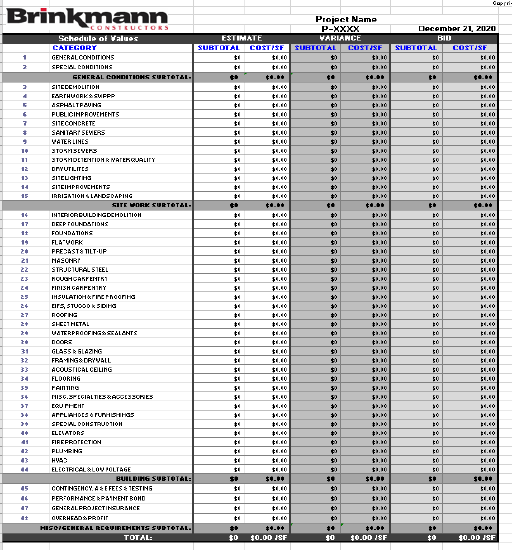
TAB 4: EST SOV The Simple Version - Estimate This is the basic Schedule of Values (SOV) that is tied to the estimate dollars of the Estimate & Bid. The information on the Est. SOV tab will be populated automatically from the data entered. Items such as the project name, date and overall SF are tied out to the info you entered to start on the estimate tab. Similarly, the SOV is being populated by the estimate and bid tab SOV summary. TIPS & TRICKS **You can manipulate this tab as needed (IE adding Alternates, hiding columns not used, changing descriptions, etc.) however, good practice is to keep the descriptions and format unchanged.**
TAB 5: EST SOV w. ALTS This tab is similar to the Est. SOV, but can be used to provide a simple breakout of alternate items that you may want to price separately from the base pricing. You can use the blue-highlighted boxes in column O and row 61 to adjust how items like General Conditions, Insurance, or OH&P are applied to the alternates. See section "7: Weighted General and Special Conditions for more details on how this is done.
TAB 6: EST. SOV - MULTI This tab will be utilized if you’re using the Area Breakdowns function, and would like to separate costs within the Schedule of Values between different areas of the building or multiple buildings on the same site. This tab is tied-out to the estimate side of the Estimate & Bid tab and will automatically pull over the costs within each division. Manipulation of this will be required if using for a client deliverable. The blue-highlighted boxes in column U and row 63 can be used to adjust how items like General Conditions, Insurance, or OH&P are applied to different project areas. See section "7: Weighted General and Special Conditions for more details on how this is done.
TAB 7: BID TAB SOV The Simple Version - Bid Tab See Tab #4 “Est. SOV”; same process and functionality, just pulling from the Bid side of the Estimate & Bid tab in lieu of the Estimate side.
TAB 8: BID SOV w. ALTS See Tab #5 “Est. SOV w. Alts”; same process and functionality, just pulling from the Bid side of the Estimate & Bid tab in lieu of the Estimate side.
TAB 9: BID TAB SOV - MULTI See Tab #6 “Est. SOV MULTI”; same process and functionality, just pulling from the Bid side of the Estimate & Bid tab in lieu of the Estimate side.
TAB 10: BOND-INS Auto Calculations for Bonds and Insurance The tables within this tab are preloaded and their inclusion or exclusion are based upon the information input in the Estimate & Bid tab. TIPS & TRICKS **These values are periodically updated, typically in the first quarter of a new calendar year. If you are updating an older estimate form, you may need to manually update these values to ensure accurate pricing.**
|


| BUILDING YOUR BID OR ESTIMATE |
|
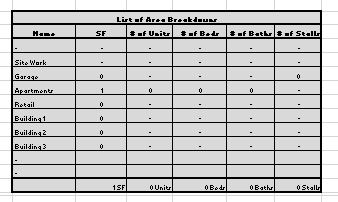
DATA ENTRY: GETTING YOUR ESTIMATE/BID TAB READY 1. Project Basics 2. List of Area Breakdown/Alternates Depending on project type, and the desired information to share when sending to the client, you may want to utilize the “List of Area Breakdown/Alternates” table to the right (see Columns K-P in rows 6-18). Discussion with the project team prior to setup of the spreadsheet is a good idea as you will want to setup this section if planning to utilize the “Est. SOV – MULTI”. There is extreme flexibility in the utilization of this table if you are interested in providing breakout pricing in the Schedule of Values for the client. Some examples of when you may use this are as follows:
There is flexibility in the utilization of this function and categories can be set up in several different ways, so early discussion with your project team on the overall deliverable to the client will assist in deciding whether you should use it. Whatever is listed here will become the names listed in the dropdown within the body of the estimate (see column K starting at Site Work). As you populate the information in the estimate (IE quantities and unit costs), you code each line item to its respective category. This will automatically populate the ALTS & MULTI tabs based upon the category you’ve chosen. See the short video clip below for clarification: Checks and Balances If you do not code a line item that has a dollar value associated with it, the ALTS & MULTI tabs will prompt you by highlighting the SOV cell in red. This is a built-in function to alert the bid preparer that they have missed categorizing something in that division. In this event, flip back to the Estimate & Bid tab, scroll to the division in question, and confirm that you’ve assigned a category to all rows with dollar values. Once complete, you will find that the ALTS & MULTI tabs have reverted back as the check feature is not finding any errors. See the short video clip below for clarification:
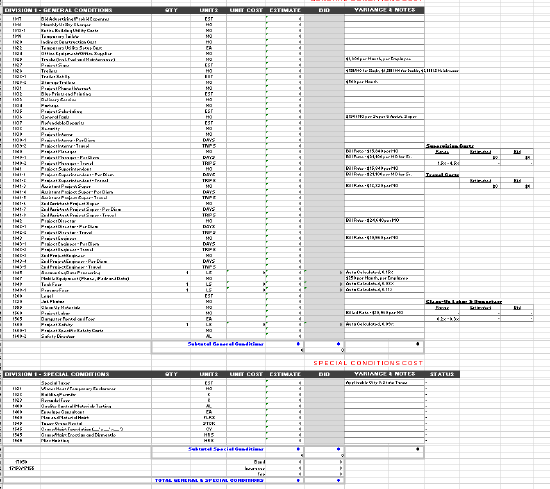
3. General Conditions Once you’ve completed the project information in the upper section of the spreadsheet, you are ready to move into the body of the estimate beginning with General Conditions (starting at ~row 110). The SOV within the estimate/bid tab should not be manipulated. The information used to create the SOV is pulled from the divisions as discussed below.
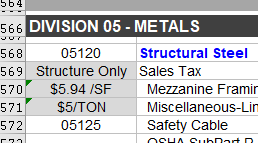
DATA ENTRY: PRICING 4. SCOPE DIVISIONS The Estimate & Bid tab is pre-populated with scope descriptions in each division. These may not all apply to your project or the list may not include all applicable scopes for your specific project. The purpose of including these are that most of these items will cover what scopes of work you will come across on a typical project at Brinkmann. These are also meant to encourage you to ask yourself “does this apply’? Since you have already done your check-set prior to beginning the estimate, you should be able to answer these questions quickly. You can modify the descriptions as needed for your project. Try to be as descriptive as possible with your line items. For instance, insert the footing size and rebar configuration for each footing type instead of simply typing “footings”. This will help both you, your team and the reviewer in understanding what is being covered in the line item and maybe more important, what may be missing.
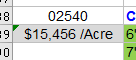
Additionally, you may utilize the “variance & notes” section to elaborate further on a specific line item. Notes such as “unit cost from project X” or “cost input from Subcontractor Y” are good practice. You can add/remove line items as needed to clean up each division. Do not hide or delete unused rows until after you’ve reviewed the estimate/bid, and everyone agrees that certain sections are not applicable to the project. Avoid having unused line items to streamline the review and navigation of the spreadsheet. "Gut-Check" Calculations You will notice that there are highlighted cells within each division in Column A. These are specific checks for overall costs by division that are utilized to provide a “gut-check” on the accuracy of the scope of work compared to historical costs. Do not delete or remove these checks. You can cut and paste these as needed when adding or deleting rows.
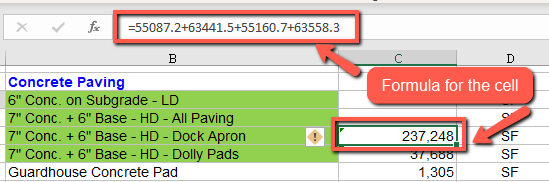
Cell Formulas When you are ready to input quantities, you will insert these in Column C. You will likely have take-off from plans to utilize. You can also arrive at quantities by utilizing information such as total building square footage, room count, acreage, etc. Proper practice when doing ANY calculations is to DO THE MATH IN THE CELL. This should be done for anything you are calculating that is not from take-off or tied to another cell within the estimate (building square footage, unit count, or cell containing a previously performed calculation). When possible, tie-out items to cells in the upper section of the estimate, the Building Info tab, or the Unit QTO tab for ease of updating later on. Example:
General Conditions Auto Calculations Some of the line items in the General Conditions are set up as auto calculations. These amounts reflect a percentage of the overall project cost. The rates and calculations are checked for accuracy on a yearly basis, at minimum, and updated within the form. Examples of these costs are things like safety, computer software, etc. |
Unit Costs Unit cost will not be pre-populated when starting an estimate. You will need to input this information based upon the scope of the item you are estimating. In almost all cases, Brinkmann will have a similar recent project in which we have received subcontractor pricing. This is where updated and accurate unit cost sheets for specific project become extremely valuable. If done correctly, you should be able to go to an active project folder and pull up the unit cost spreadsheet. These will provide the majority of what you will need for unit cost entry. You can also utilize:
Be creative, if you have a unit cost for an item that doesn’t exactly match your scope, how can you use what you’ve got to come up with a reasonable cost? Example: If you know that 4” un-reinforced sidewalk is $5/SF based upon solid unit cost info from another project. Your project has 5” unreinforced sidewalk. You can do some quick and simple math to adjust for the extra inch of concrete. That said, what remains constant in this instance? (PLACEMENT!) The difference in cost for 4” sidewalk to 5” sidewalk is mainly ALL in the material as the labor to place this extra inch of concrete is null. KEEP IN MIND, unit costs can be affected by significant differences in quantity! When making your pass through the estimate and inputting quantities and unit costs, use your best judgment to drop in a value for all line items. Note or flag any items that you’re unsure of or that need further discussion by highlighting them.
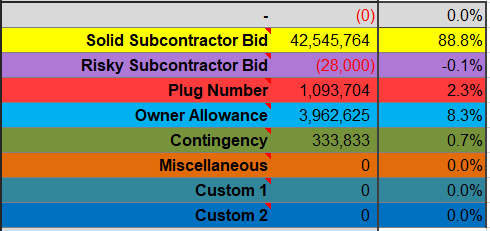
5. STATUS COLUMN The status column (column J) is used during a bid to identify and color code by the following categories (including two Custom lines to fit your needs):
Total dollar amounts and percentages of overall bid by these codes will populate automatically in the upper section of the estimate and bid tab (rows 40-47). When you select a dropdown, it will automatically be color coded to match. Additionally, if you do NOT select a status for a cell that has a dollar amount in it, it will be coded to “non-highlighted”. This provides an indication to the estimator that they have cost that have not been assigned a status. The purpose of this is to tell a quick story/recap of the overall bid. Is it filled with a lot of Brinkmann plugs? (IE lack of sub coverage). How much of the overall bid is owner contingency? What exposure do we have with risky subs? Etc. This tool is useful for the estimator(s) and executive review team when finalizing the bid and making strategic decisions for the project.
6. FINALIZING THE SOV FOR THE CLIENT You must ALWAYS PDF the SOV to transmit to the client. Do NOT send the excel version of our estimate or SOV. Once you’ve PDF’d and are ready to send, open a copy and verify that the formatting and all information is legible and correct. Review the PDF prior to sending to the client to ensure that all cells look correct and the information/text is all shown. (At times, wrapped text cells will be cut-off in a PDF and need to be adjusted to ensure everything is legible.) It is important to maintain the Brinkmann branding, soe avoid changing any colors, fonts or logos.
Tie Out Owner Bid Forms In many cases, owners will provide a bid form with their RFP. This will likely be provided in Excel format and be requested to be returned in excel format. If you are not already aware, you ARE able to tie-out one excel file to another. While you have both documents open, you are able to populate cells in the owner bid form by typing the equal (=) sign then going to the Brinkmann SOV and selecting the corresponding cell. Tying out a bid form in this manner will ensure that any changes made (last minute most likely) will pull over to the bid form without any manipulation (very important and huge time saver at the eleventh hour). KEEP IN MIND, prior to finalizing and sending the bid form in excel, you will need to save a copy and ‘copy/paste values’ on the bid form. This will keep the dollar values correct but remove the link to our Brinkmann workbook. If you do not complete this step, the document will not contain any values when opened by the owner on their computer. BE SURE TO save a copy prior to copy/pasting values or you will lose the links you took the time to make.
7. WEIGHTED GENERAL AND SPECIAL CONDITIONS The Weighted option on the "Multi-SOV" or "Alternates" tab can be used to control the value associated with certain alternates or breakouts on the estimate. For instance, if you have an alternate that GC's should not be applied to it, you can select "Yes" on the far right of the schedule of values under the "Weighted?" column on the same line as the GC's are. Next, find the column of the alternate that you choose to reduce the GC's, and at the bottom of the sheet in blue, lower the percentage value to decrease the value, or put a 0% will remove the GC's and apply evenly to the other alternates.
|
|
|
|
|
KEYBOARD SHORTCUTS
EXCEL TOOLS
|
EXCEL FORMULAS The following are just a few of the potential formulas you can use in Excel. For further help or details on other formulas please contact the Precon Department.
EDITS TO THE ESTIMATE/BID
|
|
|
|
|
DO
|
DON'T
|