| OVERVIEW |
|
|
**NOTE THESE PAGES ARE CURRENTLY IN DRAFT FORM. PLEASE CHECK BACK FOR UPDATES
|
|
|
|
| TOOL SETTINGS |
|
|
Click the GEAR ICON within the tool and ensure the following settings are correct:
Contract Configuration
- Contracts Private by Default: Yes
- Enable Purchase Orders: Yes
- Enable Contracts: Yes
- RFQ's will be Due After: 7 working days by default
- Number of Commitment Change Order Tiers: 1
- Enable Always Editable Schedule of Values: No
Default Distribution
- Include Primary Contact in Default Distribution: Yes
- Commitment Distribution: Team (Manager, Accountant, Assistant) - *NOTE: This is actually handled through DocuSign for all internal notifications
- Commitment Change Order Distribution: Same as Commitment
- RFQ Distribution: Manager and Engineer
- Invoice Distribution: N/A - Please leave this blank
Default Contract Settings
- Default Accounting Method for Purchase Orders: Amount Based
- Default Account Method for Contracts: Amount Based
- Default Retainage: 10 (as determined with accounting)
- Enable Comments by Default: Yes
- Enable Complete work retainage by default: Yes
- Enable Markup by Default: No
- Show Cost Codes on Invoice PDF by default: N/A
- Enable Stored Material Retainage by default: N/A
- Enable Subcontractor SOV by default: N/A
|
| COMMITMENTS |
|
|
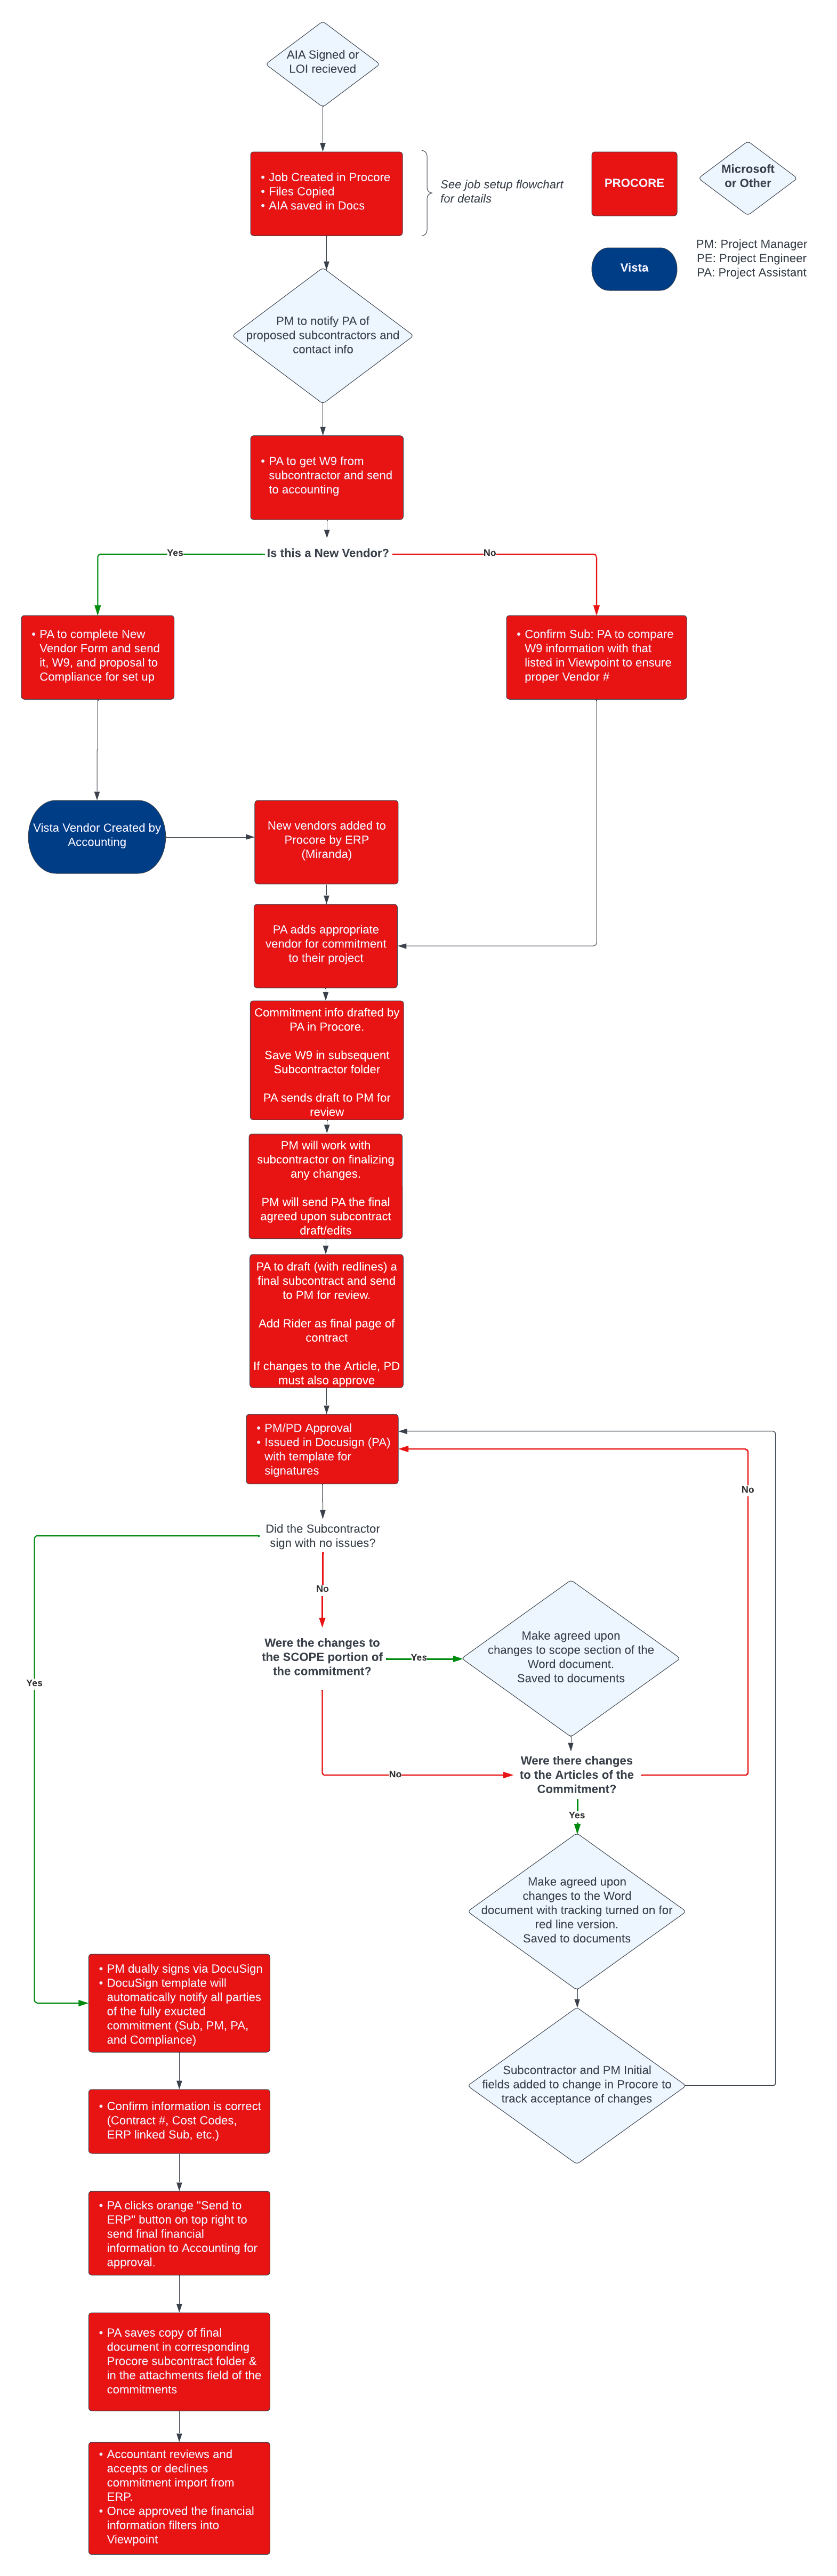
Key Information
- Signed owner contracts are required in order for Commitments to be accessible. No Schedule of Values information will be available for you write contracts against until a contract is received.
- Commitments are sent to subcontractors using DocuSign.
- It is imperative that if you are creating a contact, you link them to the appropriate subcontractor.
- Commitments can only be written to ERP LINKED SUBCONTRACTORS. (Meaning they are already created in Viewpoint and pushed over to Procore)
- The workflow process directly relates to the commitments. Please make sure you read through the workflow process page as well.
- All communication on a commitment (Subcontract or PO) should be done THROUGH the workflow for tracking functionality.
- For example: An email is sent with an attachment to be included in a contract. This attachment should either be sent directly through the Workflow, or added to the workflow as an attachment.
- Your drawing log MUST be approved by the manager on the project. You can use the drawing log export tool in Procore, HOWEVER, you will still need to add information regarding the specifications as well as any other pertinent contract documents to the document that is attached to all commitments. It is imperative this information be approved by PM, and included in the workflow as an attachment when it is initially created for review.
|
| SOP PATH |
|
 |
| STANDARD OPERATING PROCEDURES |
Items that must be filled in before beginning:
- Home Tool information
- Team (Internal and External)
- Admin Tool information
- Site Address
- Job Number
- Start/Finish Dates
- Square Footage
- PCCO Signatures
- Owner LLC – No Architect: When future Owner Change Orders will NOT require Architect signature
- Owner LLC: When future Owner Change Orders WILL require Architect signature
- Click Update
- Prime Contract Tool Info
- Date of prime contract
- Owner Info
- Ensure your vendor is added to the directory.
- Workflow Distribution Group created (see Workflow walkthrough)
Creating the Commitment
-
Click the "+Create" select "Subcontract" from dropdown
-
Items to be filled in:
-
Sign with DocuSign checked: YES
-
Contract #: Ensure the Contract # reads: “Job #-Sequential 2-digit number” (this should happen automatically - please contact Miranda if it does not)
-
If you begin to draft Subcontracts before the Prime contract is input, the numbering will appear wrong, and you will need to manually adjust it. Example, it will appear as "Sub-001" instead of Job Number-XX
-
SAMPLES:
-
Contract Company: The sub being awarded - You MUST use a company linked through ERP. Ensure with Accounting for questions regarding the appropriate vendor number.
-
Title: Cost Code - Description (Example: 04200 - Masonry)
-
Status: Initially set up as “Draft”
-
Executed: Not until fully executed (dually signed)
-
Default Retainage: Enter retainage 0 - 100 (Note this should be discussed with accounting, and set up in the tool settings.)
-
Description: Internal description (does not print). Similar to Title.
-
Attachments: This is where you will add all documents to go with the contract (Memo, Insurance, Separate Waivers, etc.).
- Items can be uploaded here from your desktop, photos tool, drawings too, forms, or from the documents tool of the project.
- Schedule of Values: Add line item(s) as required linked to each necessary code for the contract.
-
Inclusions & Exclusions: This is where you will list the scope section of the contract. (This is section 1.6)
-
Contract Dates:
- Enter as much information in these fields as possible. The dates entered here affect different items in Procore, however the only one that prints on the subcontract is the CONTRACT DATE, this is the date that will print as the date on the Subcontract.
-
Private: The contract should remain private by default.
-
Access for Non-Admin Users: Add the subcontractor to “Access to Non-Admin User” screen so they can access RFQ’s in the future.
-
Invoice Contacts: Add the subcontractors name here as well. Although we do not currently utilize Invoicing, this will allow for possible future integration.
-
Subcontract Type: The appropriate template based on your project (Arizona, Colorado, Kansas, Missouri, National, Virginia)
-
1.9: This is where you type the 1.9 portion of the contract. This is just the "meat" of the section, the heading will automatically print.
-
1.10: This is where you type the 1.10 portion of the contract. This is just the "meat" of the section, the heading will automatically print.
-
Create
-
Export DOCX (Top right of the screen)
-
Format the document (page breaks in the right locations, wrap-text is working properly, adjust titles, etc.) and add drawing log above the signatures.
-
Save to Desktop
-
Save to PDF
-
File/Share a copy to the PM for review and approval through Workflow process (see workflow template)
-
Ensure all changes made to the contract are updated in the Procore template.
-
Upload/drag using Procore Drive both the approved PDF and Word versions to Documents Tool within the project
-
Under your commitment, click “Send with DocuSign”
|
Sending with DocuSign
- The unformatted PDF of the contract will populate in the DocuSign envelope (top of the screen). To replace this copy with the correctly formatted version, click the three-dot tower at select "Replace" from the dropdown.
- Select the correctly formatted PDF from the location you have it saved (i.e. your desktop or Documents Tool).
- Set the signing order by choosing from one of the preset templates, and include the emails.
Example below of structure:
- (1) To Sign: Subcontractor
- (2) To Sign: Project Manager
- (2) CC: Project Assistant (Receives a Copy)
- (3) Compliance@BrinkmannConstructors.com (Receives a Copy)
- (3) Project Superintendent (Receives a Copy)
- (3) Project Engineer(s) (Receives Copy)
- (3) Project Accountant (Receives a Copy)
- In the email box below the signing order fill out the project information and message to the recipient.
Example:
Subject Line: <Project Name and Location>
Please see the attached Subcontract/Purchase Order Agreement for Signature.
- Click "Next"
- Add signature fields to the contract document where the PM and subcontractor will be required to sign.
- Click the top left to choose who's signature you're adding first (the list will contain a dropdown of all parties you added on the previous screen) (Example: The subcontractor)
- Scroll to the portion of the document requiring their signature
- Click the "Signature" field from the list on the left
- Drag that field to the exact line where their signature should fall
- Repeat at all locations in the document requiring that persons signature.
- On the top left, choose the next person in the signing order and repeat the previous steps to add locations where their signature should be placed. (Example: The Project Manager)
- Send to the subcontractor for signature using DocuSign
- You will need to manage the workflow stages in this process. Please read the workflow walkthrough page for further details.
|
Contracts that are rejected or returned with revisions
- Have the subcontractor download the contract, mark their revisions and return the marked up contract to the Manager.
- Manager and subcontractor to review changes until a mutually agreed upon decision is made.
- Return to your original Word document of the contract.
- Select "Review" from the ribbon and turn on "Track Changes".
- Make all agreed upon edits ensuring your revisions are noted in a printable red-lined version of the document.
- PDF the newly redlined version of the contract.
- Save the redlined version noting this is the REVISED version and date.
- Open the commitments tool, open the contract
- Click "Send with DocuSign"
- The original PDF of the contract will auto-populate. Replace using the same method listed originally only replace with the redlined PDF version of the contract.
- Set the Signing Order. The exception being that now the first approver should be the Director to review the contract revisions.
- Follow the same procedure to add signature locations on the document. EXCEPT at this stage you should also an initial field at each change for both the manager and subcontractor. This ensures that all changes are agreed to. It should look something like this:

- Add the signature fields at the bottom of the contract as you did originally and send the contract back to the subcontractor for acceptance with the changes.
- Note: You may want to confirm with PM that you have placed initials next to EVERY change before issuing so none are looked over.
|
|