- Open Sage BL module – Billing and sign in with your credentials
|
|
- At the top in the Menu Bar, Select “Tasks”, then click on “Contract-Based Invoices”
|
 |
- In the Contract-Based Invoices window that opens, type in the Job Number or scroll through the list to the find the Project. Select the project and click “OK”.
|
 |
- Once the project is selected, the Billing Window will open showing the Schedule of Values. Within this window, complete the following:
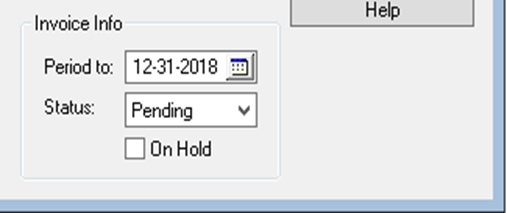
- At the bottom right in the “Invoice Info” section, complete the following:
- Period To: Enter the date for your billing period. This is typically the last Calendar Day of the month associated with the invoice. For a pay application representing work completed in December, this date would be 12/31/20XX.
- Status: Leave this set to “Pending”
- Do not check the “On Hold” checkbox
|
 |
-
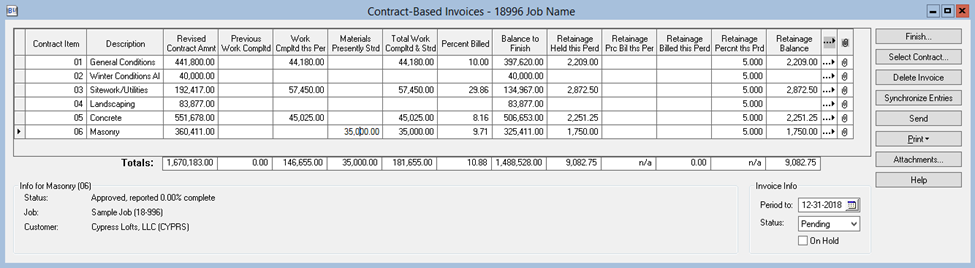
Begin Entering the Dollar Amounts to be billed on this Pay Application in the spreadsheet section. Work with the PM to review how to determine the correct amounts to bill. There are multiple ways to determine how much to bill for each project and each project may have specific requirements for monthly billings. As noted below, there are multiple ways to enter the desired billed amounts.
- The actual desired billed amounts for the month can be directly entered under the “Work Completed This Period” column.
- The “Total Work Completed and Stored” column can be used if the user prefers to enter the total amount the project should be billed to date, and not specifically for the month.
- The “Percent Billed” column can also be used if the user prefers to enter a simple Billed To percentage for the project to date
- Using any of the three methods above is acceptable and Sage will automatically calculate the other columns effectively. If the cell turns grey when selected, no information is able to be entered in this cell.
- If there are materials that are onsite not installed or materials stored off site, then these materials will need to be billed under the “Materials Presently Stored” column.
- Additionally, most owners will require two forms of documentation for these stored materials.
- Photo Documentation of the materials, clearly showing the materials and clearly labeled with the Project Name.
- Certificate of Insurance for the stored materials, if stored off-site.
|
|
-
If there is retainage for the project, the “Retainage” columns will automatically calculate based on the Retainage % typed in during the Contract Setup procedures. If the Owner is allowing Koester to reduce the Retainage for any given SOV line item, these amounts can be manually adjusted within those respective columns.
|
 |
- After all billed amounts have been entered and approved by the PM, the file can be printed. To print the Pay Application, click the “Print” button on the right hand side and then select “Final”.
|
 |
- The Print Final Invoice window will open. Within this window, complete the following:
- Invoice #: DO NOT edit this number.
- Draw #: If set up correct during the Contract Setup procedure, this number will auto-populate as a 10 digit number; the first 5 digits are the Job Number and the last 5 digits are the Pay Application number….the first pay application will have 00001 as the last 5 digits, the second pay application 00002, and so on. If this number is not auto-populating correct, it can be modified to match the correct Pay Application sequence.
- Invoice Date: This is typically the 1st Calendar Day of the month following the month associated with the pay application. For a pay application representing work completed in December, the “Period To” date established earlier would be 12/31/20XX as noted above, but here, the Invoice date is the 1st of the following month or 01/01/20XX
- Then click “Start” to print a hard copy to the printer.
|
 |
- After clicking “Start” the pay application will print to the copier and will need to be scanned and printed to the actual AIA Pay Application forms. These are found in the print room blank forms cubbies.
- Once the Pay Application is scanned and printed to the AIA forms it should be signed and notarized by the Koester PM and any certified Notary.
- After signed and notarized, it should be scanned in and saved to the Job Folder here:
- 09 Pay Applications\Pay App #1
- File Name: Job Name – Pay Application #1
- The electronic copy of the Pay Application should be emailed to the Owner and Architect for their approval and/or any other Owner requested contacts.
- Some projects require a Hard Copy to be mailed or delivered to the Owner/Architect in addition to the electronic copy. Be sure to verify the project requirements.
- Lastly, deliver a copy of the Pay Application to the Koester Accounting Department. If sending a pay application via email carbon copy Accounting on the email.
|
|
|
|

|
|
|
 |
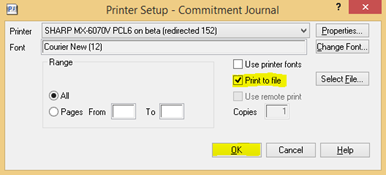
- Type the number “1” in the File Name that will pop up; click “Save”; and then “Yes” to overwrite an existing file. These are dump files so don’t worry about overwriting. This will close out of the Billing window.
|
 |
| |
|