

Uploading Credit Card Receipts to HH2
Department: Admin - Accounting
Topic: Credit Cards
Process: Uploading Credit Card Receipts to HH2
Objective
To upload a receipt to HH2 after using company credit card.
Background
When using a company credit card, receipts are required to be uploaded to HH2. It is vital that receipts get uploaded in a timely manner every month for the project team to see where purchases are hitting the budget and for the accounting team to reconcile the monthly bank statement.
Receipts are not required when using Menards, Home Depot, Lowes or fuel cards. Office admin will get those receipts online and upload them.
If an accidental personal charge is made on the company card, a receipt is not required, but the employee must email accounting so the expense can be withheld from the employee’s paycheck.
Things to Consider
- New employees will need to obtain a login for the HH2. If you have not received your login information, please reach out to someone in Accounting or IT.
- https://koester.hh2.com/#login
- company ID is koester and username will be your first initial and last name
- Once you receive your company credit card, accounting will need to assign the card number to the employee in HH2 for them to start uploading credit card receipts.
- Some project team members may have access to multiple credit cards in HH2. It is important for these employees to verify that they are uploading their receipt to the correct credit card.
- If you upload a receipt to the incorrect credit card it will not attach to the transaction in HH2.
Prerequisites
Credit Card Policy – Employee Handbook
Steps
1. In HH2, select the AP Payments icon in the upper left of the screen

2. Select Document Entry and Receipts.
3. Once the page has loaded, select Add Receipt in the upper right corner
4. Drag & drop the PDF here or select the camera icon to browse for the file.
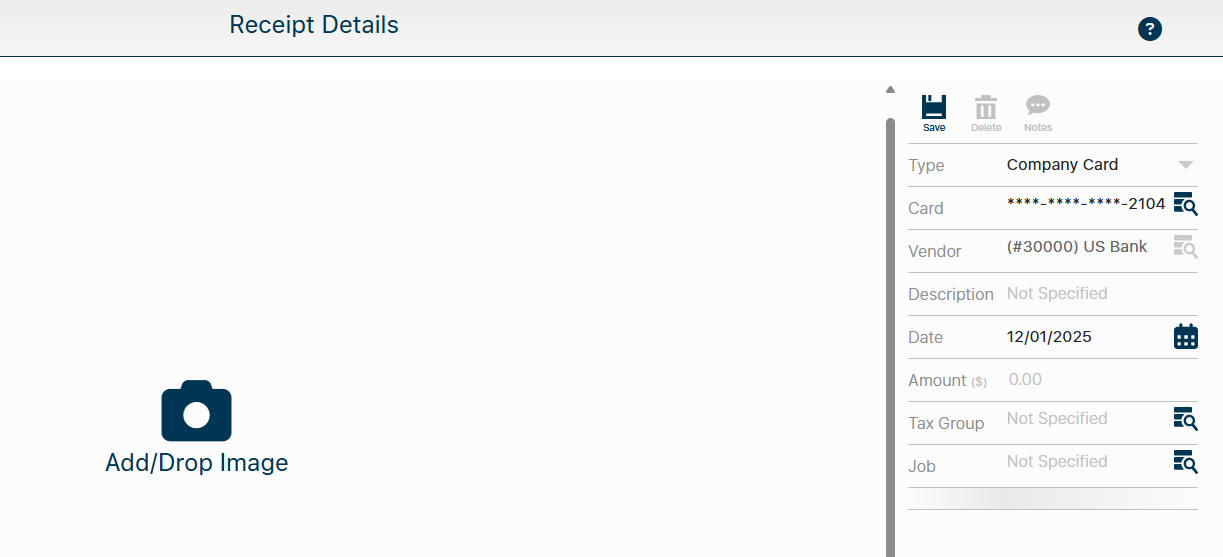
5. Confirm that the credit card and date are correct for the purchase
6. Enter the job name under description
7. Enter the amount (after tax and after tip if applicable)
**Leave Tax Group and Job blank in this section!**
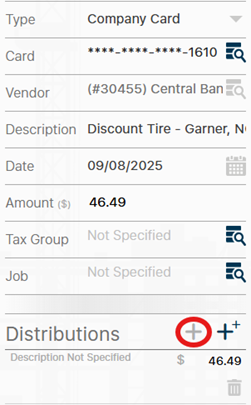
8. Click the plus sign next to Distributions
9. Enter the applicable job OR the applicable overhead account under ‘expense account’
a. This tells HH2 who to send the receipt to for further review and approval. If coding to a job, the receipt will then be sent to the project team to enter the cost code and category before approving and submitting.
b. Fields below that are not highlighted can be ignored. Please do not enter anything under "Associations"

10. Once a job OR expense account is entered, hit save at the top and you are done.
11. Please reach out to Danielle or Megan for further assistance.
If you need to code a receipt to multiple jobs, you can easily create multiple distributions. Just select the plus sign again and split the amount.
