User Guide: Bidding and Estimating Integration (Beta)
Table of Contents
- Welcome
- Create a Project
- Upload Drawings
- Add Models (if applicable)
- Add Takeoffs
- Add an Estimate
- Create a Bid Package
- View a Bid Form
- Invite Bidders
- Level Bids
- Link Leveled Bid Values to the Estimate
- Bid Proposal
- Send Estimate to Budget
- Next Steps
Overview
The Bidding and Estimating Integration beta allows you to create bid packages directly from an estimate. By connecting the two experiences, users no longer need to recreate estimates in the Bidding tool. This allows you to send out accurate bid invitations more quickly, saving time in a competitive market. After a bid is awarded, you can update your estimate to reflect the awarded contract(s) with a single click.

To learn more about the beta, see What is the Bidding and Estimating Integration? (Beta)
Considerations
Permissions
Create a Project
Upload Drawings
-
Navigate to the project's Drawings tool.
Tip
For best results, format your drawings for OCR. See How can I improve the accuracy of OCR on my drawings? -
Click Upload Drawings.
This opens the Upload Drawings prompt. -
Click Attach Files.
Tip
For best results, format your drawings for OCR. See How can I improve the accuracy of OCR on my drawings? -
In the Attach Files prompt, click Upload Files.
-
Select the files to upload from your computer or network.
-
Once uploaded, click Attach.
The system returns to the Upload Drawings prompt. -
In the Upload Drawings prompt, click the Select or Create Set drop-down menu under Drawing Set.
-
Choose one of these options:
-
Select a Drawing Set
To add the drawing to an existing set: Start typing the set name. Procore shows any sets matching your entry and you can highlight the match to select it. -
Create a Drawing Set
To add the drawing to a new set: Type a set name and click Create Set [Your Set Name].
-
-
Fill in these fields:
-
Set Date: The date the architect sent the drawing set.
-
If adding to an existing set, Procore populates this field automatically.
-
If creating a new set, click the field to select a date from the calendar.
-
-
Default Drawing Date: The date the drawings were authored. This appears as the 'Drawing Date' on all drawings in the set.
-
Click the field to select a date from the calendar.
-
-
Default Received Date: The date a drawing was received or issued by the creator of the drawings (i.e. the design team).
-
Click the field to select a date from the calendar.
-
-
Advanced Options: Click the arrow
 icon next to Advanced Options to show the following options.
 -
Default Revision: If your set has a default drawing revision number or letter, enter it here. The default revision will be set as the 'Revision' for all drawings in this upload.
Note: If a default revision is not specified, Procore will use the drawing number to determine the revision. -
Drawing No. Contains Revision: Click the drop-down menu and select the option that applies to the drawings. If a drawing number contains a revision, the drawing number will be separated at the first decimal or underscore into the Drawing No. and the Revision. For example, a drawing with 'A203.01' would show 'A203' as the Drawing No., and '01' as the Revision.
Note: See 'Get From Filename' below for guidelines on filenames if you use both settings.-
No Rev in Drawing Number: Select if the drawings do not include revisions in the drawing numbers.
-
Rev is After First Decimal: Select if the drawings contain revisions after the first decimal of a drawing number (example: A203.01).
-
Rev is After First Underscore: Select if the drawings contain revisions after the first underscore of a drawing number (example: A203_01).
-
Rev is After Last Underscore: Select if the drawings contain revisions after the last underscore of a drawing number (example: A203__EE__01)
-
-
Drawing Number:
-
Get From Filename: Mark the checkbox if you want Procore to pull the number and title of an individual drawing based off of the filename. This will bypass OCR and result in higher accuracy in the naming of your drawings.
Important! If you are using the 'Drawing No. Contains Revision' setting above, drawing filenames should match the following formats:-
For 'No Rev in Drawing Number': Number_Title.pdf
Note: If there is no underscore between the drawing number and title, the entire filename will be entered for the drawing number. -
For 'Rev is After First Underscore': Number_RevNumber_Title.pdf
-
For 'Rev is After First Decimal': Number.RevNumber_Title.pdf
-
For 'Rev is After Last Underscore': Number_Title_RevNumber.pdf
-
-
-
Drawing Language: Procore's OCR can scan for drawings in English, French, German, and Spanish. The language for your drawings is automatically selected based on the locale of the project or company, but you can select another language from the drop-down menu if necessary. See Can I change the language that Procore scans my drawings for?
-
-
When you are ready to upload the drawings, click Process.
Note: A progress indicator is shown in the side panel, and you will receive a notification email when your upload completes. After the upload has finished processing, you can click Click here to review to review the drawings.
Review and Confirm Drawings
- Click the Items to Review pop up menu.

- Hover over the upload and click Review.
- If your drawing upload contains 8 or more sheets, you will see the 'Help Procore Auto-Label Your Upload' window.
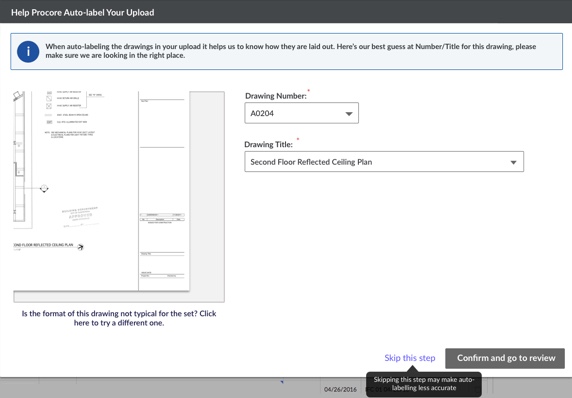
In the window, complete the following:- Verify that Procore has read the drawings correctly by selecting the correct number and title from the Drawing Number and Drawing Title drop-down menus.
Note: If you want Procore to evaluate a different drawing to yield more accurate results, click the 'Is the format of this drawing not typical for the set? Click here to try a different one' link. - Click Confirm and Go to Review.
Note: This opens the Confirm New Drawings page where you will be able to review and confirm drawings.
- Verify that Procore has read the drawings correctly by selecting the correct number and title from the Drawing Number and Drawing Title drop-down menus.
- If your drawing upload contains 8 or more sheets, you will see the 'Help Procore Auto-Label Your Upload' window.
- Verify all fields match the drawing sheet before confirming:
Note: By default, Procore places focus on the lower right corner of the drawing. To change the focus of the image thumbnail, click-and-drag the image.- General Information
- Number: Verify the drawing number.
- Discipline: Verify the drawing discipline.
Note:- This field is automatically recognized by the letters that appear before the drawing number. You can set which letters designate which disciplines by following the directions here: Configure Default Drawing Disciplines.
- If the discipline for the drawing was not populated or does not appear on the drawing, you can choose to enter it manually. After confirming the drawing, the new discipline will be added to the Discipline Abbreviation Setup list for the project and can be selected for other drawings.
- Title: Verify the title of the drawing.
- Versions: Versions are ordered according to the Drawing Date field, but you can use a drag-and-drop operation to place this version you are currently uploading into a different order.
Note: The version at the top is considered the current version.
- Revision: Verify the revision field.
Notes:- When you upload a drawing that matches a drawing number that already exists in your Drawings log, Procore will mark this drawing as the next revision number or letter in the sequence. For example, if you previously uploaded revision 5 of drawing A2.1, and you are uploading a new revision now, revision 6 will appear in this field.
- If you entered a Drawing Date for a set of drawing revisions, Procore will sort the drawings from oldest to most current based on the drawing dates. However, the revision numbers may need to be entered manually.
- Alphanumeric revision numbers are accepted (e.g. Revision Number A1, 1A, or A.1). To set which order is used on the configuration page of drawings, see Configure Advanced Settings: Drawings.
- If you enter a number that already exists in your drawings log, you will be alerted that it is a duplicate revision. In order to add a drawing with the same revision field, one of the following fields must be unique: Drawing Set Name, Drawing Date, or Received Date.
- Date Authored and Date Received: Verify the dates or select them from the calendar. If you previously set the dates on the drawing upload page, Procore will use those dates, but you can change them as needed.
- Set: This field is automatically populated based on the set you uploaded the drawings into.
- Revision: Verify the revision field.
- General Information
- Optional: If a drawing is not appearing in the correct orientation, you can rotate the PDF before confirming the drawing. See Can I rotate a drawing in Procore?
Note: You cannot rotate the drawing after you have confirmed the drawing.- Click Rotate Drawing.

- Click the clockwise or counter-clockwise rotate icons to rotate the drawing to the correct position.
- Click Update.
- Click Rotate Drawing.
- Confirm your drawings:
- If you only uploaded one drawing, or want to confirm one drawing at a time, click Confirm.
- If you uploaded multiple drawings:
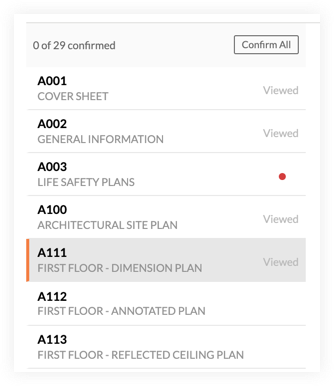
- Click through the set of drawings to ensure all information is correct. Tip! You can press the UP/DOWN arrows on your keyboard to scroll through drawings in the set.
Note: Drawings you have clicked on are designated by the word 'Viewed' in the drawings list. If you view a drawing and leave the Revision field blank, a red dot appears on the drawing to indicate that there are unresolved errors.
- Press SHIFT on your keyboard to be able to click and select multiple drawings that are in a row.
- Press CONTROL (PC) or COMMAND (Mac) on your keyboard to be able to select multiple drawings individually.
- Click Confirm Selected.
OR
If all drawings have been reviewed and no errors are present, click Confirm All.
- Click through the set of drawings to ensure all information is correct. Tip! You can press the UP/DOWN arrows on your keyboard to scroll through drawings in the set.
Optional: Remove Drawings
If drawings have been uploaded that do not need to be added to the drawings log, users with 'Admin' level permission to the Drawings tool can remove them.
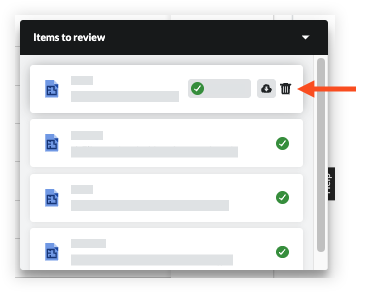
- To delete one or more pending drawings, click the Items to Review pop up.
- To delete the entire drawing package, navigate to the Drawings landing page and click the 'x' on the set you want to remove. Click OK to confirm.
Publish Drawings
After the results of auto-labeling/OCR are confirmed on a new drawing upload, the drawings will have an “unpublished” status until they are published. You will notice the following banner in the list page.
- Navigate to the Drawings tool.
- Click into the drawing set that contains the uploaded drawings.
- Click the Publish drop-down menu in the banner above the list.

- Click one of the following options:
- Click Publish & Distribute to publish the drawings and send a notification email and push notification to drawings log subscribers.
- Click Publish to publish the drawings without sending a notification email to drawings log subscribers.
- All of the drawings in the upload will be published and available to the team on mobile devices and on the web.
Add Models to Project Documents
There are a few different ways to upload files to a project's Documents tool. Choose to follow steps from one of the following:
- Upload Files or Folders Using the Documents Tool
- Upload Files by Sending an Email
- Upload Files or Folders Using Procore Drive
Upload Files or Folders Using the Documents Tool
- Navigate to the project's Documents tool.
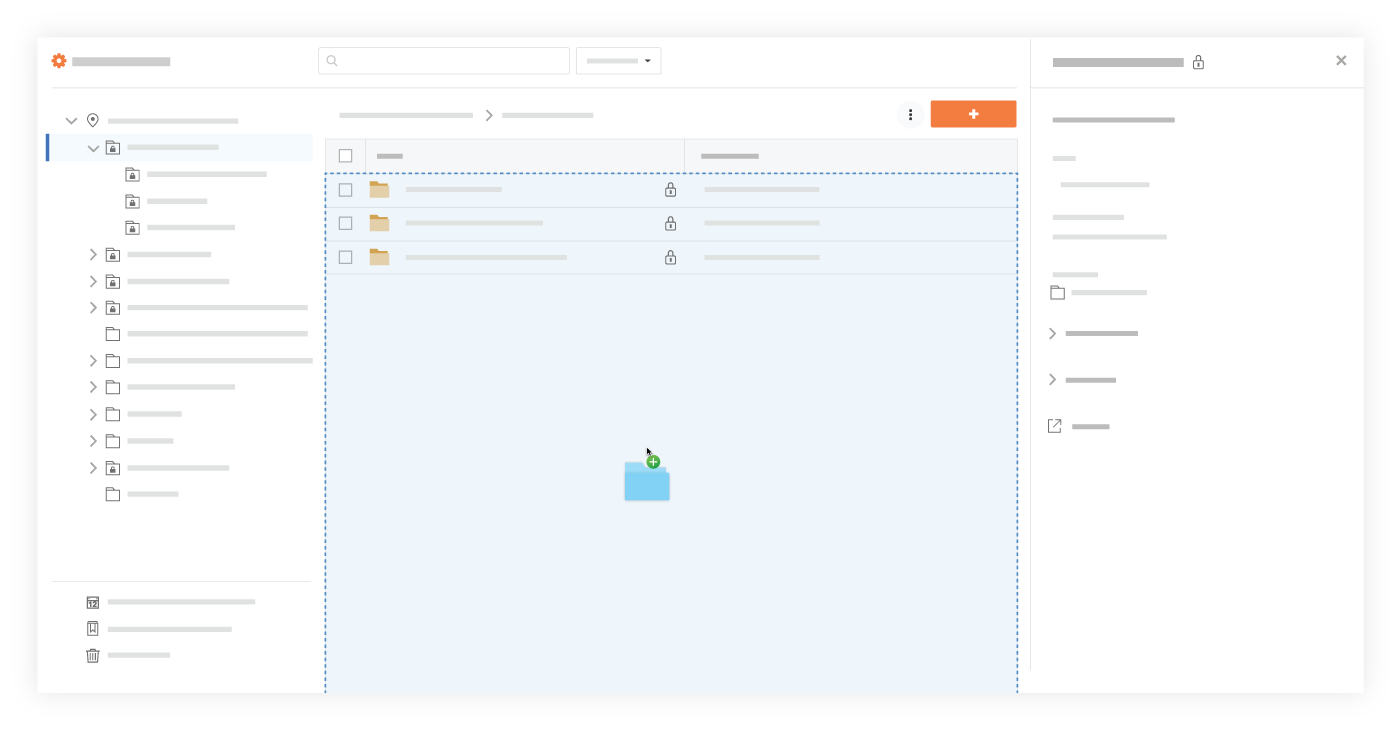
- Click on the folder in the Documents tool that you want to upload files or folders to.
- After selecting files or folders on your computer, drag and drop them to the center panel of the Documents tool.
Tip! You can also use this method to upload empty folders from your computer instead of having to create the same folders manually in the Documents tool.
OR
- Click the + New drop-down menu.
- Choose whether you want to upload files or folders:
- Click File Upload to select files to upload.
- Click Folder Upload to select folders to upload.
- Select the files or folders you want to upload from your computer.
Note: Empty folders cannot be uploaded during this step. They can only be uploaded using the drag-and-drop method shown above. - Click Open.
Notes:- A progress indicator is shown for each upload, and the system returns to the Documents tool page after the upload is complete.
- If you are uploading one or more files with the same filename as an existing file, you are prompted to choose whether you want to upload them as new versions, or rename the files.
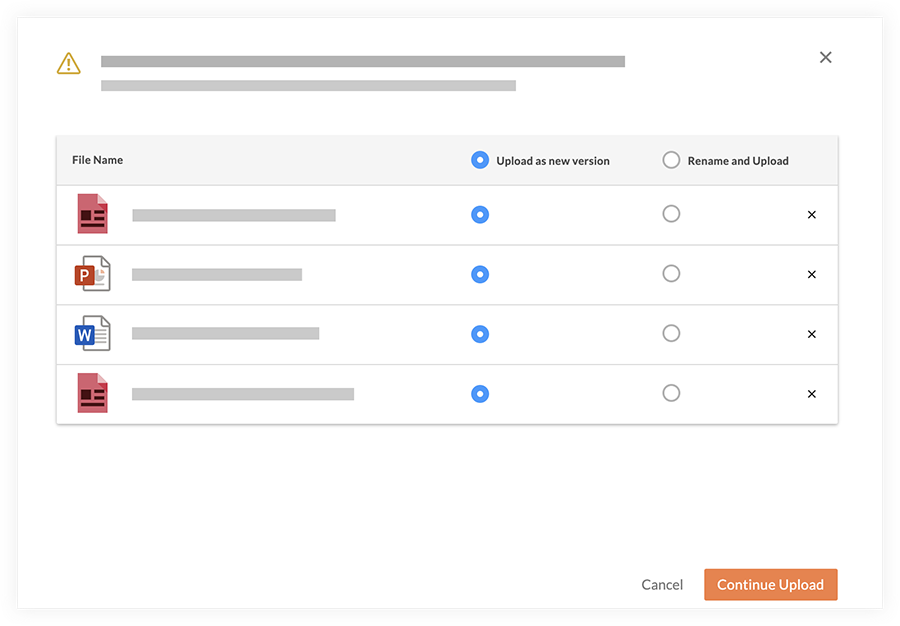
- Click Continue Upload.
Upload Files by Sending an Email
- Navigate to the Documents tool.
- Click the Settings
 icon to open the 'Document Settings'.
 - Under the General tab, you will find the email address to email files to, listed under Import Options.

- Create an email that is addressed to your Documents tool's email address, as shown in the image above.
- Attach any files you want to add to the Documents tool to the email.
Note: The files will be uploaded to the 'Emailed Documents' folder.
Upload Files or Folders Using Procore Drive
Procore Drive is another efficient way to upload files in bulk. See Upload a File to a Folder in Procore Drive.
Note: If Procore Drive is not configured on your Windows computer, please see the Procore Drive Setup Guide.
Add 2D Takeoffs from Drawings
- Navigate to the Bid Board or Portfolio Planning tool and select the project.
OR
Navigate to the project's Estimating tool. - Click the Takeoffs tab.
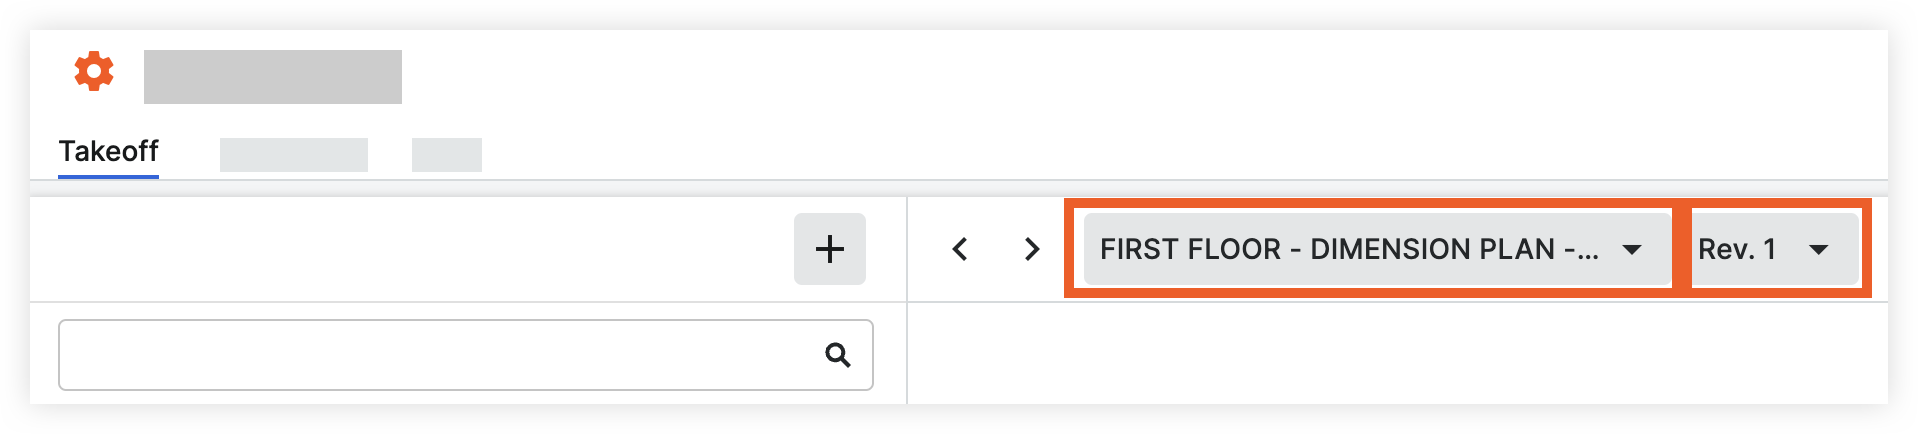
- Select the drawing and revision number.
- Click Create New Takeoff Layer.
- Enter a material name, or click Browse Catalog to select an item from the material Cost Catalog.
Note: If you select a material from the catalog, always check to make sure that it matches the client’s specification and unit prices. - Select a Measurement Type.
- Select Unit of Measurement, Color, Symbol, and Line Width as necessary for your measurement.
- Click Create to initiate 'Drawing Mode'. Then follow the steps below for the relevant takeoff:
- Count Measurements
- Run Auto Count to count similar symbols using Procore advanced symbol recognition feature.
OR - On the drawing, click each symbol to manually count it in your takeoff.
- Run Auto Count to count similar symbols using Procore advanced symbol recognition feature.
- Linear or Count by Distance Takeoffs
- On the drawing, point and click the cursor at the starting point of the measurement and repeat it by segment until you reach the endpoint of the linear measurement.
Note: Add multiple points or segments to accommodate the preferred linear measurement.- To delete a segment, press the BACKSPACE or DELETE key on your keyboard. To delete the entire line placement, press the ESC key on your keyboard.
- A linear measurement will appear:
- Double-click to complete the measurement.
The measured distance value will appear under the takeoff name.
- Double-click to complete the measurement.
- On the drawing, point and click the cursor at the starting point of the measurement and repeat it by segment until you reach the endpoint of the linear measurement.
- Linear with Drop Takeoffs
- On the drawing, point and click the cursor at the starting point of the measurement, click the location of each drop point until you reach the end of the
linear measurement.
Note: To create automatic labels for Drop length points, select the vertical ellipsis next to the the takeoff layer and move the Automatically Label Drops toggle
  ON. Labeling can include a Prefix, Suffix, and Incremental numbering.
 - Double-click to complete the measurement.
- To delete a segment, press the BACKSPACE or DELETE key on your keyboard. To delete the entire placement, press the ESC key on your keyboard.
- Set the drop length for each drop point.
- To set a default drop length for all drop points in the takeoff layer, click the vertical ellipsis next to the the takeoff layer. Then enter the default drop length.
- To set a drop length for an individual drop point, double click the drop point on the drawing. Enter the drop length and click Confirm.
- To set a default drop length for all drop points in the takeoff layer, click the vertical ellipsis
- On the drawing, point and click the cursor at the starting point of the measurement, click the location of each drop point until you reach the end of the
- Area or Volume Takeoffs
- Run Auto Area Takeoff to automatically detect areas in a floor plan.
OR - To manually measure, click the starting point of the area followed by different points to cover the area that you want to measure on the drawing.
- To delete a point, press the BACKSPACE or DELETE key on your keyboard. Delete multiple points by pressing the BACKSPACE key one point at a time. To delete the entire measured area, press the ESC key on your keyboard.
- Double-click to complete the measurement. The selected area will be highlighted by the selected color, and the measured area will appear under the takeoff name.
- Run Auto Area Takeoff to automatically detect areas in a floor plan.
- Count Measurements
- To end 'Drawing Mode', clear the checkbox for the takeoff layer.
- Optional: You can add additional parameters for the takeoff to add more detail for the set on the estimate.
- In the list of takeoffs, click the vertical ellipsis icon for the takeoff you are working on.
- Click Additional Parameters.
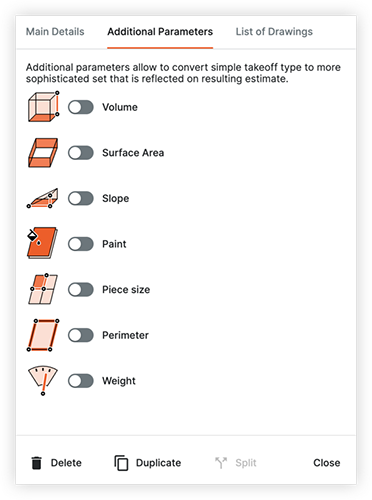
- Click the toggle
 ON for a parameter that you want to add details for.
 - Enter information as necessary.
- Click Close
- In the list of takeoffs, click the vertical ellipsis
Add 3D Takeoffs from Models
- Navigate to the project's Estimating tool on app.procore.com.
Note: The Estimating tool automatically opens to the Takeoff page. - Click the drawing drop-down menu.

- Click the Models tab.
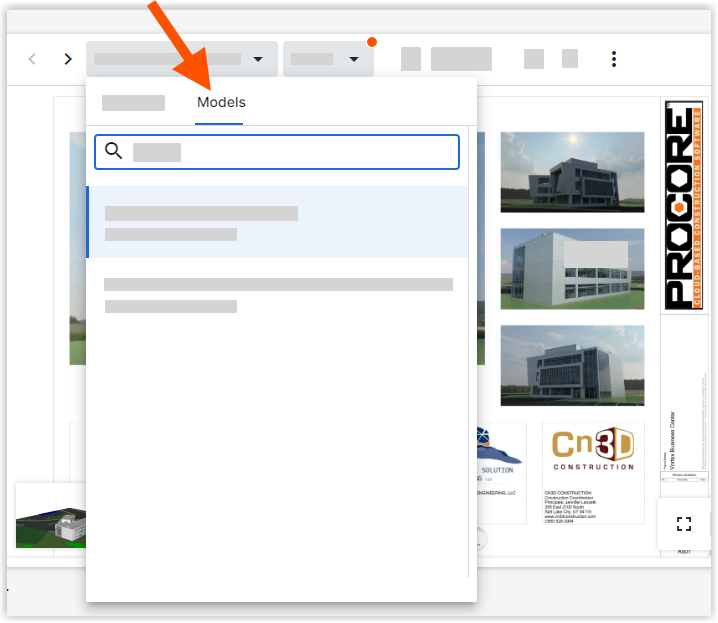
Note: This pulls model files from the project's Documents tool. See Upload Files or Folders to the Project Level Documents Tool. - Click the model you want to add a takeoff for.
This opens a 'Model Objects' panel and viewer for the model.- If you want to switch between the 2D drawing and 3D model at any point, click the drawing thumbnail at the bottom left of the viewer.
- The following tools are available:
 Default
Click to navigate the model from the default camera view. Fly
Fly
Click to navigate the model from the camera view at varying velocities. Orbit
Orbit
Click to rotate the camera from a fixed point. X-Ray
X-Ray
Use X-Ray mode to easily isolate and view specific objects in a model without objects blocking your view. Measure
Click on two objects to automatically calculate the shortest distance between the two objects. Home
Home
Click to return to the Home viewpoint.
- If you right-click on an object in the model viewer, or click the vertical ellipsis
 icon for the object in the panel, you can access the following options:
- Hide Object
- Isolate
- View Properties
- Zoom to Object
- Click the eye
 icon next to an object in the 'Model Objects' panel to hide or show an object.
- Select the objects you want to add quantities for. You can select objects in the model or in the 'Model Objects' panel.
- 'Available Quantities' will be shown for the object with the option to search for specific quantities and a filter option to show advanced quantities.
- Click Takeoff for the relevant quantity.

- Select a takeoff layer to add the quantity to.
OR
If you want to add the takeoff as a new layer, click Create New Takeoff Layer. See Add Takeoffs. - The quantity of the selected objects is automatically added to the takeoff layer.
Add an Estimate
- Navigate to the Bid Board or Portfolio Planning tool and select the project.
OR
Navigate to the project's Estimating tool. - Click the Estimating tab.
- Click Add Estimate.
- If you want to use an existing estimate, click Copy Selected Estimate.
OR
If you want to create a completely new estimate, click Create Empty Estimate. - Click the vertical ellipsis
 icon.
icon.

-
Toggle ON
 Flexible Table Layout.
 - See the sections below for available options:
Adjust Estimate Settings
- Click the vertical ellipsis icon.
- The following modes are available for project estimates. Click a toggle ON
 to activate the mode, or OFF
  to deactivate it. See What are the functions of the Estimating toggle Settings?
- Flexible table layout
- Group table columns
- Dynamic grouping
- 'Use' Tax Instead of 'Sales Tax'
- Use "unit labor cost" pricing for labor
- Individual labor rates
- Budget code validation
- Round quantities using the "ea" measurement unit
- Flexible table layout
Add Adjustments
Follow steps to Add Adjustments to an Estimate.
Add Inclusions and Exclusions
Follow steps to Add Inclusions and Exclusions to Estimates
Create a New Group
- In the section of the estimate that you want to add a new group to, click Create New Group.
- Click into the title field to enter a new name.
Group By Requested Bid Item
Note: This feature is only available for bids sent with bid forms as part of the new Bid Management Enhanced Experience. If you have questions, contact the company that sent you a bid invitation.
- Go to the group section in the Estimating tab.
- Click Select next to 'Requested Bid Item'.
- Choose the Requested Bid Scope Item to group by.
- If you create a new group, you can drag the requested bid items to the new group.
Add Items
Tip
The following information is important when creating estimates:
- On the right side of the row for a group, click the add
 icon.
icon. - Mark the checkboxes next to any items you want to include and click Select.
- Enter information into each column as necessary:
Note: The amounts that you enter for these fields will automatically calculate to populate the Total Cost, Sales Price, Total Sales, Profit, and Total Labor columns.- Budget Code:
Tip
- If you have Procore Project Financials enabled, the budget code selections that are available have been imported from the project budget.
- If you have the ERP Integrations tool enabled, budget code selections will be available from your connected ERP integration.
- Click Select next to the estimate group budget code to assign a budget code to an entire group of cost items or click Select within the individual cost item to assign a budget code by cost item.
- Enter or select the budget code from the drop-menu to apply the budget code.
- Optional: Click Create Budget Code if you need to create a code that is not listed.
See Assign a Budget Code from an Estimate for more details. - After your budget code has been applied, you can click on any budget code to make changes.
- Click the 'x' within the budget code for options to remove it.
- Quantity: Enter the quantity required of the item.
- Item Cost: Enter the cost of the item.
- Waste: If there will be waste for the item, enter the amount as a percentage.
- Margin/Markup: Click to switch between 'Margin' and 'Markup' Enter a percentage of margin or markup to apply.
- Labor (Mins / Hrs): Click to switch between 'Mins’ or 'Hrs'. Enter the amount of labor required in hours or minutes.
- Difficulty: Enter the difficulty level. The higher the difficulty, the more the cost will be multiplied.
- Tax: Mark the checkbox if the item should be taxed.
- Budget Code:
Add Notes to the Estimate
- Scroll to 'Notes' and click the arrow to expand the section.
- The following sections are available by default to add notes to:
- Scope of Work
- Included
- Excluded
- Project Notes
- Click into a field to add notes as necessary.
- The following actions are also available:
- To delete a section, click the Delete icon.
- To add a new line, click Add New.
- To add from your library, click Browse Library. See Create a Library of Inclusions and Exclusions below.
Optional: Create a Library of Inclusions and Exclusions
Tip
To save time on future estimates, you can create a library of Inclusions and Exclusions to choose from. See the steps below.- Click Browse Library.
- Click New Inclusions or New Exclusions.
- Enter a name and content.
- Click Confirm.
Note: When you add notes in the Additional Notes section, click Browse Library to select the inclusions or exclusions that you want to add to the estimate. - Optional: To make inclusions or exclusions standard on projects"
- Click the vertical ellipsis icon.
- Next to 'Include in Projects by Default', click the toggle to the ON
 position.
- Click the vertical ellipsis
Export a Bill of Materials
- Click the vertical ellipsis icon.
- Hover over Export Bill of Materials.
- Select one of the the following options for your export:
- Export Bill of Materials as Flat List to Excel
- Export Bill of Materials as List Grouped by Plan to Excel
Import a Bill of Materials
Tip
This option can be used to import external bill of materials information from a previous source into a new project.- Click the vertical ellipsis icon and select Download Bill of Materials Import Template.
- Enter material information on the template and save the file.
Note: Quantity (Qty), Unit of Measurement (UOM), and Item Cost are required. - Click the vertical ellipsis icon again.
- Hover over Import Bill of Materials and select Import Bill of Materials From Excel Template.
Your new items will now appear as a new group with the date imported. - Optional: Click within the title of the new group to rename it.
Bulk Update a Bill of Materials
- Click the vertical ellipsis icon.
- Hover over Export Bill of Materials.
- Select one of the the following options for your export:
- Export Bill of Materials as Flat List to Excel
- Export Bill of Materials as List Grouped by Plan to Excel
- Update the 'Item Cost' column and save file.
- Click the vertical ellipsis icon again.
- Hover over Import Bill of Materials and select Update Bill of Materials Pricing from Excel File.
Confirm Summary items
- Click the expand
 icon to view the Summary section.
 - Review a summary of your Labor and Materials, Profit, Additional Adjustments, Taxes, and 'Other' adjustments.
Note: The 'Global Labor Cost' amount applies to the rest of the estimate. However, you can still make individual adjustments to items if needed. - Adjust editable percentages as needed.
Create a Bid Package
Add Documents to the Bid Package
View a Bid Form
- Navigate to the project's Bidding tool.
- Open the bid package.
This opens the Bidding tab. - Click View Bid Forms.
All bid forms are shown in the left side panel.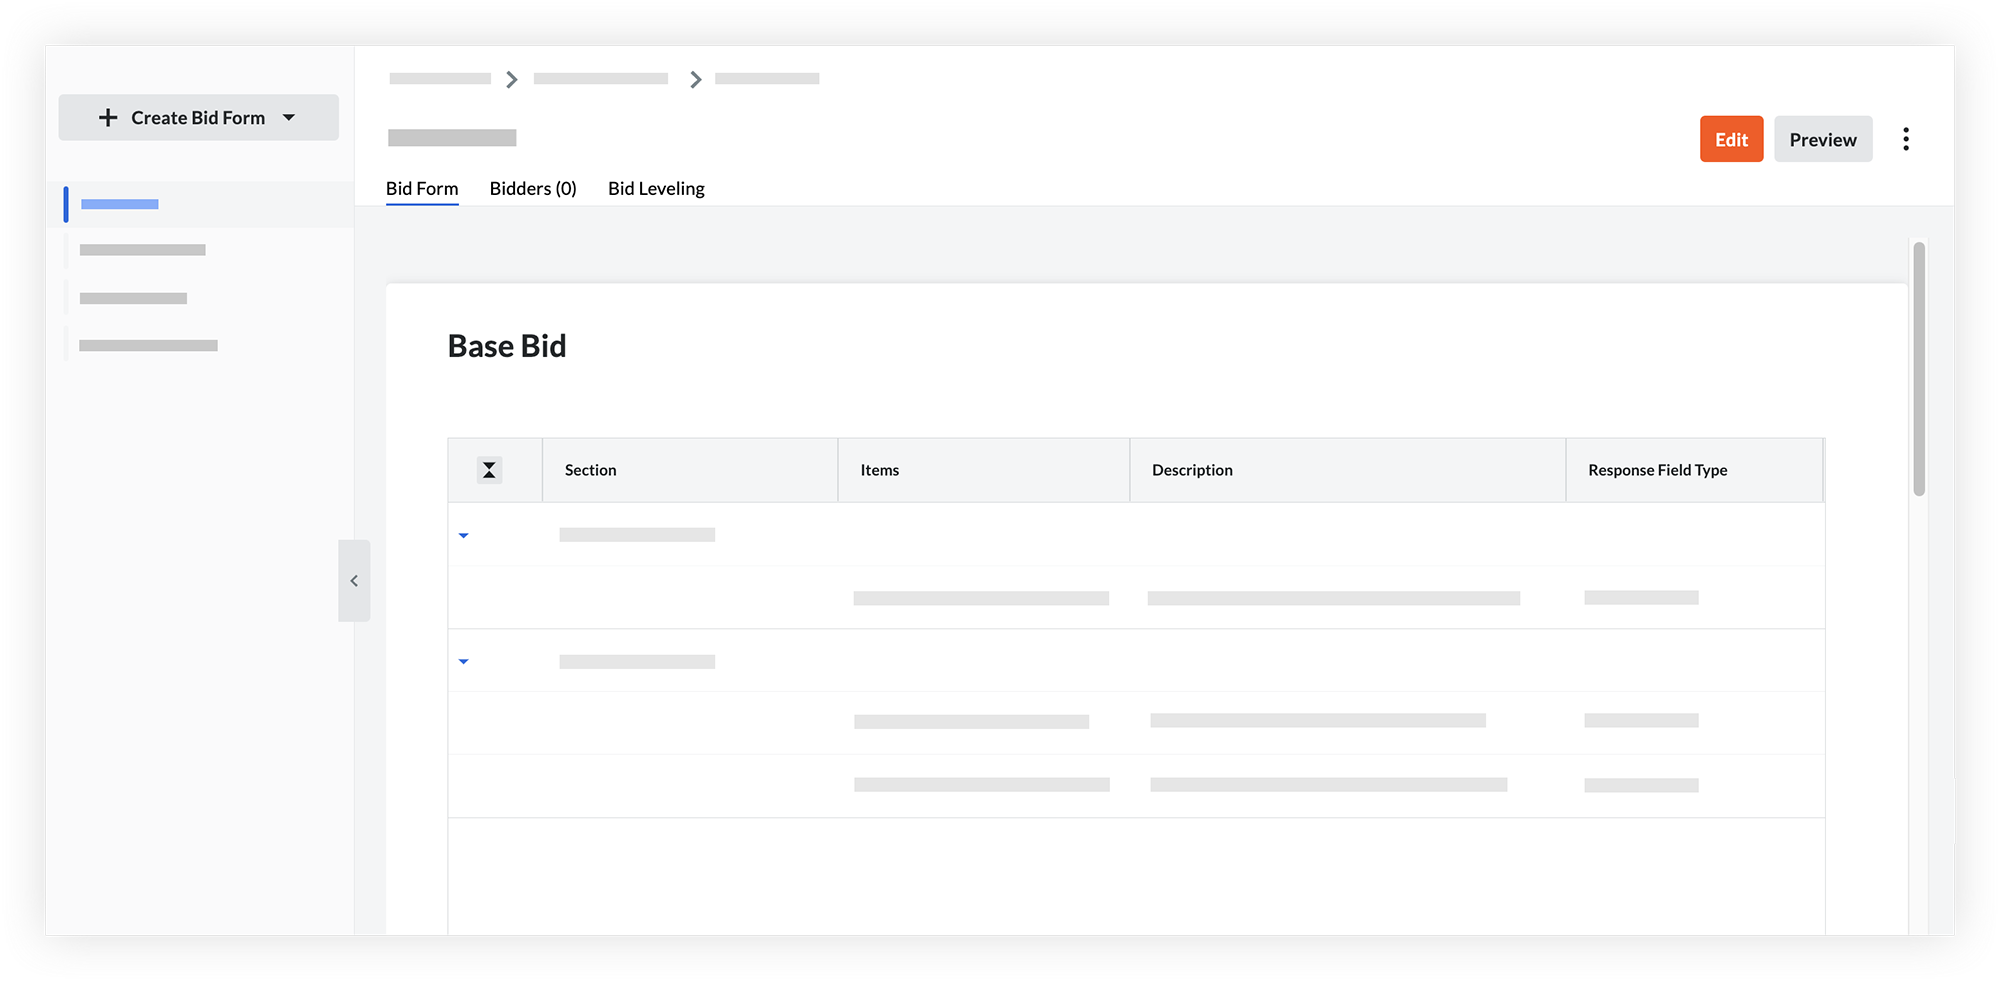
- Click the bid form that you want to view.
The details of the bid form are shown on the 'Bid Form' tab. - The following actions are also available:
- To adjust a column width, hover over the line between columns and click and drag to resize.
- To expand or collapse a section, click the arrow for that section.
- To see how the bid form will look to bidders, click Preview. See Preview a Bid Form.
- To view the bidders who were added to this bid form, click the Bidders tab.
- To compare bids that have been received for the bid form, click the Bid Leveling tab. See Level Bids for a Bid Form.
Invite From Your Directory
- Navigate to the project's Bidding tool.
- Open the bid package.
- Across from the bid form you want to add bidders to, click the plus
 icon and select Directory.

OR
Click the bid form name.- Click the Bidders tab.
- Click Add Bidders and select Directory.
- Optional: Search for and Filter Companies to Add to a Bid Form.
- Optional: Click the Company name to view it's details.
Note
Depending on the company information, the following information is available:
- Company Information from your directory is available by default.
- Overview and Procore Activity tabs are available if the bidding company is a connected company, or you have the company's EIN or valid address in your company's Direcotry.
Note: The Overview tab replaces the default company information section. - Qualifications are available if you use the COMPASS integration. See About the Bidding + COMPASS Integration.
- Mark the checkbox for the companies you want to add to the bid form.
- Decide when to invite bidders:
- To add the bidders without sending an invitation, click Add Bidders.
- To invite the bidders now:
- Click Send Invitations.
- Click Send to confirm sending the bid invitation email.
Invite from the Procore Construction Network
Limited Release
This feature is currently available in English for customers in the United States and Canada.
- Navigate to the project's Bidding tool.
- Open the bid package.
- Across from the bid form you want to add bidders to, click the plus icon and select Construction Network.
OR
Click the bid form name.- Click the Bidders tab.
- Click Add Bidders and select Directory.
- Optional: Search for and Filter Companies to Add to a Bid Form.
- Optional: Click the Company name to view it's details.
- Mark the checkbox for the companies you want to add to the bid form.
- Decide when to invite bidders:
- To add the bidders without sending an invitation, click Add Bidders.
- To invite the bidders now:
- Click Send Invitations.
- Click Send to confirm sending the bid invitation email.
Note
Companies added from the Procore Construction Network are automatically added to your Directory. See What happens when companies and users are added from the Procore Construction Network to the Company Directory?Level Bids
- Navigate to the project's Bidding tool.
- Click View or the name of the relevant bid package.
Note: You can also click the name of the bid package. - Click the bid form name.
- Click the Bid Leveling tab.
- Click the Leveled Bids view.
- Take any of the following actions:
- Alternates
- Expand the 'Alternates' section.
- Move the toggles ON or
 OFF to show or hide alternates.
- Bid Summary
- View how many items are excluded or missing from the submitted bid.
- Configure Columns for Submitted Bids
- Click the table filter
 icon.
icon. - Move the toggles ON or OFF to show or hide a bid.
- Click the table filter
- Edit Line Items.
- Double click the field in the bid you want to edit.
Note: Fields that have been edited will have a triangle in the cell. - If available, select Include or Exclude.
Note: This is based on the 'Response Field Type' in the bid form. - Enter the new amount.
- Optional: Enter a note.
- Optional: Select a Line Item Color.
- Click Add.
- Optional: Click View Activity to view change history for the field,
- Double click the field in the bid you want to edit.
- Private Line Items
- Locate the 'Private Line Items' section.
- Click + icon.
- Click Add Line Item and select Cost Code or Plain Text.
- Enter the item's Cost Code or Name, Description, and select the Response Field Type.
- Optional: To create a section for your line items, click Add Section and enter the section name.
- Optional: Repeat the steps above to add additional sections and line items.
- Optional: To delete a section or line item, click the vertical ellipsesand select Delete Section or Delete Line Item. Click Delete to confirm.
- Click Save.
- Click into any of the fields for your private line items to enter included or excluded quantities. See the 'Edit Line Items' section above for more information.
- Sort Bids
- Click Sort to re-sort bids from lowest to highest.
Note: Bids are automatically sorted from lowest to highest from left to right. Use this button to re-sort after editing a bid.
- Click Sort to re-sort bids from lowest to highest.
- Alternates
- Optional: Export Bid Leveling Data.
Link Leveled Bid Values to the Estimate
Bidding tool Steps
- Navigate to the project's Bidding tool.
- Click View or the name of the relevant bid package.
Note: You can also click the name of the bid package. -
Click the bid form name.
-
Click the Bid Leveling tab.
-
Click the Leveled Bids view.
-
Click the ellipsis
icon next to the relevant company. -
Select Show Bid in Estimating.
-
A green banner will appear saying the bid is successfully showing in Estimating
-
Click Show to go to the Estimating tool.
Estimating Tool Steps
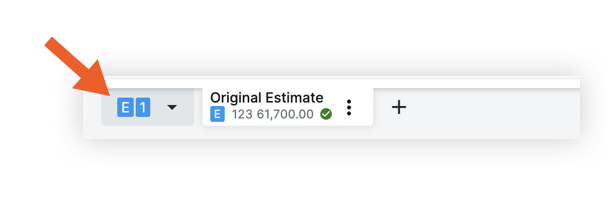
-
You can view the bid values in the Total Bid Value column.
-
Once the values are confirmed, click the ellipsis
icon in the Bid Recipient column. -
Click Set as Estimate Value.
-
The link
 icon will turn from gray to black once the bid value is set as the estimate value.
Generate a Bid Proposal
Note
Review the Project Estimate, Additional Notes, and Summary sections before generating a proposal. If there is a need for adjustments, you can update the pricing and costs by changing the appropriate value.- Navigate to the Bid Board or Portfolio Planning tool and select the project.
OR
Navigate to the project's Estimating tool. - Click the Estimating tab.
- Select the relevant estimate from the drop-down menu on the bottom of the page.
- After thoroughly reviewing the estimate, click Show Proposal Sheet or click the Proposal tab.
A preview of the proposal will be generated. This is where you can add or exclude values by selecting the preferred options. - Select what information you want to include in the relevant section of the proposal by turning toggles
 ON or
ON or  OFF.
OFF.
- Quick Simplification
- Groups Only
- Lump Sum
- Materials Details
- Quantity
- Assembly Items
- Item Total Cost
- Combined Unit Cost
- Group Subtotals
- Manufacturer
- Catalog Number
- Description
- Summary Details
- Labor and Materials
- Taxes
- Profit
- Accepted By
- Date
- Include Additional Alternates
- Include Items from Alternates
- Include Alternates in Estimate Total
- Include Approved Change Orders
- Include Items from Change Orders
- Round Proposal Total
- Price / sq ft
- Cost Items
- Group Subtotals
- Summary
- Estimate Total
- Quick Simplification
- Optional: Click the Proposal Builder toggle ON to edit information directly in the proposal.
- Optional: Under 'Cover and Appendix Pages', select the relevant pages.
Note: You can preview the cover page or appendix page by clicking the open in new tab icon.
icon. - Optional: If sharing with a third party, you can add the customer's information to the proposal.
- Under 'Customer Information,' click Add Customer and choose from the following options:
- Select existing company.
- Select the company from the list your company's Directory, then click Select.
Notes:- Once selected, the customer's name will appear on your proposal.
- If a bid contacts are designated in your company's Directory, the bid contact and the company's addressing information are automatically added.
- You can change which bid contact you want to address the proposal to by clicking the vertical ellipsis .
- Select the company from the list your company's Directory, then click Select.
- Create a new company.
- Click Create New Customer.
- Enter the company information.
- Click Create.
- Select existing company.
- If a bid contact is not automatically added, click Add Contact and choose from the following options:
- Select an existing contact.
- Select the contact fro your company's Directory and click Select.
Note: After a bid contact is added, the company's addressing information will populate.
- Select the contact fro your company's Directory and click Select.
- Create a new contact.
- Click Create New Contact.
- Enter the contact information.
- Click Create.
- Select an existing contact.
- Under 'Customer Information,' click Add Customer and choose from the following options:
Export a Bid Proposal
Send Estimate to Budget
Note
The segments and items that you can select on your Procore project are unique to your project's specific WBS. Contact your company's Procore Administrator if you require assistance with creating a budget code for your environment.- Navigate to the project's Estimating tool.
- Click the Estimating tab.
- Select the estimate.
- Click the Actions menu and select Send to Budget.
- Update any below the line adjustments as needed.
- Send Costs: Select send costs only or send entire estimate including additional adjustments.
- Profit, Overhead, Discount, Taxes, Others: Select spread across estimate items or summarize into specific budget code. See How do budget codes in an estimate create line items in a budget?
- If summarizing into a specific budget code, click Select or the current selection to configure the cost code and cost type for each. Then click Save Changes.
- Optional: Select Manage to make changes to the WBS segments and budget code structure.
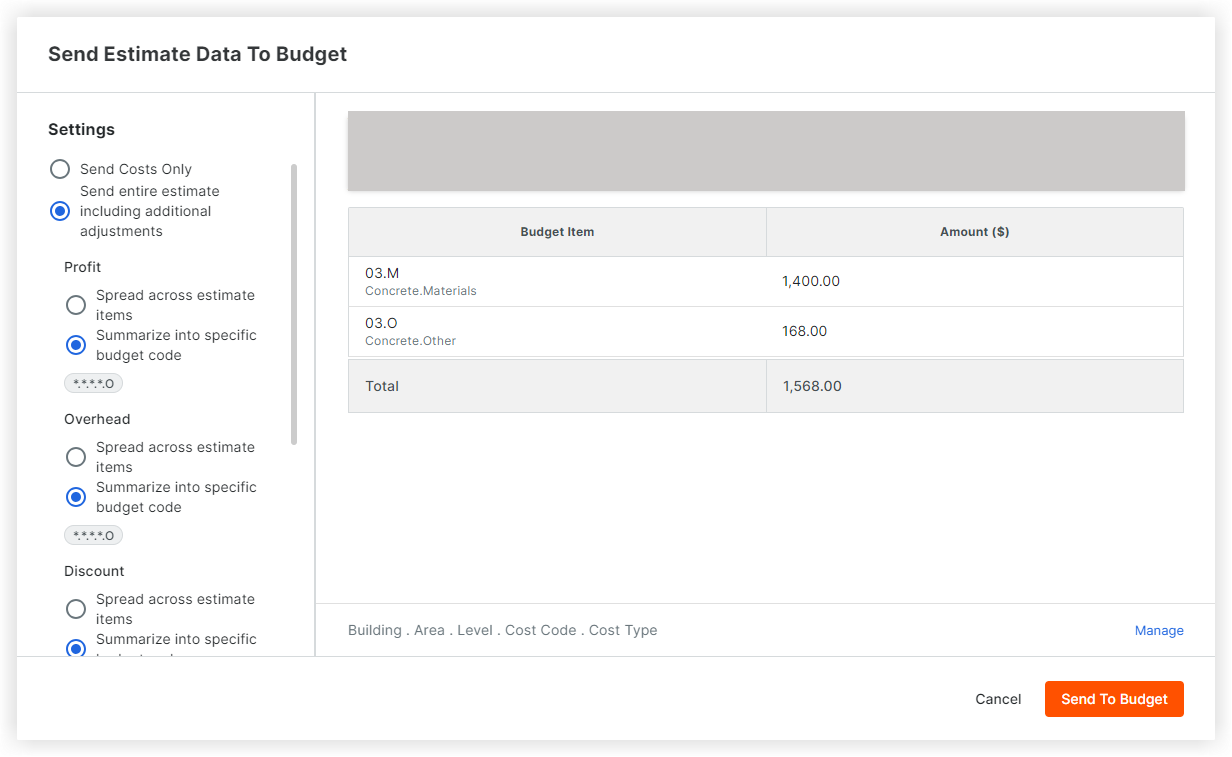
- Click Send to Budget.