View Documents in the Document Management Tool
Things to Consider
-
Required User Permissions:
-
'Standard' or 'Admin' level permissions to the project's Document Management tool.
Note:-
Users can only view documents that they have access to through a permission group. See How do permissions work in the Document Management tool?
-
Users with 'Admin' level permissions to the Document Management tool can view all files that have been added to the 'Uploads' tab. Users with 'Standard' permission can only view the files that they have uploaded.
-
-
-
Additional Information:
-
The following file types can currently be opened in the viewer:
Note: .doc, .docx, .ppt, .pptx, .xls, and .xlsx automatically open in Office 365.-
Documents: .pdf, .doc, .docx, .ppt, .pptx
-
3D models: .rvt, .nwd, .nwc, .ifc, .dwg, .dwf, .dwfx (for details see View 3D Models in the Document Management Tool)
-
Spreadsheets: .xls, .xlsx
-
Images: .jpg, .jpeg, .png, gif, .svg, .webp
-
Videos: .mov, .mp4
-
Audio: .mp3, .mp4, .wav
-
-
-
Viewer Layout Customization: When viewing a document, panels such as Connected Items, Workflows, Markups, and Information can be detached, resized, or moved anywhere on your screen canvas. Your panel layout arrangements are saved throughout your active browser session.
-
Direct Item Creation: You can create and pin RFIs, Punch List items, Inspections, Inspection Items, and Coordination Issues directly from the Connected Items panel in the Document Viewer.
Steps
Tip
If you want to be able to quickly access and view a specific set of documents, you can create your own saved views. See Create a Saved View in the Document Management Tool.-
Navigate to the project's Document Management tool.
-
Follow the steps below depending on what documents you want to view in the Document Management tool:
-
View All Documents
-
View Documents in Saved Views
-
View a Document in the Viewer
-
View Document Revisions
-
View Uploads
-
Compare Documents
-
View All Documents
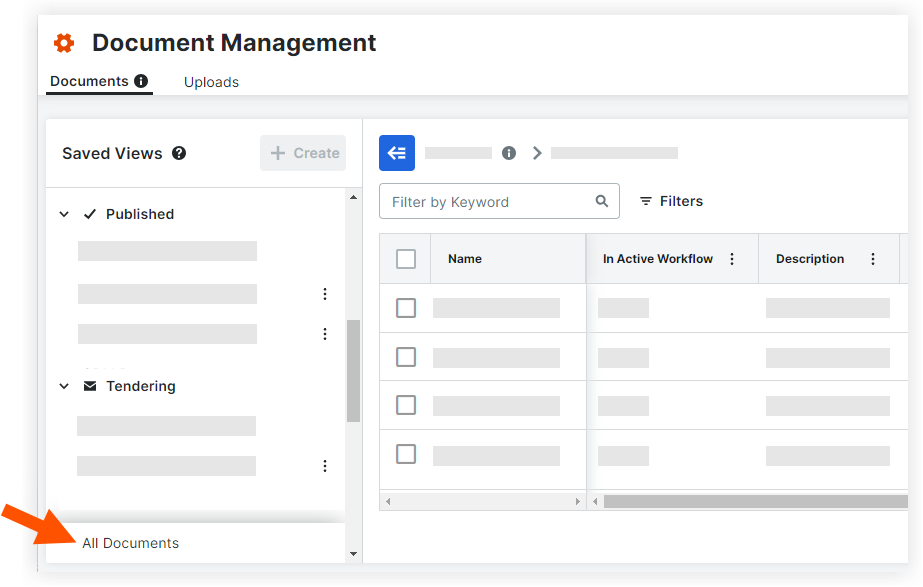
View a list of all submitted documents that you have access to. Each document has its own row, with attributes shown in each column.
-
Click the Documents tab.
-
Click All Documents at the bottom of the 'Saved View' panel.
Note: If the Saved View panels is hidden, click the Show Saved Views icon at the top of the table.
 -
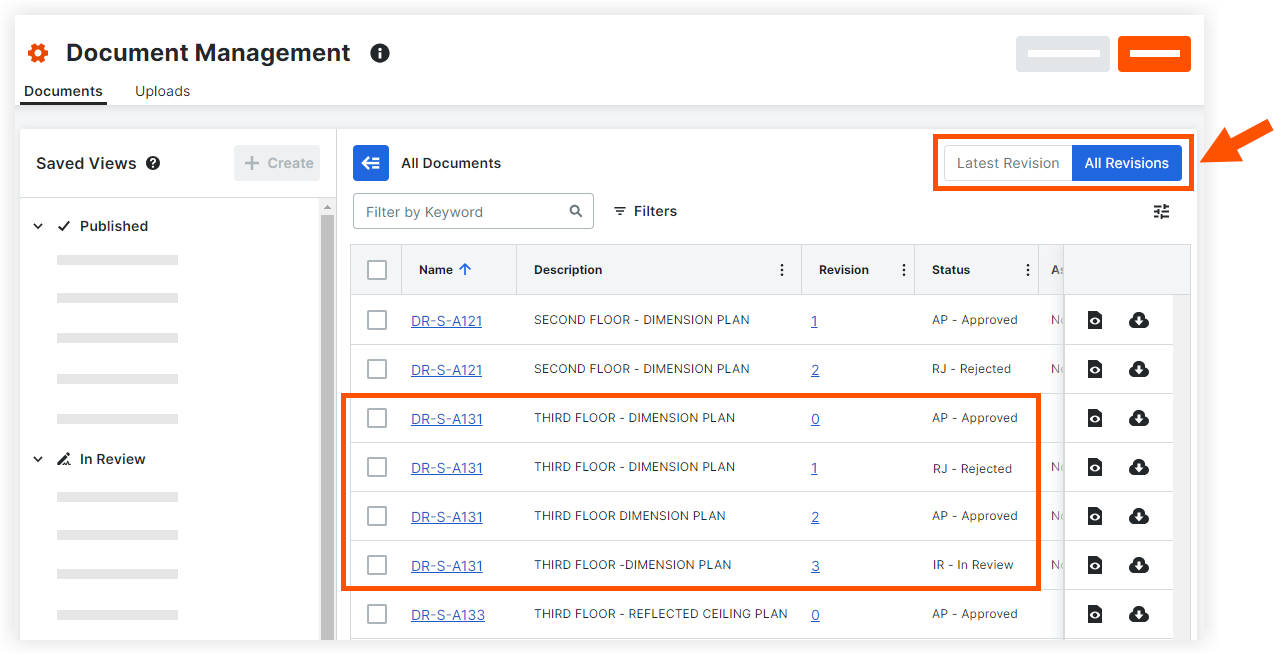
Switch between viewing the Latest Revision of each document and viewing All Revisions using the buttons in the upper right, as needed.
View Documents in Saved Views
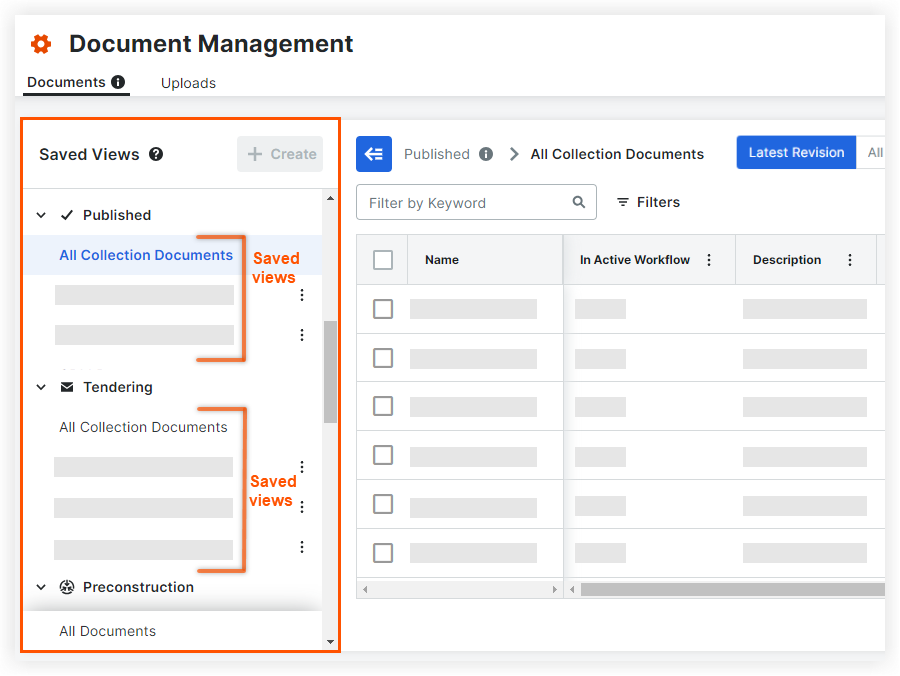
View a list of documents that fit the filters of a particular saved view, are submitted, and you have permission to view.
-
Click the Documents tab.
-
In the Saved Views panel, click the name of a saved view to access all documents within that view.
-
If the Saved View panels is hidden, click the Show Saved Views
icon at the top of the table. -
To create your own view, see Create a Saved View in the Document Management Tool.
-
-
Switch between viewing the Latest Revision of each document and viewing All Revisions using the buttons in the upper right, as needed.
View a Document in the Viewer
-
Click the Documents or Uploads tab to find the document that you want to view.
Note: Use the search bar and filters if necessary. See Search for and Filter Documents. -
Click the document name to open it.
-
The document is shown in the viewer with the following options:
-
Managing Viewer Panels: To move a panel, click and drag the top header bar of any open panel (such as Information, Workflows, Search, Markups, or Connected Items) and drop it anywhere on the viewer canvas.
-
To resize a panel, hover over the edges of the panel and drag horizontally or vertically to expand or narrow your view.
-
To collapse a panel, click the collapse icon on the panel header to minimize it into a floating header block. Click the icon again to expand it back to full size.
-
-
Connected Items: To view or create linked items on the document, click the Connected Items
 icon in the side toolbar.
-
To create and pin a new item (RFI, Punch List, Inspection, Inspection Item, or Coordination Issue), select the item category, click the + icon in the panel header, and click the desired location on the drawing canvas to drop a pin and complete the creation form.
-
-
Zoom Settings: To zoom in or out of the document, click the + and - symbols. Click the dropdown menu to select a percentage, Zoom to Fit, or Zoom to Width.
-
Show Pages: To view a list of pages that exist in the PDF document, click the Show Pages icon on the left side of the page.
-
View Previous or Next Document: To view the previous document, click the left arrow. To view the next document, click the right arrow.
-
Open Another Document or Revision: To open a different document or revision, select it from the dropdown menus at the top of the page.
-
Markups: To open the Markups side panel, click Markups or the markup icon. You can show, hide, or filter markups as needed. See view markups or add markups.
-
Information: To view information about the document, click the info
 icon.
icon. -
Search: To search text on the document, click the search icon and enter a search term.
-
Workflows: To view the workflow on the document (if available), click the workflow
icon.
-
Download: To download the document to your computer, click the download
 icon.
icon. -
Keyboard Shortcuts: To view keyboard shortcuts, click the keyboard icon in the bottom right corner.
-
-
To exit out of the viewer, click Close.
View Document Revisions
-
Click the Documents tab.
-
Find the document that you want to view a revision for.
-
Click the value in the Revision column.
This value is the latest revision for that document, and clicking it opens a Revisions panel listing all revisions that have been uploaded for the document. -
To open the revision in the viewer, hover over the row in the main table and click the viewer icon.
Note: When navigating to a document from a saved view, if you view an older revisions of a document, Procore adds a banner to the top of the document informing you that it's not the latest revision of the document in the collection you're currently viewing.

Tip
Switching between viewing only the Latest Revision of each document and viewing All Revisions using the buttons in the upper right is another way to see other revisions of the same document.
The main table will update according to your choice, and the Revision column shows the revision identifier for each of the document's revisions. You may need to re-sort the table by clicking on the 'Name'column header if you want a document's revisions grouped together in the list.
View Uploads
-
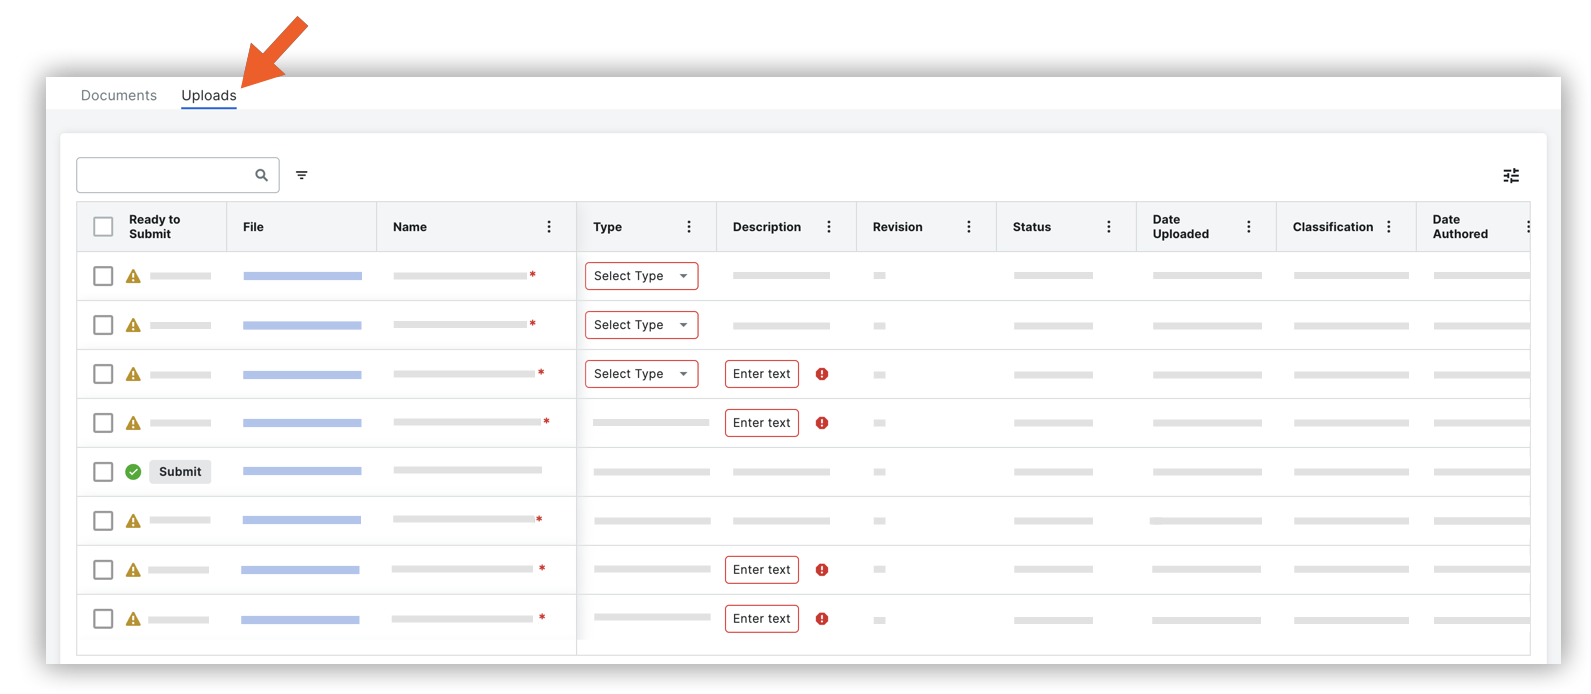
Click the Uploads tab.
-
Uploaded files are listed in the table. Each file has its own row, with its details shown in each column.
Note: Procore automatically populates certain fields during an upload based on metadata and upload requirements set for the tool, and any remaining information must be entered manually. See What are the different fields in the Document Management tool? and What data can Procore automatically populate when uploading files to the Document Management tool? Files that are missing attributes have an asterisk (*) next to the name, with missing fields outlined in red. -
If necessary, scroll to the right in the table to view more information. To refine your view, you can adjust the row height and column widths, and turn columns on or off. See Configure Your View in the Document Management Tool.
Compare Documents
See Compare Documents in the Document Management tool to learn how to compare two documents with the overlay or side-by-side comparison method.