One to Many Project Structure
1. ONE TO MANY PROJECT STRUCTURE
1.1. Purpose
This document introduces the One-to-Many Project Structure in Procore and provides step-by-step navigation to utilize different tools and features in a One-to-Many project setup. This guide is intended for the Project team (CVM, Design team, Project Managers).
1.2. Definitions and Acronyms
- DP - SDG&E Phased Project: A project that can have multiple Job Notifications attached to it in SAP.
- Job Notification (JN): A job package or sub job under a project.
- One-to-Many: A project structure in Procore where a single project will have multiple job levels/job packages.
2. RELATIONSHIP BETWEEN PROCORE ONE-TO-MANY PROJECT AND SAP DP
The multiple job levels in a One-to-Many project are distinctly identified in Procore and SAP as Correspondence# and Job Number# respectively. Each Correspondence Level in Procore relates to the Job Number in SAP:

3. SETTING UP PROJECT IN PROCORE
The One-to-Many Projects are to be set up manually if there is no integration with SAP.
(See the References section to access the quick link in the training center for this process)
3.1. Select the appropriate One-to-Many template.
3.2. Complete only the Project Information section and click +Create Project at the bottom right corner of the page.

4. NAVIGATING TO THE ADMIN TOOL TO UPDATE THE LOCATION
The Location tool is used to track the job levels throughout the project.
Note: These are the manual instructions to populate the Locations field. For projects that are integrated with SAP this field should auto populate.
Note: This process will be repeated if a new job level is added to the project.
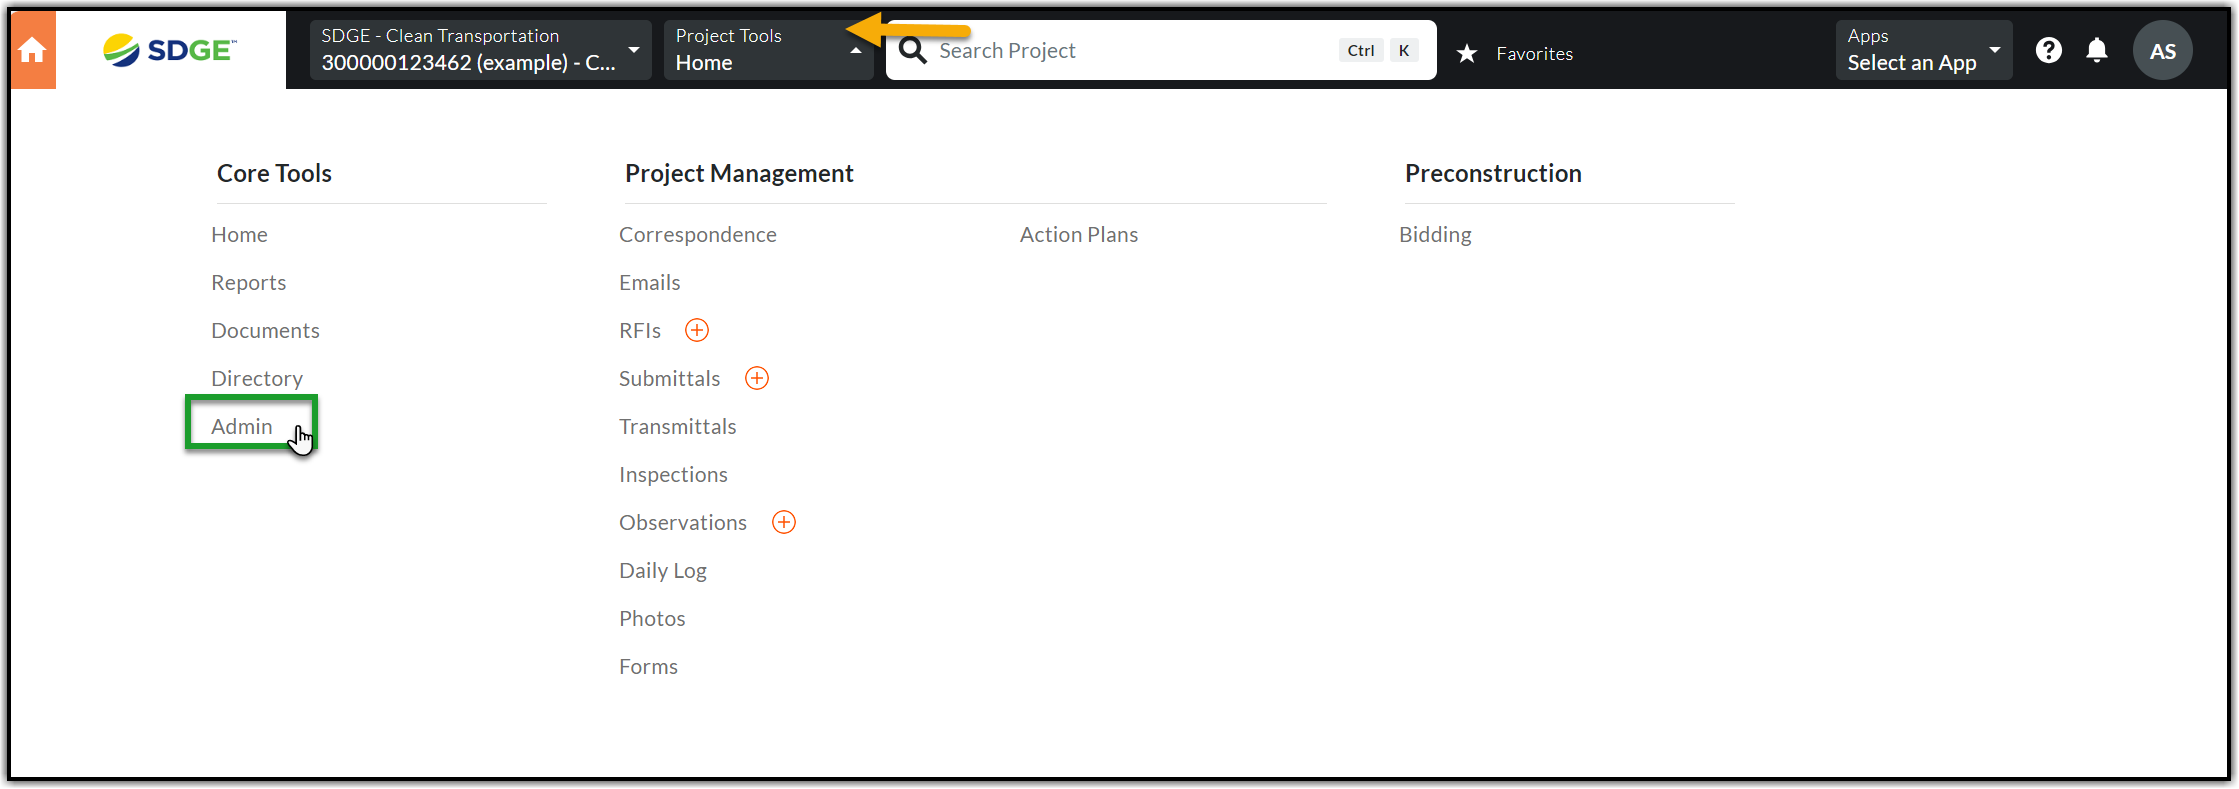
4.1. From Project Home page, click the Project Tools dropdown and select the Admin tool.
4.2. Select Locations from the Project Settings option in the right pane of the Admin tool.

4.3. This will lead to the Locations page. The first step is to create the 1st Tier. Select +1st and type (Job Notification Number and the Type of Work/Projects). To save select the orange checkmark. Next, you will create the 2nd Tier. Select +2nd Tier and type (Project ID and Job Name) also known as the Job Level Naming Convention, save.
Note: The 1st Tier contains Job Notification Number and the Type of Work/Projects such as UG, OH or SCADA.

5. CREATING DOCUMENT FOLDERS
5.1. The folder structure in the left pane of the Documents tool reflects the standard One-to-many project structure. It has a single project with multiple folders representing the job levels (job packages). This needs to mirror the locations set up in the admin tool.


5.2. Folders need to be locked to avoid visibility to users that don’t need access to certain folders.
(See the References section for training center quick link on how to manage permissions for document folders)
6. USING LOCATIONS TOOL WHEN CREATING ITEMS IN PROJECT
When creating project items in a One-to-Many project structure the Locations tool can be used to identify the job package that the item is associated with. The Locations tool exists across most of the Project Management and Quality & Safey Procore tools.
Snapshot of the Locations Tool Configuration in a One-to-Many project in Procore:

Note: The 1st Tier contains Job Notifications with job package codes or work types and the 2nd Tier contains any additional information such as Job Structure IDs or any secondary identifiers associated with the job notification.
6.1. Follow the navigation to create any project item (The image below is captured using the following navigation steps: Project Home page > Project Tools > Submittal > Create > Submittal).

6.2. Click the Location dropdown and select the Job Notification (1st Tier) and this should give the option to select corresponding additional information (2nd Tier). 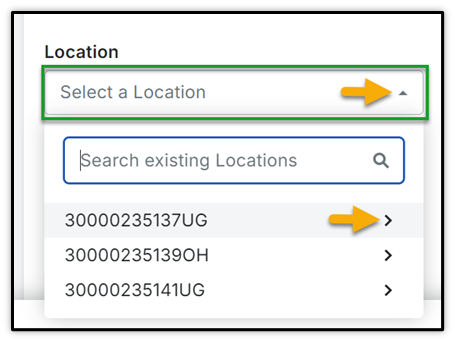
6.3. The Locations field will be updated, and the item/form will be associated with the corresponding job package upon submitting the form.

7. CREATING JOB NOTIFICATION CORRESPONDENCE
7.1. Navigate to Job Notification Correspondence. From the Project Home page, click the Project Tools dropdown and select the Correspondence tool.

7.2. Creating Job Notification Correspondence
Note: This step is automated in all the projects that are integrated with SAP. If there is no active integration of SAP in any project, then create Job Notification Correspondence manually using the following steps:
7.2.1 From the Correspondence page, click the orange +Create button and select (Global) Job Notification Level to open a new Correspondence.
Note: The type of Correspondence is program specific, select type that is applicable.

7.2.2 Fill out the respective fields in the General Information section. The fields in this section are standardized across all BUs. For those using the SAP integration – these fields get populated by that automation.

· Subject: Must contain the SAP Job Notification number and notification title are concatenated.
· Description: This must match the field in SAP
· Required Start Date: What is the start date of the project in SAP
· Required End Date: What is the end date of the project in SAP
· Job/Work Type: This should include the scope of work for this job level as indicated in SAP
· SAP User Status: Replicate the User Status listed in SAP
7.2.3 Fill out all fields in the Additional Data, Pre-Construction, and Construction sections as applicable to your Business Unit. Click +Create and Issue to submit the form.
7.2.4 Procore will generate an email notification with details and a link to open the new Job Notification Correspondence. The list in CT Job Notification Correspondence will also be updated with the new Correspondence
7.3. Linking Related Items to Job Notification Correspondence
7.3.1 Click the View Online link in the email notification related to the Job Notification Correspondence.
7.3.2. Alternatively, navigate to the Correspondence page (Refer to the above step in Section 7.1). Find the Job Notification Correspondence and click the Subject or the Procore generated number to open

7.3.3. Switch to Related items tab from the General tab of the Correspondence.

7.3.4. Click Link Related Item orange button on the top right corner of the page.

7.3.5. A new Link Related Item window will appear on the right corner of the page. Select the item related to the job package to be linked to the Job Notification Correspondence. Scroll down to see the complete list of items/tools that can be linked.

Note: This step will be mostly performed at a later stage, when the job package is processed and other items related to the job package are created and need to be linked for reference.
Note: This is to show how to track multiple items that are related to each job package.
7.3.6 Select the item from the existing list of items (List of RFIs in the image below).

7.3.7. Add any notes (if any) and click Link button.

7.3.8. The newly linked item should be reflected under the list of Related Items.

Note: Multiple related items can be linked to one Correspondence
8. PERFORMING A PROJECT LEVEL SEARCH
Procore allows for searching, identifying and tracking the items across different job levels in a project.
8.1. From the Portfolio page, select the project from the list and navigate to project Home page.

8.2. This will lead to Project Home page.

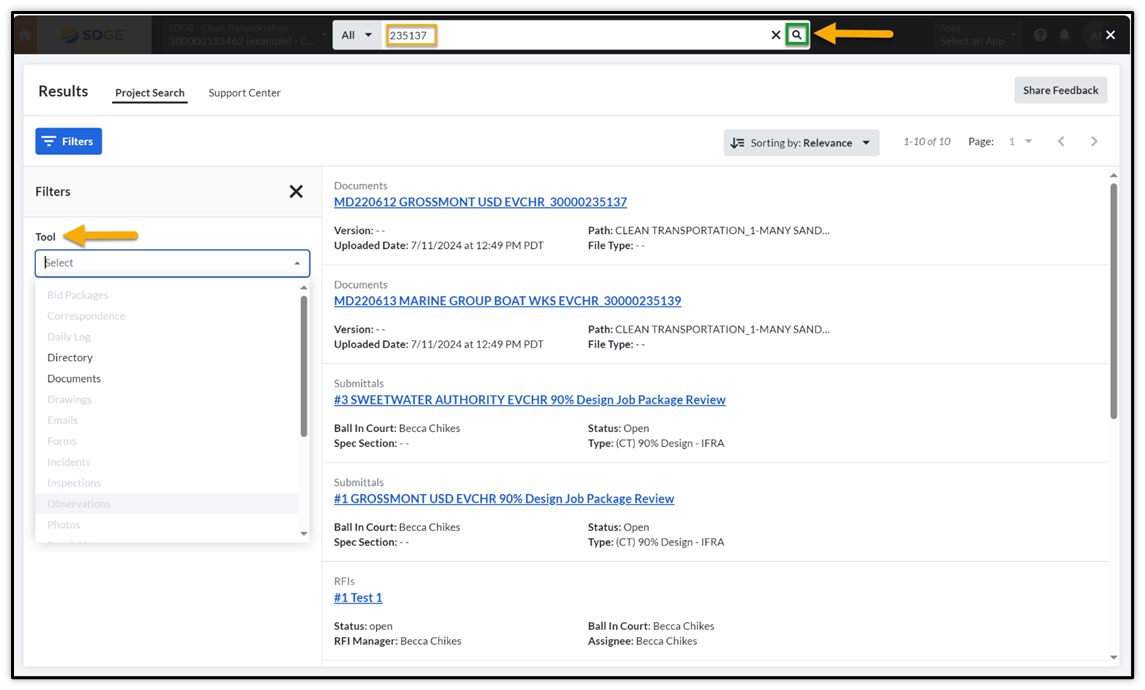
8.3 From Project Home page, enter the keywords (Project#, DP#) in the Search option at top center of the page and click the Search icon.
8.4 The search results will pull all the project items (tools and documents, etc.) matching the keywords entered.
8.5 The Filters option on the top left corner of the page will help filter the results based on tools.
Note: For Projects that are not integrated with SAP there will be other numbers that can be used to search the projects.
9. REFERENCES
· Quick Link: SDGE Training Center>Electric>Create a New Project
· Quick Link: SDGE Training Center>Electric>Document Folder Permissions