Construction Redlines Process - Transmission
1. THE CONSTRUCTION REDLINES PROCESS
1.1. Purpose
The Construction Redlines (also known as As-builts) process consists of submitting and approving multiple documents after the completion of the construction work. It involves the Construction Contractor as a submitter and CVM team as reviewers/approvers of the Construction Redlines (documents). It also varies by the type of work being performed. This guide will outline the Procore tools and workflows involved throughout the process.
1.2. Tools
Forms Tool:
There are two Forms templates that are used for completing the Construction Redlines process (Construction Redlines Coversheet, Yard Asset Release).
Submittals Tool:
There are three Submittal types that are used as a part of the Construction Redlines Review process depending on the type of work performed.
Overhead (OH): This type of work will have Preliminary and Final Submittals.
The Submittal type assigned to Preliminary Submittal is: (Global) – QAQC Construction Redlines Review
The Submittal type assigned to Final Submittal is: (Global) - OH Final Construction Redlines
Underground (UG): This type of work will have one Final Submittal.
The Submittal type assigned to Final Submittal is: (Global) - UG Final Construction Redlines.
Correspondence Tool:
There are three Correspondence types that are used as a part of the Construction Redlines Review process for the OH type of work.
The designated Correspondence type assigned in Procore is: (Trans) - Post Construction Inspection
2. CONSTRUCTION REDLINES REVIEW - STEPS
Here is the overview of steps to be followed and workflows applied in the Submittal and Correspondence tools:
2.1. The OH Construction Redlines Review Process:
Preliminary Submittal -
Step 1: The Contractor creates the Submittal and submits the Construction Redlines.
Step 2: The PMO will review by downloading the files from the Documents tool (if applicable)
Step 3: The FCA reviews the Construction Redlines for completeness/accuracy and provides sign-off.
Step 4: The CMS opens Correspondence 1 for QA/QC Coordination which results in the Post Construction Inspection (PCI) report.
Step 5: The CMS will go on to create Correspondence 2 to upload the review comments on the PCI report from the Engineering team.
Step 6: Following the internal reviews the CMS will create third and final Correspondence 3 to share the PCI Report with the Contractor.
Step 7: The Contractor will respond to the Correspondence 3 and schedule the go-back work.
Step 8: The CMS will close the Preliminary Submittal.
Final Submittal –
Step 1: The Contractor creates the Final Submittal and submits the final Construction Redlines including the reconciled PCI Report. The Final Submittal will have Contractor as Submitter, FCA as approver along with PMO (if applicable).
Step 2: The FCA reviews the Construction Redlines and reconciled PCI Report for completeness/accuracy and provides final sign-off.
Step 3: The PMO will reconcile the Final Construction Redlines with Engineers and upload the workstream then to the SAP (if applicable).
Step 4: The CMS ends the review process - Closes and distributes/uploads the Construction Redlines to workstream if there is no PMO.
2.2. The UG Construction Redlines Review Process:
Final Submittal –
Step 1: The Contractor creates the Submittal and submits the Construction Redlines. The Final Submittal will have Contractor as Submitter, FCA and CMS as approvers along with PMO (if applicable).
Step 2: The Contractor creates the Submittal and submits the Construction Redlines.
Step 3: The FCA reviews the Construction Redlines for completeness/accuracy and provides sign-off.
Step 4: The CMS will decide what to do next - Pass it on to PMO (if applicable) or Close or Distribute.
Step 5: The PMO will reconcile the Final Construction Redlines with Engineers and upload to workstream then to the SAP.
Step 6: The CMS ends the review process - Closes and distributes/uploads the Construction Redlines to workstream if there is no PMO.
3. GUIDELINE OF WORKFLOW
Following are the workflows based on the work type:
3.1. Underground (UG) Work Type:
Only the “UG Final Construction Redlines Review” Submittal type is involved for Underground work. Please ensure you choose the correct Submittal type, and apply the correct workflow based on the table below.
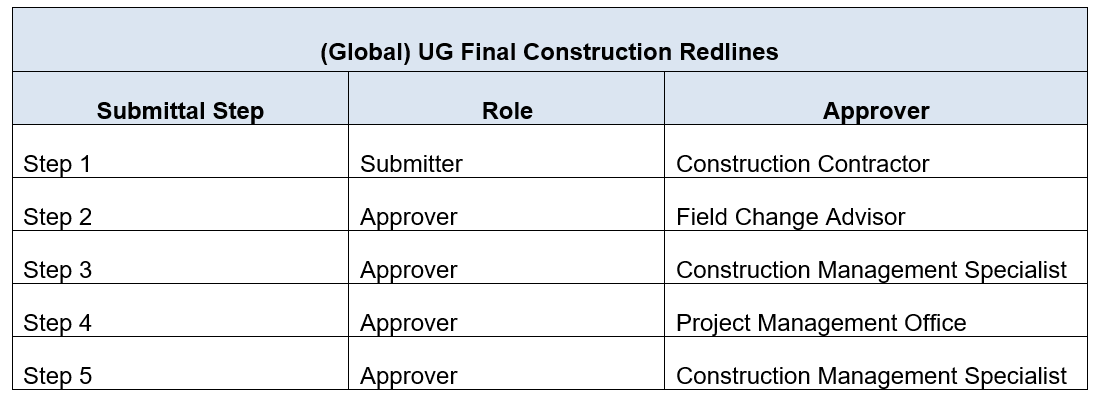
Note: If the PMO is not involved in the Project/Program – then Steps 3 and 4 will not be applicable and you should jump straight to Step 5.
3.2. Overhead (OH) Work Type:
For Transmission Overhead work, the process involves two separate tools - The Submittal tool, and the Post Construction Inspection Correspondence in the Correspondence tool in Procore in multiple steps. There are two Submittals and in between there are up to three Correspondences that are used for internal approvals.
Overall, to finalize the Construction Redlines closing process, there are five levels to complete:

Note: The CMS will create all forms in this process. The duration for each Submittal is driven by the MSAs for each type of work, please follow those correctly to ensure the project is fully executed on time.
4. FIVE LEVELS TO COMPLETE THE OH CONSTRUCTION REDLINES PROCESS
4.1. Level 1: Submittal 1- (Global) - QAQC Construction Redlines Review
Create the Preliminary Submittal i.e., Submittal 1 using the Submittal type (Global) - QAQC Construction Redlines Review.
Note: When submitting Preliminary Redlined Construction Redlines documents, all referenced work order packages, such as OH Distribution, UG Distribution, SCADA, or any other relevant referenced WOs associated with the Transmission Overhead WO will be submitted in one binder and only under the Transmission Overhead WO project. PCI reports will be generated by QA/QC and transmitted to the Contractor only in the Transmission OH work order.
Note: Navigation to Overhead (OH) Project - Enter the Work Order (WO) number in the Project Search option on the top left corner of the Portfolio page and click the Search icon. You can find the WO in either the Name field or the Project Number field.

4.1.1. Follow the below workflow while creating the Preliminary Submittal:
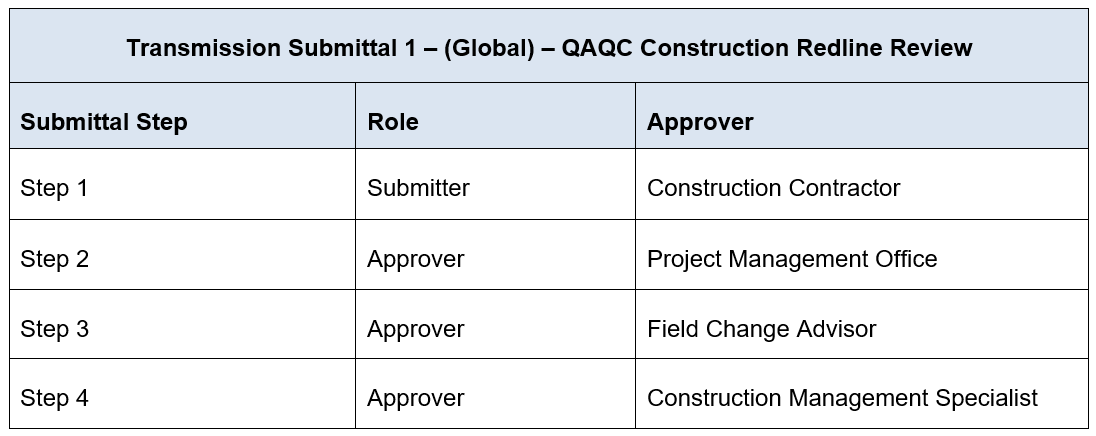
Note: If the PMO is not involved in the Project/Program – then Step 2 will not be applicable and you should jump straight to Step 3.
4.2. Level 2: Correspondence 1 - Initial PCI Report
Note: Correspondence 1 will be created at the same time as the above QA/QC Submittal to produce the PCI report.
4.2.1. CMS will create this Correspondence 1 using the Correspondence tool and assign it to QA/QC, Construction Manager and Field Construction Advisor (Assignees field).
4.2.2. Add the Construction Management Specialist to the Distribution Member field.
4.2.3. QAQC inspects the project job package and produces PCI Report. Once they have created the PCI Report they will upload it to the Documents tool and attach it to the Correspondence.
4.2.4. CVM will review the report, if there are no questions or revisions to be made, move on to Correspondence 2.
Workflow:
CVM > QAQC > PCI (Punchlist) > CVM
4.3. Level 3: Correspondence 2 PCI Report with Comments
Following the initial review that took place in Correspondence 1 – the Engineering group may need to be engaged for review. This will be done through an email sent across to the PMO teams, Internal Designers, or Internal Engineers. The CMS will provide all updates to this Correspondence (Correspondence 2) based on that email communication. If there are no engineering items to address, proceed to Correspondence #3 – Final PCI Report.
4.3.1. CVM will attach a revised PCI report, that includes any items that need to be reviewed by the Engineering teams and assign it to the Engineering team and Field Construction Advisor (Assignees field).
4.3.2. For visibility the distribution list should be QA/QC advisors or appointed inspectors for both the electrical and structural teams and other Construction Management Specialists.
4.3.3. The CMS will gather all the notes from the Engineering team and submit them into the Correspondence on the Engineering team's behalf.
4.3.4. CVM will update the Correspondence with all responses from Engineering teams for consistency and concurrence.
Workflow:
CVM > ENG > PCI (ENG. Punchlist) > CVM
4.4. Level 4: Correspondence 3 Final PCI Report
Following both internal reviews (as applicable) the CVM team will create the third and final Correspondence to provide the PCI report to the contractor.
4.4.1. CVM to upload PCI Report with CVM and Engineering/Design comments to the Documents tool for Contractor in the Punchlist subfolder and assign the Correspondence to Contractor (Assignees field).
4.4.2. The PMO will be added to the Distribution Member for this form.
4.4.3. The Contractor will review the PCI Report.
4.4.4. The Contractor will identify disputed items and CVM will respond within the Correspondence. If there are no questions or disputes the Contractor will acknowledge the receipt of the PCI Report and schedule go-back work.
Note: Once the Correspondence has been closed – if there are additional questions or items to be disputed, those must follow the standard RFI process.
Workflow:
CVM > Updated PCI (Punchlist) > Contractor > CVM
4.5. Level 5: Submittal 2 - (Global) - OH Final Construction Redlines
4.5.1. Follow the below workflow while creating the Preliminary Submittal:
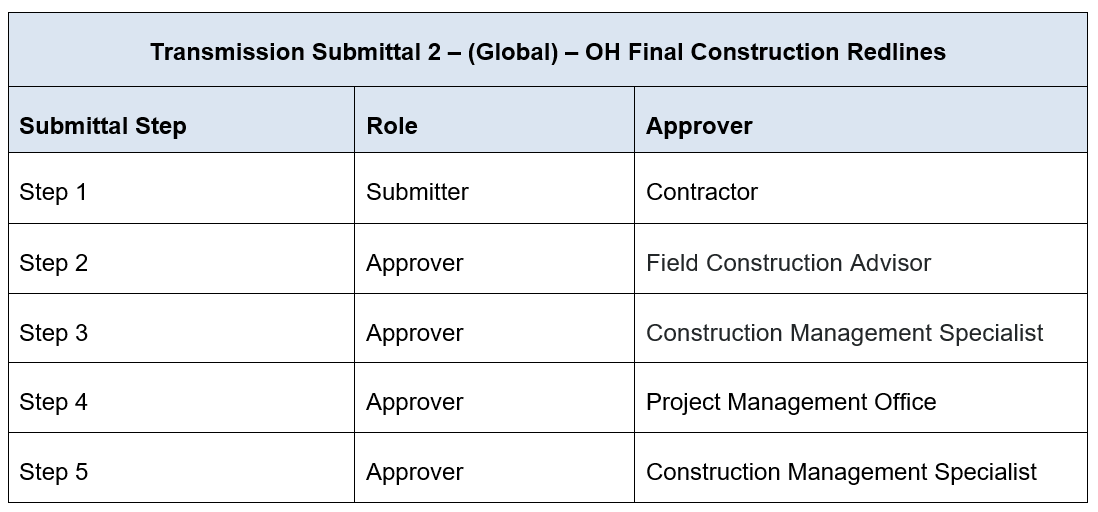
Note: If the PMO is not involved in the Project/Program – then Step 4 will not be applicable and you should jump straight to Step 5.
5. CREATING THE SUBMITTAL
5.1. Click +Create orange box on the top right corner and select Submittal.

5.2. Complete the required fields in the General Information section using the information below.

- Title: Enter the Job Notification Number and add “Construction Redlines Review” after the Job Notification.
- Submittal Type: Select the appropriate Submittal type from the drop-down based on the type of work.
- Responsible Contractor: Select the primary contact of the Construction Contractor.
- Received From: This is always you or the person on behalf of whom you are creating the Submittal.
- Submittal Manager: This should be you. The Submittal Manager will be responsible for closing the Submittal.
- Status: Keep the default as ‘Open’.
- Distribution List: Select members who should be notified of the Submittal (Optional).
- Description: Add any notes for the Contractor. You can also mention if there is any specific information or additional documents that you are expecting as a part of the Construction Redlines package.
- SAP Job Notification#: Put NA as this field is not applicable for the Transmission process
- Trade: Please select from Civil, Electric or Scada based on the job.
5.3. Refer the tables in Section 3 and create a multi-step workflow under the Submittal Workflow section based on the Submittal type. In Step 1 select the primary contact of the Contractor company. Change the default Role from ‘Approver’ to Submitter.

5.4. Add more steps as per the guideline of workflow (Section 3) based on the Submittal type. Keep the default Role as ‘Approver’ in all the steps. Click the Create and Send Emails orange button.

Note: Some Procore instances use Submittal Templates – you do not have to fully create the workflow if this is the case. Choose the correct Submittal template and add the users needed to proceed.
6. RESPONDING TO THE SUBMITTAL - AS AN APPROVER
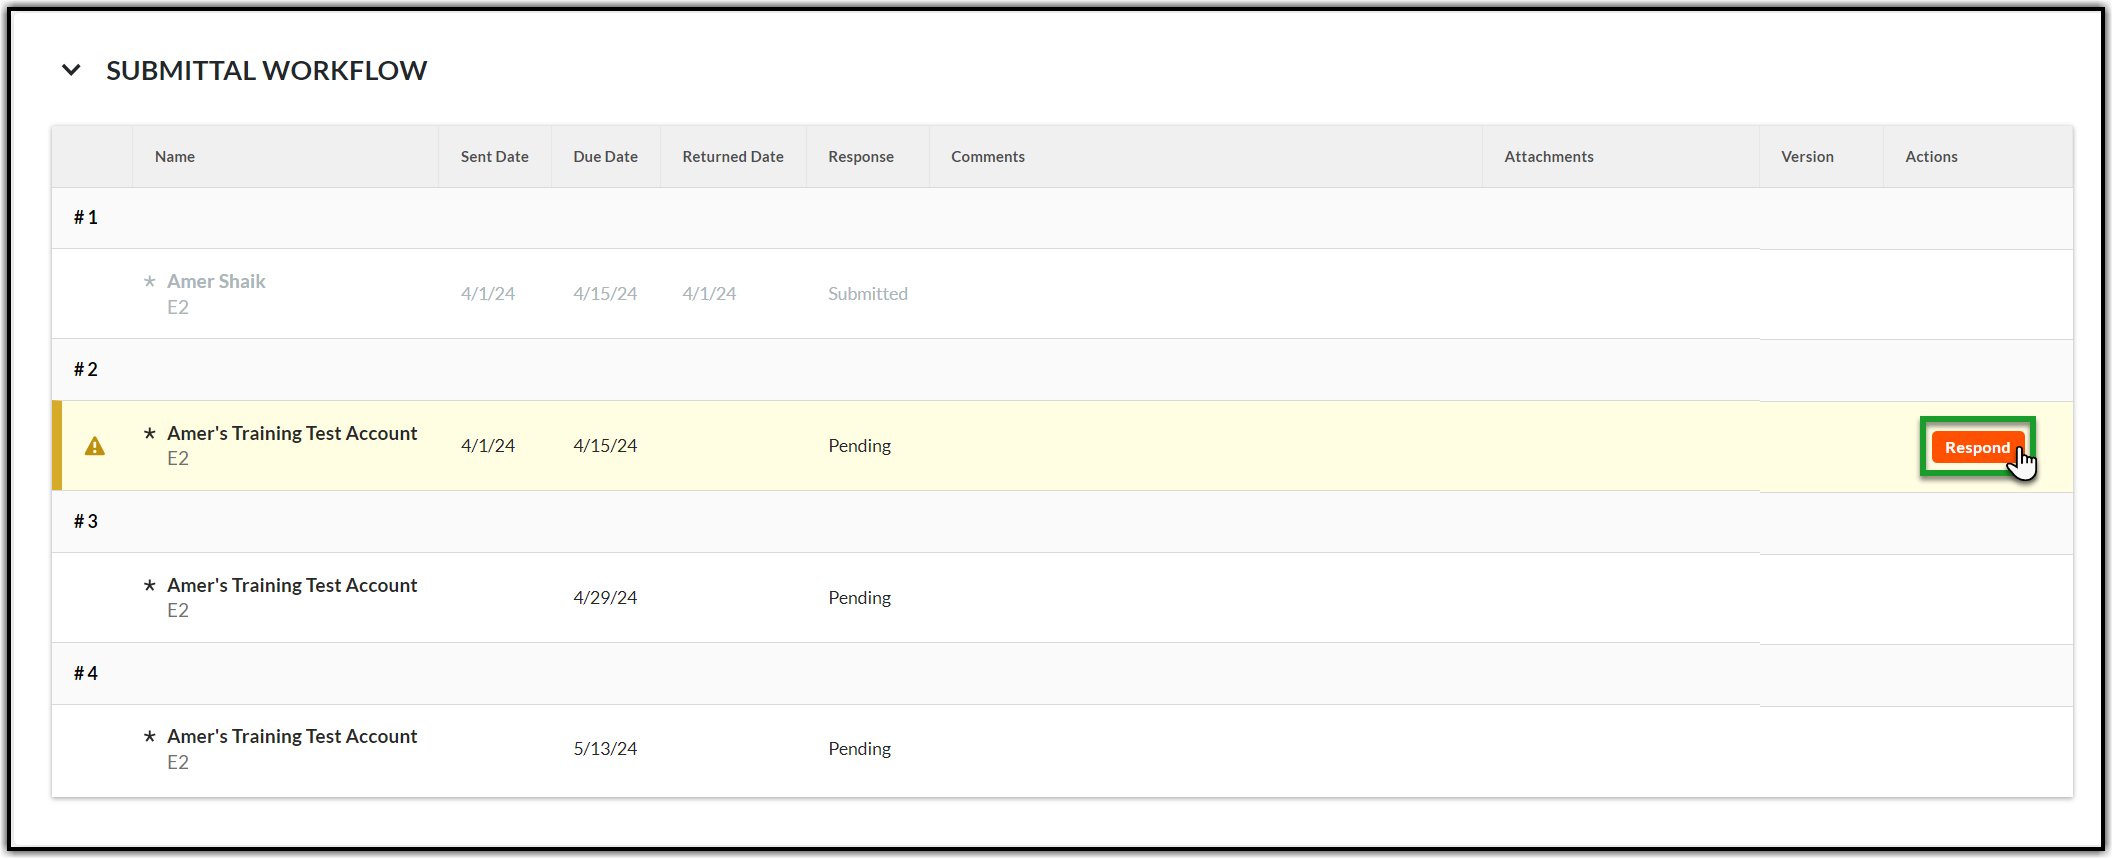
Responding to the Submittal as an approver will move the workflow towards completion. There must be one Submittal for each Job Level and each work type. The packages will not be combined. Each submittal will arrive via email notification with a link to the project and the submittal.
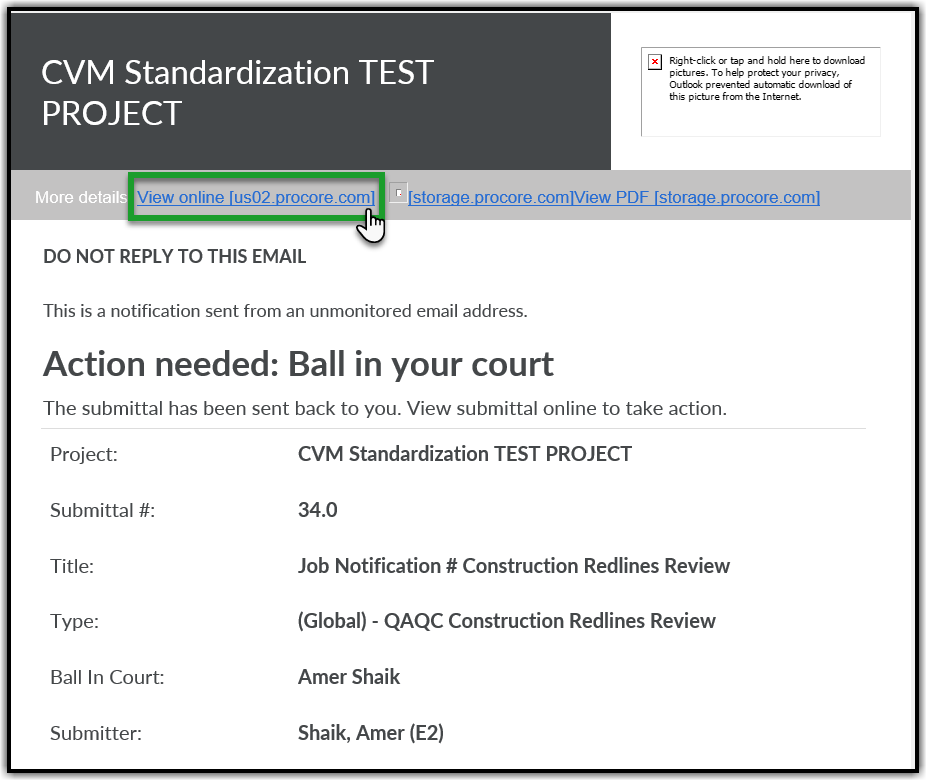
6.1. An email will arrive prompting you to use a link. Click View Online to open the Submittal directly.
6.2. Alternatively, instead of using the email link, Navigate to the Project Tools menu and select the Submittals tool.

6.3. Choose the corresponding Submittal (You can find the Submittal item by its Number provided in email) and click View to open the Submittal.

6.4. The yellow banner indicates that the Ball is in your court. Review the Construction Redlines submitted by the Contractor and click Respond orange button on the right side of the page to provide appropriate response.
6.5. A popup window will appear. Click Attach Files (if applicable) or skip this step and the next step (6.5 to 6.6) and click Next.

6.6. Select Documents in the left pane. Navigate to the Correct Job Level, Stage 5 Folder, and Construction Redlines subfolder in the Documents tool and select the Construction Redlines documents you uploaded in the previous steps. Click Attach and then click Next.

Note: You must follow the SDG&E document naming convention while naming your Construction Redlines Package file.
6.7. You will be in the Respond window. Choose an appropriate response. Enter any special notes for the Contractor related to the documents in the Comments section (if any). Click Preview.

6.8. Once you click Preview, the next window will display the next steps in the Submittal process. Click Respond to finalize Submittal response and move the Submittal to the next step.

6.9. If the Construction Redlines need to be revised:
6.9.1. If the Construction Redlines have errors, and cannot be approved, the Submittal should be marked as “Revise and Resubmit” (refer step 6.7.) by stating the reasons in the comments section to resolve any issues.
6.9.2. A Submittal revision will then be created by the CMS, and you will then resubmit the Construction Redlines in the revised Submittal indicated by Revision Number 1 (if it is the first revision). Open the Submittal that was not approved, click the Ellipsis menu (three dots icon on the right corner of the page) next to Edit and select Create Revision from the dropdown.

7. NAVIGATING TO POST CONSTRUCTION INSPECTION CORRESPONDENCE TOOL
7.1. Navigate to Project Tools from the top menu and select Correspondence tool.

7.2. Click +Create in the orange box on the top right corner and select (Trans) – Post Construction Inspection.

8. CREATING THE POST CONSTRUCTION INSPECTION CORRESPONDENCE TOOL
8.1. Complete the required fields in the General Information section using the information below. Click the Create and Issue orange button on the bottom right of the page.

- Status: Keep the default as ‘Open’
- Subject: Enter the Job Notification Number and add “Correspondence (1 or 2 or 3 as applicable)” after the Job Notification.
- Assignees: Add as per the instructions in Correspondence 1, 2 and 3 respectively based on the Correspondence you are creating.
- Received From: This is always you or the person on behalf of whom you are creating the Submittal.
- Distribution Member: Select members who should be notified of the Correspondence. Add as per the instructions in Correspondence 1, 2 and 3 respectively based on the Correspondence you are creating.
- Description: Add any notes about the job/project.
- Attachments: Click Attach Files. Select Documents in the left pane. Navigate to the correct job level (Job Notification), go to Stage 5 Folder, and Punch List subfolder in the Documents tool and select the Construction Redlines documents you uploaded in the previous steps. Click Attach and then click Next.
Note: You should first upload the PCI report to Punch List subfolder and link it to this Correspondence using the Attachments option.
- SAP Job Notification#: Put NA as this field is not applicable for the Substation process.
9. RESPONDING TO THE POST CONSTRUCTION INSPECTION CORRESPONDENCE TOOL
Receive and Review the Correspondence:
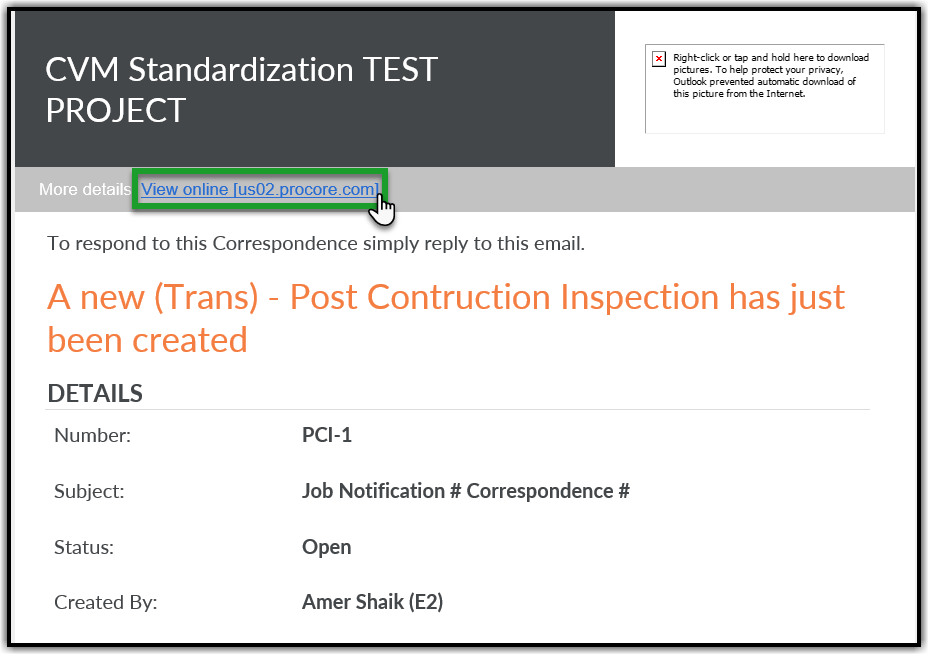
9.1. An email will arrive prompting all parties to use a link. Click View Online to open the Correspondence directly in Procore.
Note: Attachments can be viewed directly in the Email or in the Correspondence, or you can navigate to the Documents tool, then to the correct job level to review the Job package in the Stage Five – Construction under Punchlist folder.
9.2. Alternatively, instead of using the email link, Navigate to the Project Tools menu and select the Correspondence tool.
9.3. You will be on the Correspondence page. Find the right Post Construction Inspection Correspondence using the Number (PCI – 1 in the screenshot) or the Subject (Job Notification # Correspondence # in the Screenshot). Click either of these two to open. Review the information and perform the necessary actions depending on the Correspondence (1 or 2 or 3) and as outlined in Sections 4.2. to 4.4.

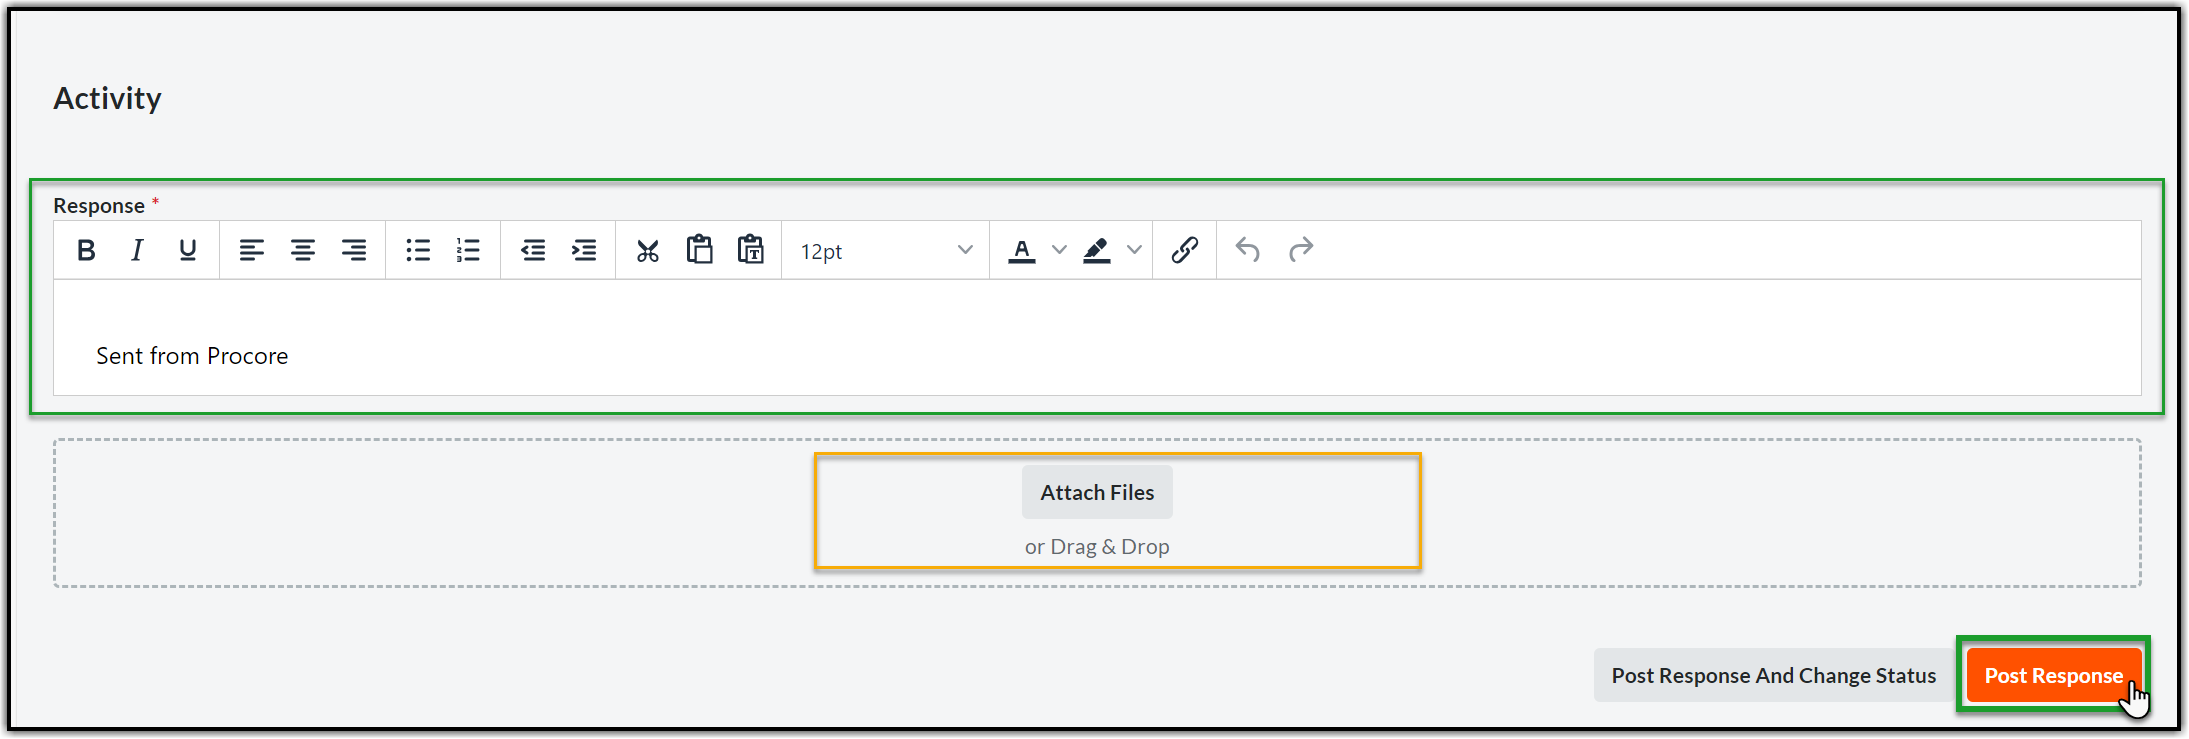
9.4. To respond, please go to the Response text area in the Activity section. Type in your response (you may also attach any documents using Attach Files option if necessary) and hit Post Response orange button on the bottom right corner.
10. CLOSING THE CONSTRUCTION REDLINES SUBMITTAL TOOL
10.1. Open the corresponding Construction Redlines Submittal via the link in email (refer section 6.1.) or by navigating to the Submittals page (refer section 6.2.). Click Close & Distribute on the Submittal. You should be on the Close & Distribute Submittal popup.

10.2. Select members who should be notified of the closing of the Submittal in To and CC fields. Check the Create revision upon close and distribution box if you wish to create a revision else leave it unchecked. Enter any closing message. Select the official response from the FCA/CM in Workflow Responses and click Distribute orange button.

Note: If you check the Create revision upon close and distribution box then you must select the official response in Workflow Responses from the FCA/CM. In this case the Distribute orange button will change to Distribute and Create Revision button.

10.3. All the members in To and CC will get notified of the distribution via email with Distribution Response and other high-level details related to the closing of the Submittal.
11. CLOSING THE POST CONSTRUCTION INSPECTION CORRESPONDENCE
11.1. Open the Correspondence and scroll down to the Activity section. Enter the closing response in the Response section and click Post Response and Change Status at the bottom right corner of the page.
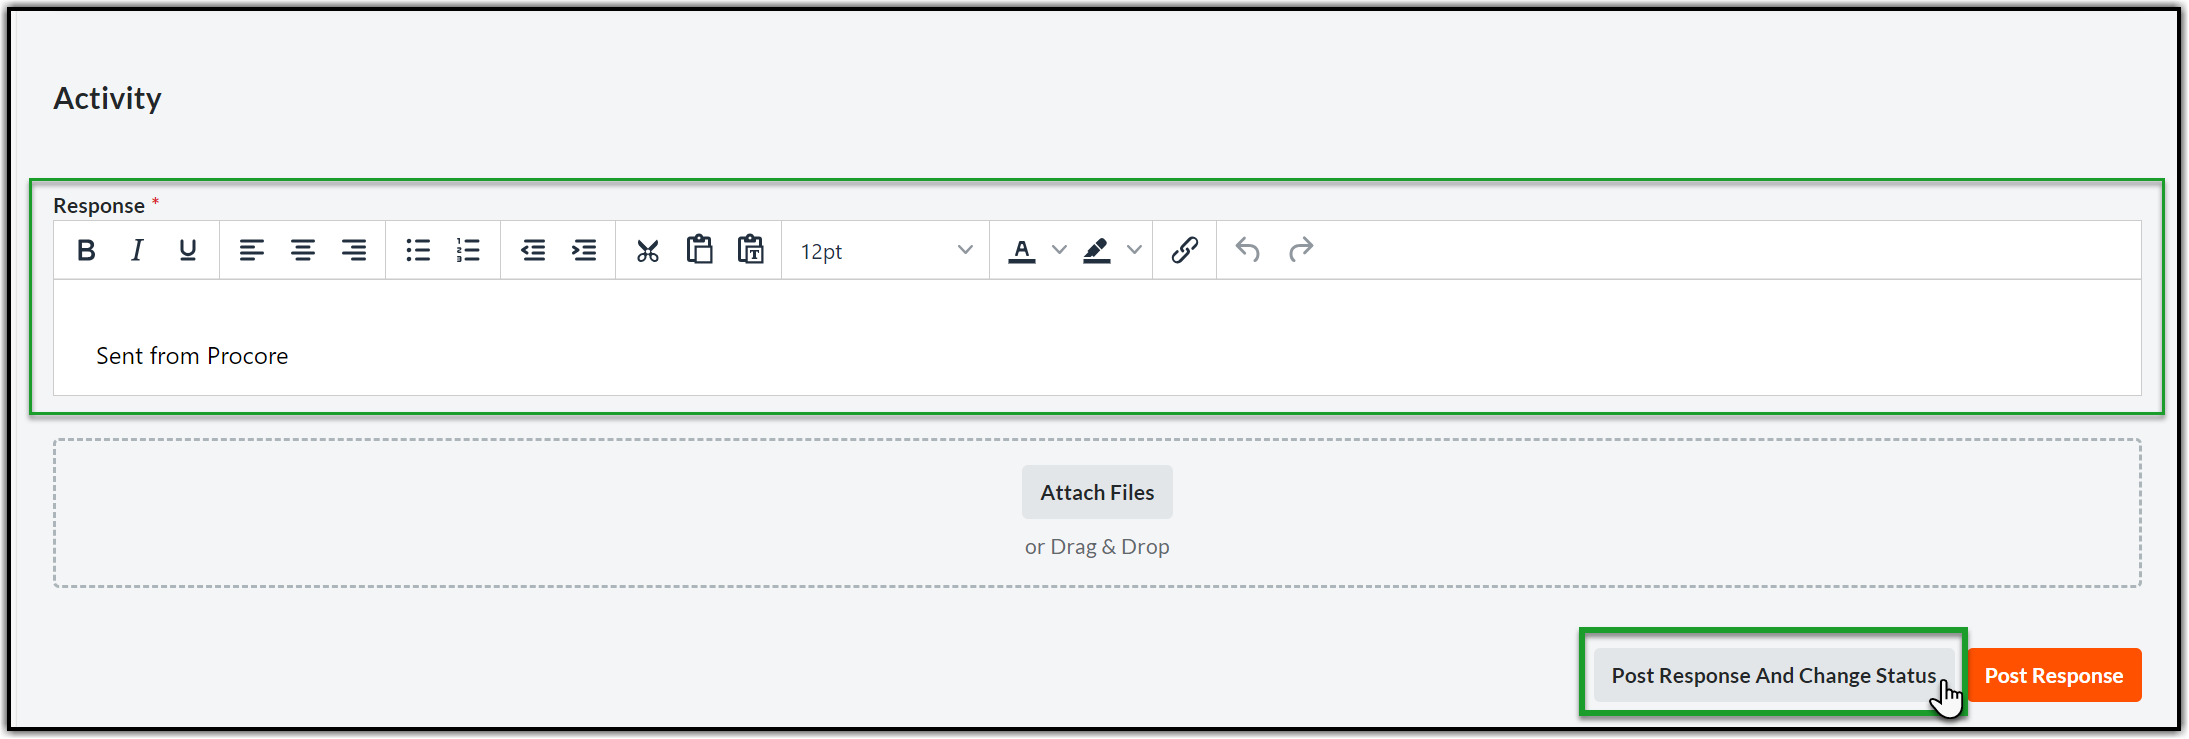
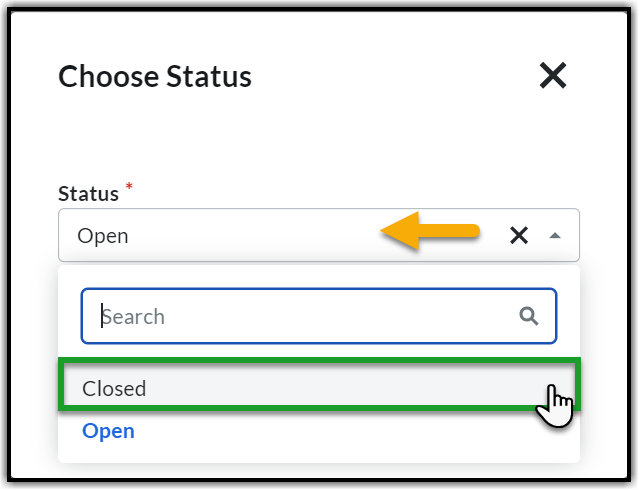
11.2. Click the Status dropdown and select Closed.
11.3. Click Save and Change Status to post the response and close the Construction Bid Evaluation Correspondence.

12. APPENDIX
JOB PACKAGE COVER LETTER/CONSTRUCTION REDLINES COVERSHEET
Please refer to this checklist when reviewing all Construction Redlines Package for either Preliminary or Final review.
Construction Vegetation Management Redline Submission:
