CVM Manual for CMS
1. THE CVM MANUAL FOR CMS
1.1. Purpose
The CVM (Construction Vegetation Management) Standardization refers to the changes made to align the CVM Processes and establish a standard. The focus of this alignment is to review and redefine processes that are specifically used in Procore during Stage 5-Construction, and Stage 6- Closeout. This user guide will help SDG&E employees with detailed instructions on utilizing Procore while implementing the end-to-end CVM Standardization Process for their projects. Each project type follows a specific process with designated project roles, in this guide, you will learn what the overall Procore process is for a project, with more detailed user guides available to review specific Project submittal processes (e.g., Fuse, Hotline/Clamps).
1.2. Definitions and Acronyms
The CVM Standardisation process involves the following terms/acronyms as defined below:
List of Abbreviations and Technical Terminology
- SDG&E: San Diego Gas & Electric
- Instance: Group within Procore based on job and project type (e.g. Gas or FiRM)
- CMS: Construction Management Specialist
- MLP: Materials Logistics Planner
- FCA: Field Construction Advisor
- CSPM: Construction Services Project Manager
- CM: Construction Manager
- SPL: Strategic Project Lead
- FUS: Field Utility Specialist
- NTP: Notice to Proceed
- FEWA: Field Extra Work Authorization
- FACT: Field Audit Collection Tool
- CPD: Construction Planning and Design module in SAP
- WO: Work Order
- DBL: Design By Location
- JTO: Joint Trench Offer
- (Step #): If located next to a Section/Sub-section heading, represents Step in the Submittal/Review Process.
1.3. Roles And Responsibilities
- CMS (Construction Management Specialist): Receive incoming IFCs and issue the NTP to the Contractor. Receive the Submittal containing the Construction Redlines and/or QAQC, create a submittal for QAQC (if applicable). Receive the Construction Redlines from FCA or CM and complete the closeout process in Procore.
- CM (Construction Manager): Help with the Contractor assignment, add notes to CVM Data – Construction Readiness Correspondence in Procore (if applicable), Review the job package documents in Construction Bid Evaluation Correspondence in Procore.
- SPL (Strategic Project Lead): Verify job packages for construction readiness using the Documents tool.
- MLP (Materials Logistics Planner) Verify job package for construction readiness using the Documents tool.
- CSPM (Construction Services Project Manager): Data verification for internal stakeholders and contractors.
- Construction Contractor: Perform the construction activities, review and accept job packages using the Correspondence (NTP), issue Field Change Notices (FCNs) and respond to Field Change Orders (FCOs), issue and respond to Project Notice Forms, submit Construction Redlines using the Submittal and Punch list (if applicable) tools.
- FCA (Field Construction Advisor): Oversee construction in the fields, note conditions through the Daily log, facilitate changes coming from the field (FCO, EPIC), and review /approve Construction As-builts.
2. BEFORE YOU BEGIN
2.1. Before beginning, all users must have an account in Procore. If you are a new user an invitation will arrive in email prompting you to set up the password.

2.2. Please follow the link in the Welcome to Procore email. This will take you to Create a Password page. Please follow the requirements while entering the password and click Set Password.

Note: If Welcome to Procore email is not received, then please check the spam folder. If the email cannot be found, then please reach out to SDG&E Procore Support at ProcoreAdmin@sdge.com to request a new account.
2.3. After setting up the password, you can access your Portfolio by going to www.procore.com and clicking on Login located in the upper right corner of the landing page. Projects assigned to you can be found here – if you have not been added to a project, please reach out to the Procore System Administrator for your instance.
Note: It is Procore’s recommendation to use Chrome, however, you can use any Chromium/Modern browser.

2.4. Enter your email address and Procore password. Check the box Remember Me then hit the Log In orange button. This will take you to the Home Page.
Note: if you are assigned to multiple Instances in Procore, then it asks you to select the Instance after logging in, otherwise it will take you to the Portfolio.

3. CONSTRUCTION MANAGEMENT SPECIALIST
3.1. Projects will originate and come to the CMS in either one of the following two methods:
3.1.1. Method 1: Internally from Procore – The Upstream Department uses Procore during the early stages of the Design and Preconstruction and have already created the Project in Procore. In this case the project already exists, and they will simply create a Submittal to officially hand off the Job package to move the project to Construction stage. They will add the CMS and then the CMS will add MLP, SPL, and CM to the Project Directory and Project Home Page. The project arrives via an IFC to CVM Submittal as an email notification from Procore.
3.1.2. Method 2: Outside of Procore – The Upstream Department does not use Procore, and they will hand off the job package to the CMS either as a softcopy package via email or through SAP. In this case, as there is no existing project in Procore the CMS will go ahead and create a new project once the package is received.
4. CVM INTAKE PROCESS
The CMS performs the following activites as a part of the job intake process:

4.1. The Construction Management Specialist (CMS) position will create new projects in Procore and/or respond to IFC to CVM submittals to start the workflow.
4.2. If the project is already within Procore, the CMS will Update the project Directory, create the CVM Data - Construction Readiness Correspondence tool, and attach the construction ready job package from the stage five folder.
4.3. If the project is not within Procore, the CMS will create the Project, create the Project Directory, upload Construction Ready Job Package Documents to the stage five folder, and create the Construction Bid Evaluation Correspondence and CVM Data Correspondence Tool item.
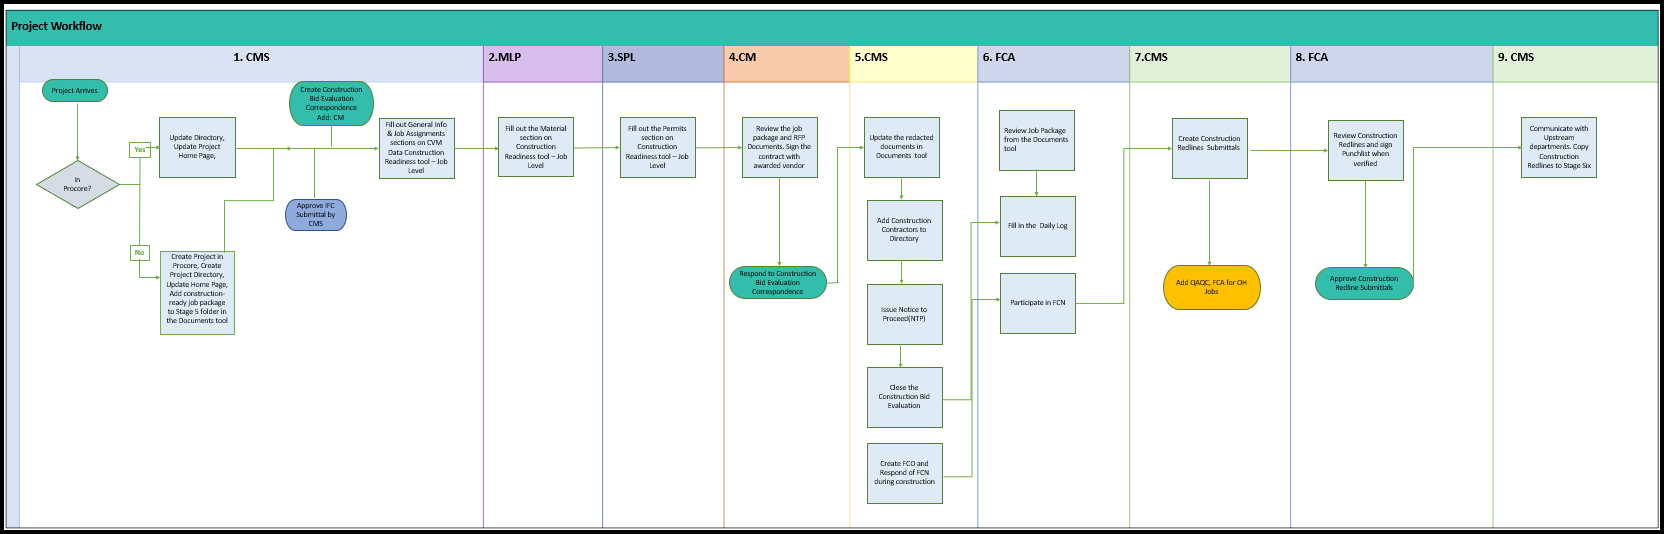
Helpful Tip: Double-click the workflow below to see the complete Project Workflow.
4.4. Before adding any new projects in Procore, run a quick search to see if the project is already in Procore.
4.5. From the Home Screen (Portfolio page), in the top left corner, type in any keyword to search, in the search field , and apply any filters that might be required. If the project already exists, then please proceed to the Project Directory section below or else create a new Project by following the instructions in Section

5. CREATING A NEW PROJECT IN PROCORE
5.1. To create a new project within Procore, login and navigate to the Procore Home Page for the desired instance (Refer Section 2 to know how to login and select the instance).
5.2. Click the + Create Project orange button on the top right of the landing page to create a new project.

5.3. A new window will open. Please complete the required fields for the project’s PROJECT INFORMATION
and PROJECT LOCATION sections utilizing the information below:
- Name: Please use the Project name from SAP – following the Global Standard Naming Convention.
- Total Value: Find in Face Sheet.
- Start Date: Should be the day the project was initiated.
- Stage: Select Stage Gate: 5 - Construction from the dropdown.
- Type: Select the appropriate Project Type from the dropdown based on the Job.
- Project Number: Input the Primary Project Identification Number based on your Business Unit (Example: SAP No. or WO).
- Description: Copy from the Job Package.
- Country: Keep the default as 'United States'.
- Time Zone: Keep thge default as (GMT-8:00) Pacific Time (US & Canada).
- Address: Enter the Project Address.
- City: Enter the Project's City (if you know the town, enter that after the City, for example, SD - Rancho Penasquitos).
- State: Select the State.
- Zip Code: Enter the Zip Code.
- Department: Enter the Name of the Project Owner Department, Record Owner.
- Program: Select the correct name (e.g., Reliability, New Business, System Hardening).
- Region: Select the appropriate region for the project.
- Budget Code: Find in TM1.
- MCU#: Find in SAP
- SAP Job Notification#: Find in SAP.
5.5. The PRE-CONSTRUCTION and CONSTRUCTION applies to Transmission and Substation and will be filled out as applicable. Once all
the applicable fields from the previous sections are filled out, click the Create Project at the bottom right of the page.
5.6. Then click the Continue Project Set Up on the bottom right corner.
Note: Once the SAP integration is active later this year, it is likely that all projects will already be created, and these steps can be skipped. If this is the case – proceed to the steps below.

6. CREATE/UPDATE PROJECT DIRECTORY
Once the project is created, select Continue to Project Set Up and it should take you to the Project Directory. This is where you can add the project team members who will need to access the project. If the project already exists, then these steps can be taken to update any missing personnel.
Note: The Directory is where all the users’ contact information is stored for project team members and vendors. From the Directory, users are invited to individual projects as project collaborators. User access is based on permission level which controls which tools they can access. The following steps will review how to add any CVM users if they are not already in the existing project directory.
6.1. Some roles that may be required: CMS, FCA, and Construction Contractors once they are awarded the job.
6.2. From the Project Tools menu on the top select Directory.

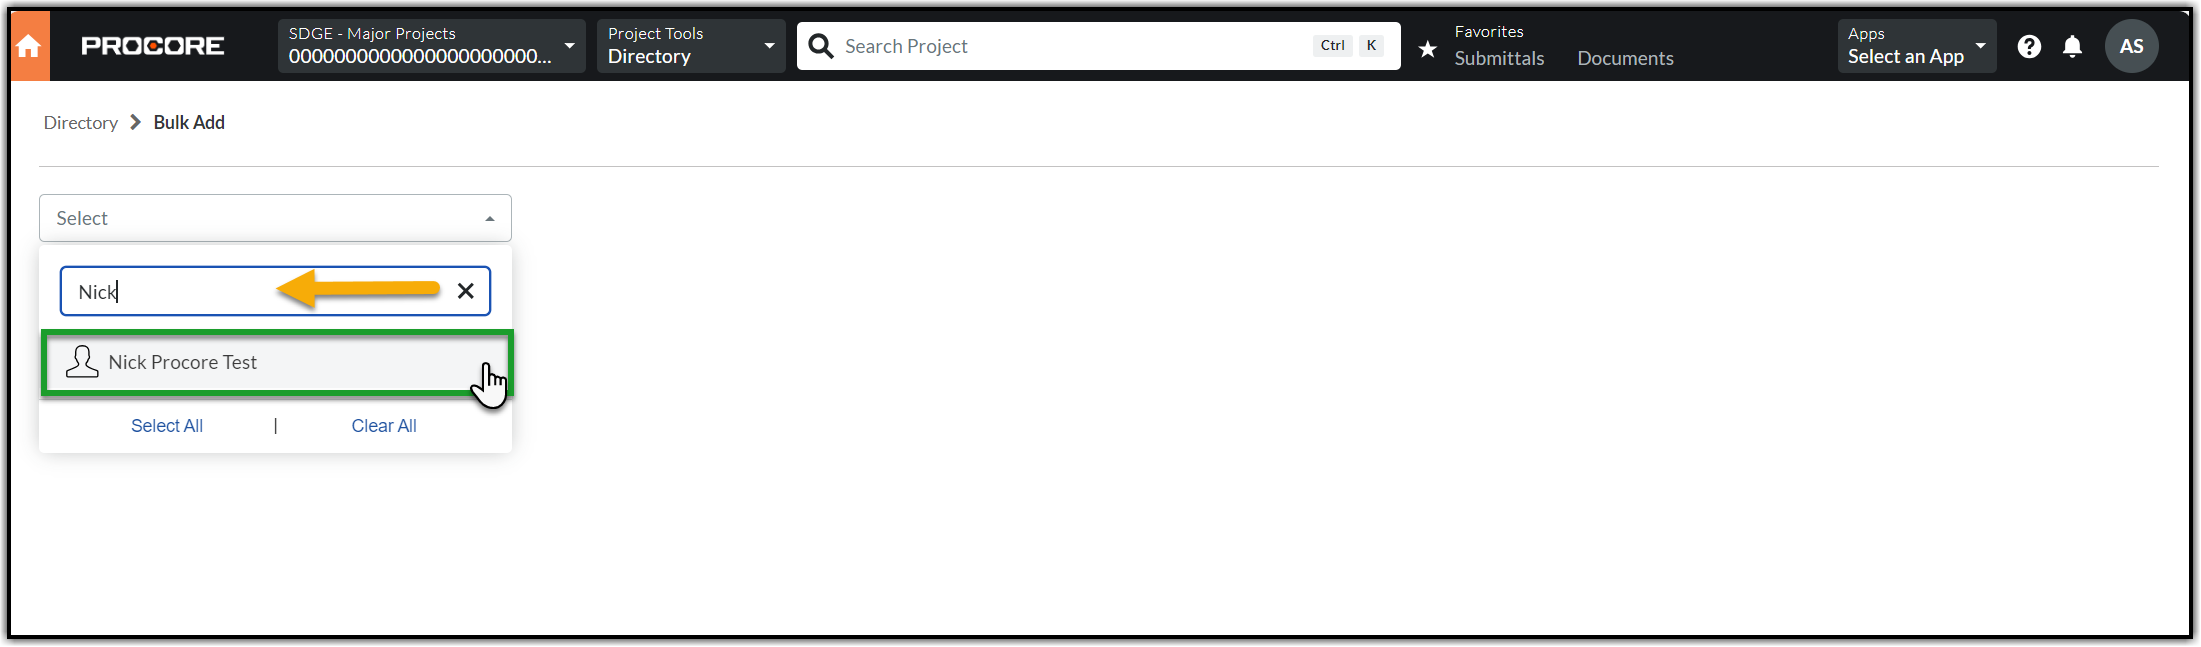
6.3. Once at the Project Directory, click +Bulk Add from Co. Directory orange button.

6.4. Click the Select dropdown, type in the Person’s name in the Search option. The name should auto populate, select it from the dropdown. If the name appears in gray instead of black, it means the user is already added to the project.
6.5. All the users should have a default project template applied at the Company level. Please only choose the template that applies to their role. If assigned template cannot be found or it’s blank, please reach out to the Procore Administrator for instance.
6.6. Select the relevant Project Role (e.g., CMS, MLP, CM, FCA, etc.). click on the Notify? Box to send an email notification that they have been added to the project. Selecting the role in this step will also add that user to the Project Home Page for that role.

6.7. After selecting the Project Role, click Add to Project.

7. ADD USERS TO HOME SCREEN
If the users in question are already added to the Project Directory, it is then important to add these users to the Project Home screen by assigning them a role. This will increase the visibility of those who are working on the job and ensure timely and effective collaboration. This is automatically accomplished in the previous steps for new users when you assign them a Project Role.
7.1. To edit the Project Team hover anywhere on the table and you should see the Edit option towards the right just above the Mobile column. Click Edit.

7.2. A new window will open where all the roles in Project Directory Settings can be seen. Add applicable users – CMS and FCA are required; CM, MLP, and SPL are optional; by selecting from the drop downs and hit the back button.

8. UPLOADING DOCUMENTS IN THE DOCUMENTS TOOL
Once a project is created in Procore, you will now be able to upload all project-related documents into the Documents tool section of the project.
8.1. Confirm that the Job Package does not contain any Financial Information (DBL and Face sheet) and is Construction Ready before it is uploaded/moved to the Stage 5 – Construction folder.
8.2. Gather all relevant project documents and prepare to upload them into Procore in Construction Package subfolder under Stage 5 – Construction folder. Files can be transferred from an encrypted USB stick, scanned onto your computer, or save from a softcopy from email or SAP onto your desktop for uploading.
8.3. From the top menu bar, click the Project Tools dropdown and select Documents tool.

Note: Please do not upload Zip files, use PDFs.
8.4. If there are multiple Job Notifications or Job Levels (One-to-Many Project Structure) then go to the appropriate level and click Stage 5 – Construction folder, then click the appropriate subfolder. All folder/subfolder structures should carry down from the project template when the project is created. Please follow the structure for that designated program – some will be in a one to one structure and some will be in one to many.
8.5. Upload to the Stage 5 – Construction folder. Add only Construction Ready Job Package to the Construction Package sub-folder. Click +New then select File Upload. Next, Attach file(s). Alternatively, you can also use drag and drop feature to upload the files.
Note: Ensure that all financial information was already removed/redacted from the DBL and Face sheet when the Job Package was provided to CVM.

9. MANAGING THE PERMISSIONS FOR FOLDERS, SUB-FOLDERS, AND FILES IN THE DOCUMENTS TOOL
Ensure that the Contractors and others have restricted access to only those folders and files that are allowed to be viewed.
Note: By default, all the folders in each job level except the Stage 5 – Construction folder will be locked. This Stage 5 folder remains accessible to the project team including the Contractors.
Note: The permission levels of the top-tier folder will override the permissions of individual subfolders and files within. For instance, if there is a locked folder with a locked subfolder, granting user access to this subfolder without granting access to the top-tier folder will result in user not being able to access the subfolder. In this case the subfolder is inheriting the permissions of the top-tier folder and as the user does not have permissions to the top-tier folder the subfolder will not be visible or accessible.
9.1. To lock any subfolder or give access to a subfolder, select the subfolder, and click the ‘i’ (info) icon next to the Email icon on the top right corner of the page (In the screenshot the Stage 5 Construction folder is expanded and then the Field Change subfolder is selected).

9.2. You should see a new pane with the General Information section. Click Permissions and check the Make Private box to lock.

9.3. This will lock the subfolder and the files within the subfolder as indicated with the lock icon in the screenshot below. You should also see the Make Private box checked with a blue check mark. Click Manage Permissions beneath the Make Private option.

Note: The locked/private folders are only visible to members who have access.
9.4. You will be on the Manage Permissions pop up window. Select the members to who should gain access to the folder. Enter the name in the Search area and select the member from the auto populated results by checking the box before the name.

10. CREATING THE CONSTRUCTION BID EVALUATION CORRESPONDENCE
The construction bid Evaluation is a CVM specific Correspondence created to keep all information in one place and to limit its visibility to the internal CVM team during the bid event. This is generally created once the job is confirmed to be a Quick Bid.
This new Correspondence will streamline activities under the CMS. These activities include managing the Quick Bid process (separately) and coordinating with the CM for reviewing the RFP documents and getting feedback in the process of awarding the contract to the appropriate Contractor.
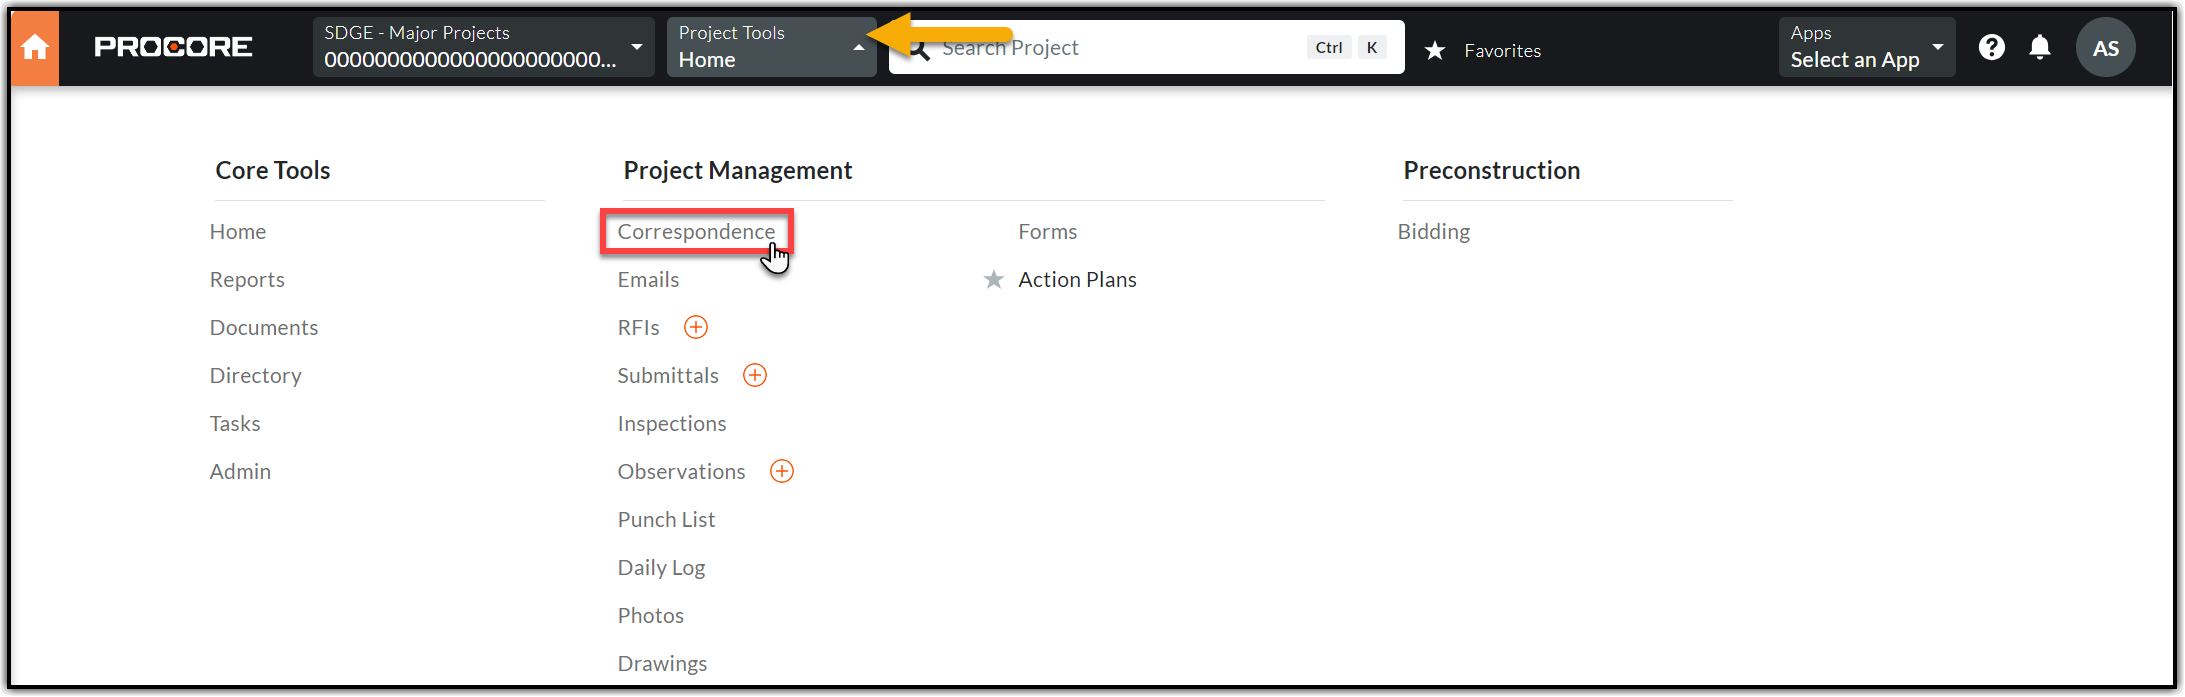
10.1. Navigation to Construction Bid Evaluation - Navigate to Project Tools from the top menu and select Correspondence tool.

10.2. Click +Create in the orange box on the top right corner and select (Global) – Construction Bid Evaluation.

10.3. Please fill out the following fields in the General Information section using the below details and click Create & Issue.

- Status: Keep the default status - ‘Open’.
- Subject: Enter the Job Package title.
- Assignees: Add the Construction Manager.
- Received From: Select your name or the requestor’s name if you are creating this form on someone else’s behalf.
- Distribution Member: Add those who may need to be notified of this correspondence.
- Trades: Choose the work based on your job (Civil or Electric or SCADA)
- Description: Enter any special notes related to job or the RFP documents.
- Attachments: Attach the RFP documents when the Contractors respond to the bid. Click Attach Files, select the Documents tool from Project Tools, expand the Job Notification then select the RFP subfolder.
- SAP Job Notification#: Find in Job Package or SAP created by the upstream department.
- Assigned FCA(s): Find in CVM Construction Contractor Smartsheet
- Construction Company: Select the winning contractor's company name from the dropdown after the decision is made.
- Work Order#: Find in Job Package or SAP
- Due Date: Give 5 business days for Distribution and 7 business days for Transmission.
Note: The overall Construction Bid Evaluation process is essentially aligned for both Distribution and Transmission. However, one of the differences is the lead time given to the Construction Manager to review and provide feedback. Distribution gives 5 business days and Transmission gives 7 business days.
Note: For DPM Franchise work, additionally, you should send email notification to upstream department on the awarded Contractor information. DPM will provide any additional information that will impact the NTP.
10.4. Create the Bid in Bidding tool by following the Quick Bid process.
Note: Please refer the Quick Bid process in the Training Center in case you are not familiar.
Reference: SDGE Training Center > Electric > Bidding Tool
11. CLOSING THE CONSTRUCTION BID EVALUATION - CMS
After the bidding event in Procore's Bidding tool finalizes proceed to close the internal Construction Bid Evaluation correspondence before issuing the Notice to Proceed to the winning Contractor via the Notice to Proceed correspondence.
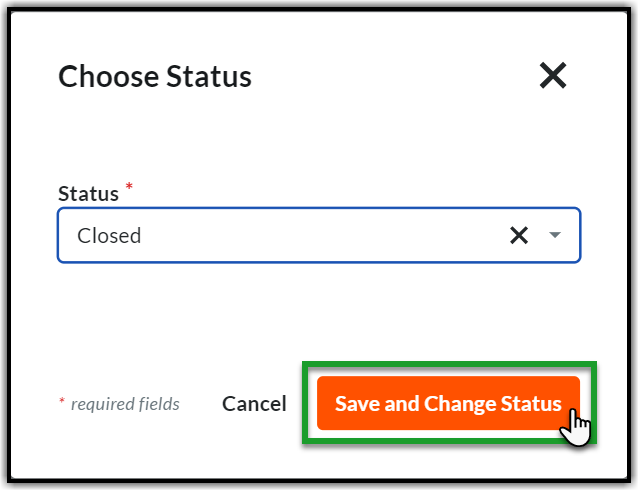
11.1. Open the Correspondence and scroll down to the Activity section. Enter the closing response in the Response section and click Post Response and Change Status at the bottom right corner of the page.

11.2. Click the Status dropdown and select Closed.
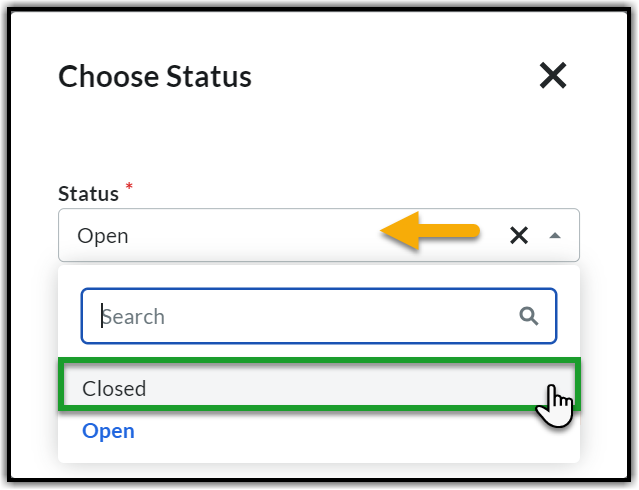
11.3. Click Save and Change Status to post the response and close the Construction Bid Evaluation Correspondence.
12. REVIEW DOCUMENTS
By now the Project is in Procore, the documents are uploaded (if needed), and Construction Bid Evaluation is created to get feedback on the job package and
to finalize the Contractor. At this point you should review the documents, create and complete the necessary fields in the CVM Data - Construction Readiness tool for constructability review and approve the IFC to CVM Submittal. 12.1. Navigate to the Documents tool and verify the documents are located where they should be in Stage 5 – Construction folder and confirm they include all the required information for a Construction Job Package. 12.2. You may also need to review the full job package with financial information, which will be in the folder for the previous stage gates. These should also be linked directly to the IFC to CVM Submittal as well.
12.3. If there are missing items, look in the Stage 4 folder. However, if you still can’t find them then mark the IFC to CVM Submittal as ‘Revise and Resubmit’. This will require the Upstream Department to resubmit the Job Package with missing item / document.
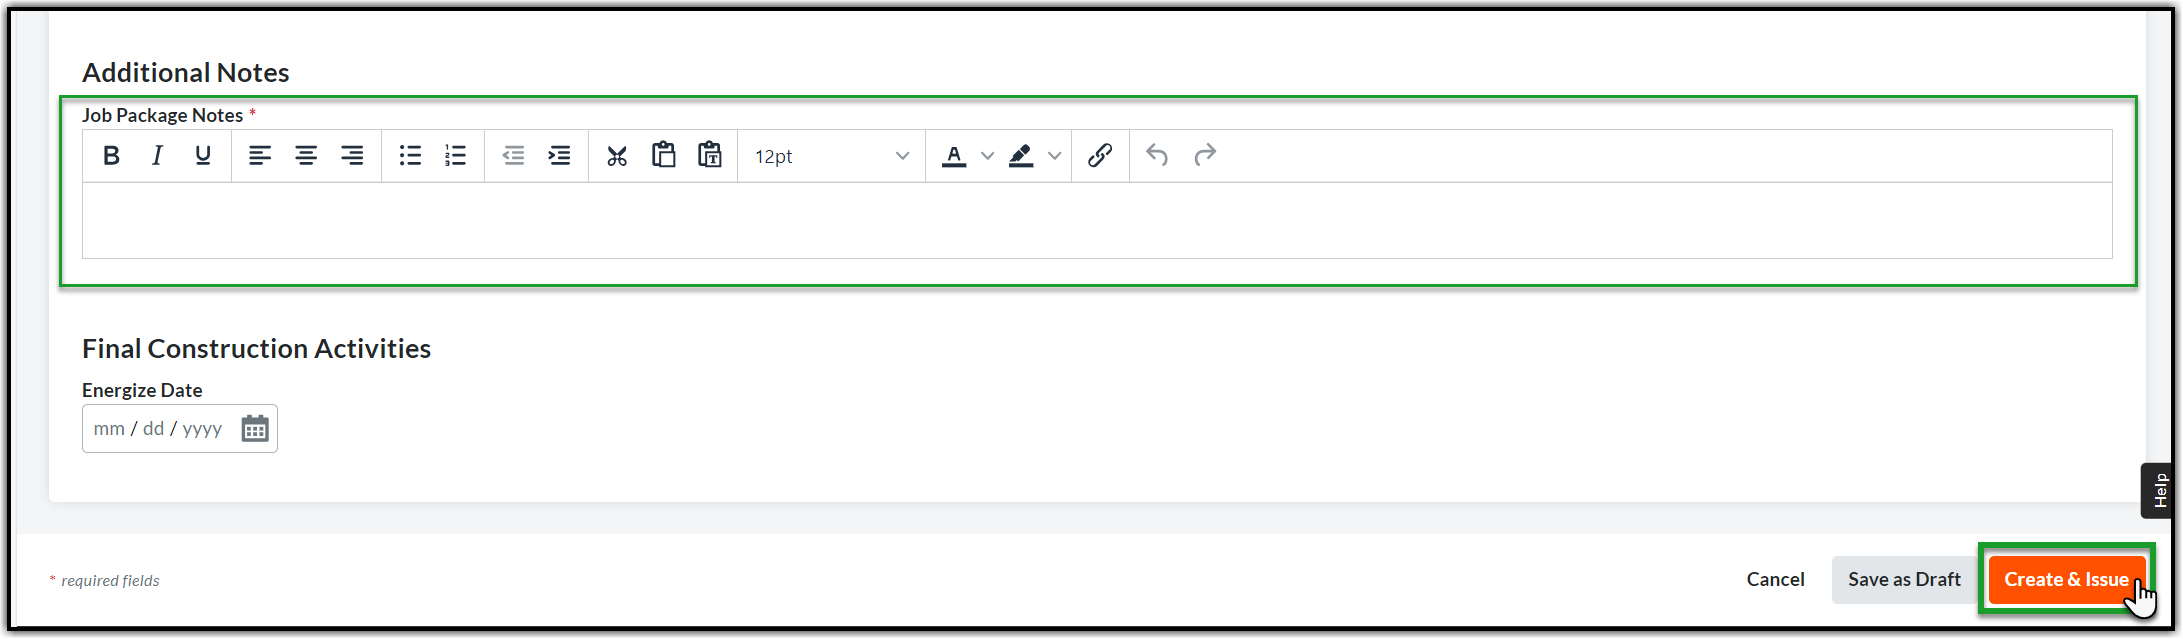
13. CREATING THE CVM DATA - CONSTRUCTION READINESS TOOL
The CVM Data - Construction Readiness is a custom tool created for SDG&E to provide construction updates, permit information, milestone dates, and overall construction project information that is not captured in the Procore “Out of the Box tools. There will need to be one for each Job Level for the project (Civil, Electrical, multi-scope, etc.). 13.1. Navigate to Project Tools from the top menu and select Correspondence tool.

Note: Create a new CVM. Data – Construction Readiness for all work types within a project (Civil, Electric, UG, etc.), and all job levels if applicable.
- Status: Keep the default as 'Open'.
- Subject: Enter the Job Package Title and Job Number.
- Distribution Member: This is optional. Add anyone who can contribute or for visibility. You may add the CM, the FCA, the MLP, the SPL and anyone from upstream department who need to see.
- Origin Correspondence: Select from the dropdown (if applicable).
- Origin RFI: Select from the dropdown (if applicable).
- Attachments: Attach the Job Package from the Documents tool.
Note: The Permits, Materials, and Crew Information sections will be filled out later by other stakeholder in the project.
13.4. Fill out the Job Assignment section by utilizing the information below.
- Construction Manager: Find in CVM Contstruction Contractor Smartsheet.
- FCA: Find in CVM Contstruction Contractor Smartsheet.
- PO#: Find in Job Package or SAP (created by the upstream department).
- Must Finish by Date: Date for completion.If the Must Finish by Date is no longer feasible, the Strategic Project Lead can review with the Job Owner/ Project Manager and update the Must Finish by Date in the Job Level section of the CMV Data - Construction Readiness Tool.
- Construction Contractor Company: Select the winning contractor's company name from the dropdown after the job is awarded (should be done later).
14. RESPONDING TO THE IFC TO CVM SUBMITTAL - CMS
Once the Upstream Department creates and issues the Job Package via IFC to CVM Submittal the ball will be in your court waiting for your approval. You should review the Job Package and ensure that it includes all the project documents (listed in the table below) as a part of the ‘Construction Ready Job Package’ before approving. If it does and there is no other information needed, then you can accept/approve IFC to CVM Submittal or mark it as ‘Revise and Resubmit to send it back to the Upstream Department with your review comments.| S.no | Job Package Documents |
|---|---|
| 1 | Face Sheet (remove financial information) |
| 2 | DBL (remove financial information) |
| 3 | Environment Release or Quick Release |
| 4 | Material List or JTO Material List |
| 5 | Tie Line Map and/or Transmission Circuit Map |
| 6 | Alignment Map or Construction Plan |
| 7 | Pole Data Sheet and/or Pole Loading Calculation |
| 8 | Plan and Profile |
| 9 | Fielding Photos |
| 10 | Permits |
| 11 | Fusing Request |
| 12 | Sketches |
| 13 | Traffic Control Plan |
| 14 | JTO |
| 15 | City of SD MOU Requirement Checklist (only applicable for City of San Diego jobs) |
Table: List of Job Package Documents
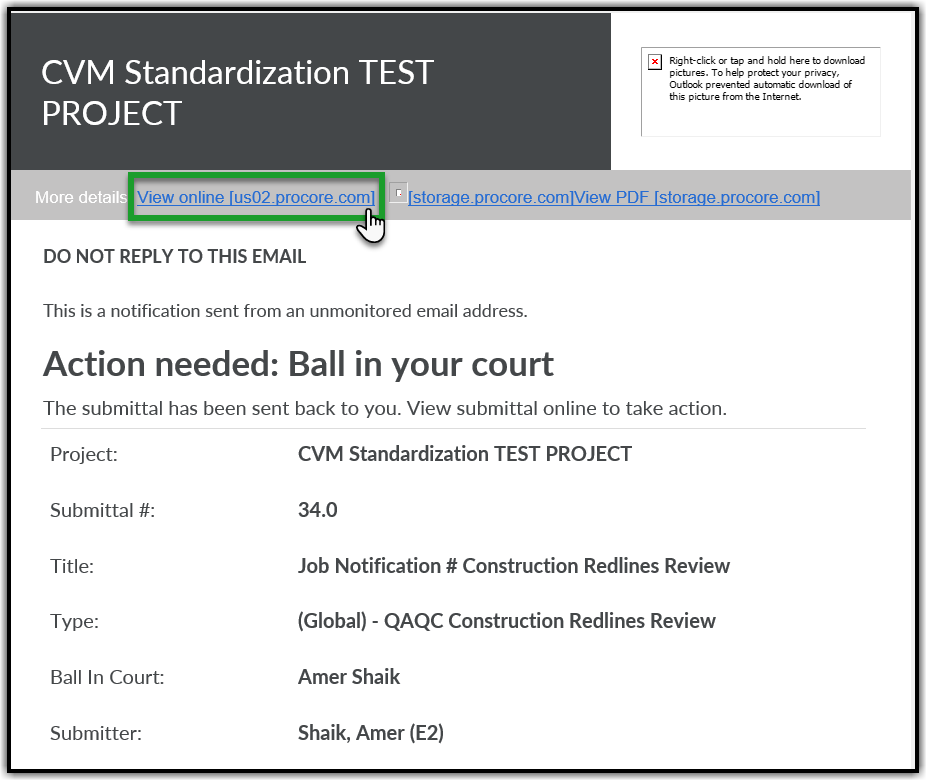
14.1. An email will arrive prompting you to use a link. Click View Online to open the Submittal directly.

 14.4. The yellow banner indicates that the Ball is in your court. Review the Job Package submitted by the Upstream Department and click Respond orange button on the right side of the page to provide appropriate response.
 14.5. A popup window will appear. Click Attach Files (if applicable) or skip this step and the next step (14.5 to 14.6) and click Next.

14.6. You will be in the Respond window. Choose an appropriate response. Enter any special notes for the Contractor related to the documents in the Comments section (if any). Click Preview.


15. COMPLETE THE CVM DATA CONSTRUCTION READINESS - CMS
There are multiple stakeholders involved in completing the Construction Evaluation and the Construction Readiness Tool. Each stakeholder who is not a CMS will have to proceed through the following steps.
There are multiple stakeholders involved in completing the Construction Readiness tool. Each stakeholder will have to proceed through the following steps.
15.1. Navigate to the CVM Data – Construction Readiness tool. If there are multiple job levels click Edit to open the correct one.
15.2. The CMS should complete the Permits section in CVM Data – Construction Readiness.

- Environmental Release: Select the status from the dropdown - Yes,No,NA, Quick Release.
- All Permits Included: Select the type of Permits from the dropdown (you can select multiple).
- Permit Notes: List all details or information needed for any applicable permits.
15.3. The Crew Information section is filled in once the job is awarded. Click Save.

Note: Please refer to the documentation on the Bidding process available in the SDGE Procore Training Center.
- Engineering Estimates: Refers to the value in dollars estimated by the project team or Construction team prior awarding the job.
- Award Amount: Refers to the value in dollars the was established after the Bid Event or awarded cost to the vendor.

16. ISSUE THE JOB TO CONTRACTOR THROUGH NOTICE TO PROCEED– CMS
The following are the activities to be performed while issuing the Job to the Contractor.
16.1. All these activities except issuing Notice to Proceed are explained in previous sections. Therefore, in this section we will focus on how to create and issue the Notice to Proceed (NTP) Correspondence to the Contractor.
Note: The CMS timeframe is 10 DAYS for closing the IFC Submittal and creating the NTP Correspondence.
To do this follow the steps below:
16.2. Navigate to the Project Tools from the top menu and select Correspondence tool.
16.3. Click +Create in the orange box on the top right corner and select (Global) – Notice to Proceed.

16.4. Please fill out the following fields in the General Information section using the below details.

- Status: Keep the default status - ‘Open’.
- Subject: Enter the Job Notification title.
- Assignees: Add the Construction Contractor who is awarded with job.
- Distribution Member: Add those who need to be notified by this correspondence – Include the MLP, the CM, the CSPM, the FCA, and anyone from upstream departments (if applicable).
- Trades: Choose the work based on your job (Civil or Electric or SCADA).
- Description: Enter all the pertinent information that the contractor needs to know including but not limited to permit details, material information, city requirements and any other important notes from the job package.
- Attachments: Attach the Construction Ready Job Package. Click Attach Files, select the Documents tool from Project Tools, expand the Job Notification then expand the Stage Five folder followed by Construction Package subfolder.
- SAP Job Notification#: Find this number in the job package or in SAP.
16.5. Please fill out the following fields in the Notice to Proceed section using the below details. Click Create and Issue on the bottom right of your screen after filling in the information.

- Assigned FCA(s): Select the FCAs assigned to this job level.
- Construction Company: Company to which the work is awarded or assigned.
- PO#: Purchase Order number is found within the job package or in SAP.
- Must Finish by Date: Should be typically eight weeks from IFC completion date, verify the documentation to confirm.
- Permit Expiration Date: Find this date in the Permit document.
- Work Order#: Find this number in SAP.
- Materials Status: Find this information in ‘CVM Data - Construction Readiness’ tool.
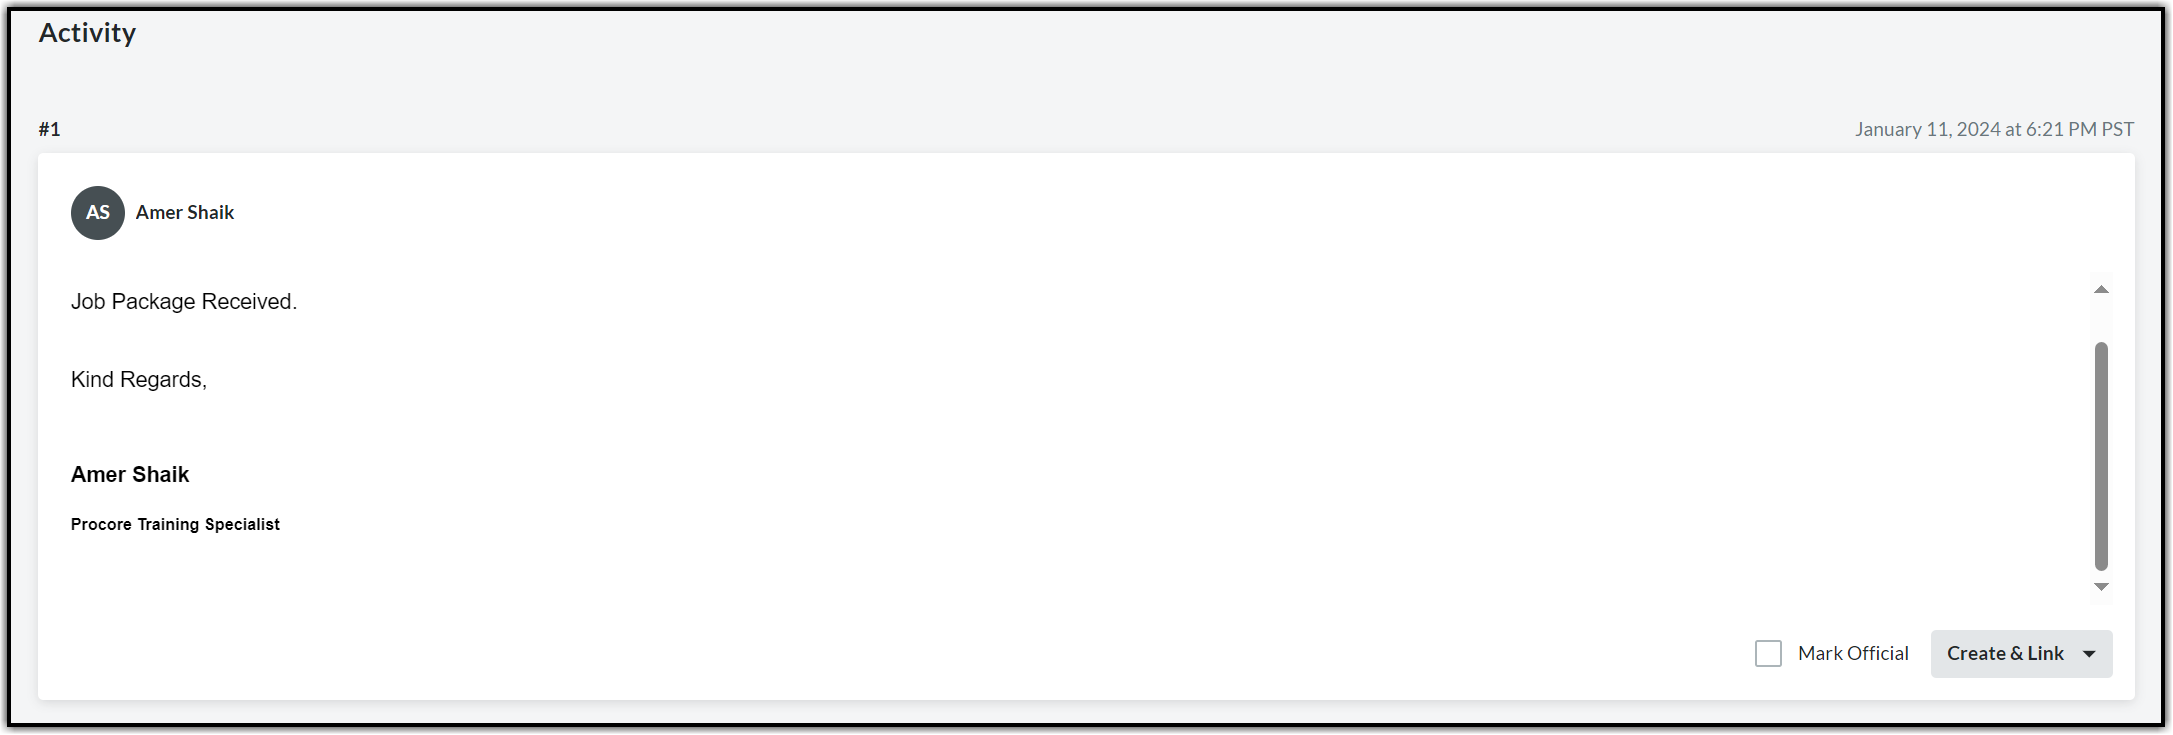
16.7. Open the Correspondence and scroll down to the Activity section. Enter the closing response in the Response section and click Post Response and Change Status at the bottom right corner of the page.
16.8. Click the Status dropdown and select Closed.

16.9. Click Save and Change Status to post the response and close the Notice to Proceed Correspondence.

17. CREATING AND CLOSING THE FIELD CHANGE ORDER
This is a new form (Correspondence type) that represents officially agreed upon field changes from the engineers to the contractors. If there is still a question about a potential change that needs review then that can go through the RFI tool as usual, however, once the change itself has been agreed upon, either in the RFI or in the field, then this form will have to be created for official project record.
FCN will be created by Construction Contractors for Engineers
FCO will be initiated by Engineering Team/Project management/ Construction Management for Construction Contractors
Note: EPICS (used by Transmission) will also fall under the FCO form.
Note: Depending on when the EPIC/FCO occurs during the project lifecycle there will be following variations to the process:
- If an EPIC/FCO occurs during the construction or before giving the Final Construction Redlines (As-Builts) to the Engineering team for review – only an FCO form will be used.
- If an EPIC/FCO occurs post-construction or during the review of Final Construction Redlines (As-Builts) by engineering groups – a new work order needs to be issued, which will in turn result in issuing an NTP and will be considered as a new project scope.
- If an EPIC/FCO occurs during the job walk or RFP process – It is a rev up (from REV0 to REV1) to the IFC package, and not to be issued as an EPIC/FCO.
- It is possible that if an upstream department also uses Procore that they may issue a new NTP directly to the contractor.
17.1. Click Project Tools from the Project Home page and select Correspondence from the drop-down menu.

17.2. From the Correspondence page, click the orange +Create button and select (Global) – Field Change Order Form.

17.3. Complete all the required fields (marked with an asterisk) using the below information and then click Create & Issue at the bottom right.

- Status: Keep the default - “Open”.
- Subject: Give the Job Package Number and add a title to describe the change in very few words.
- Assignees: Select the Contractor, Project Manager, CMS, FCA, and RFI Manager (if applicable).
- Received From: Should always be you - the sender (SDG&E).
- Distribution Member: Select anyone else who may want to be notified of this form.
- Origin RFI: If this conversation originated in an RFI, please reference that here.
- Description: Describe the change to be made in as much detail as possible, specify where in the job package, mention if it affects specifications, or materials.
- Attachments: Add photos and/or documentation representing the agreed change, including any markups/redlines. These should all be uploaded in the Documents tool in the Stage Five – Field Changes subfolder and linked over here.
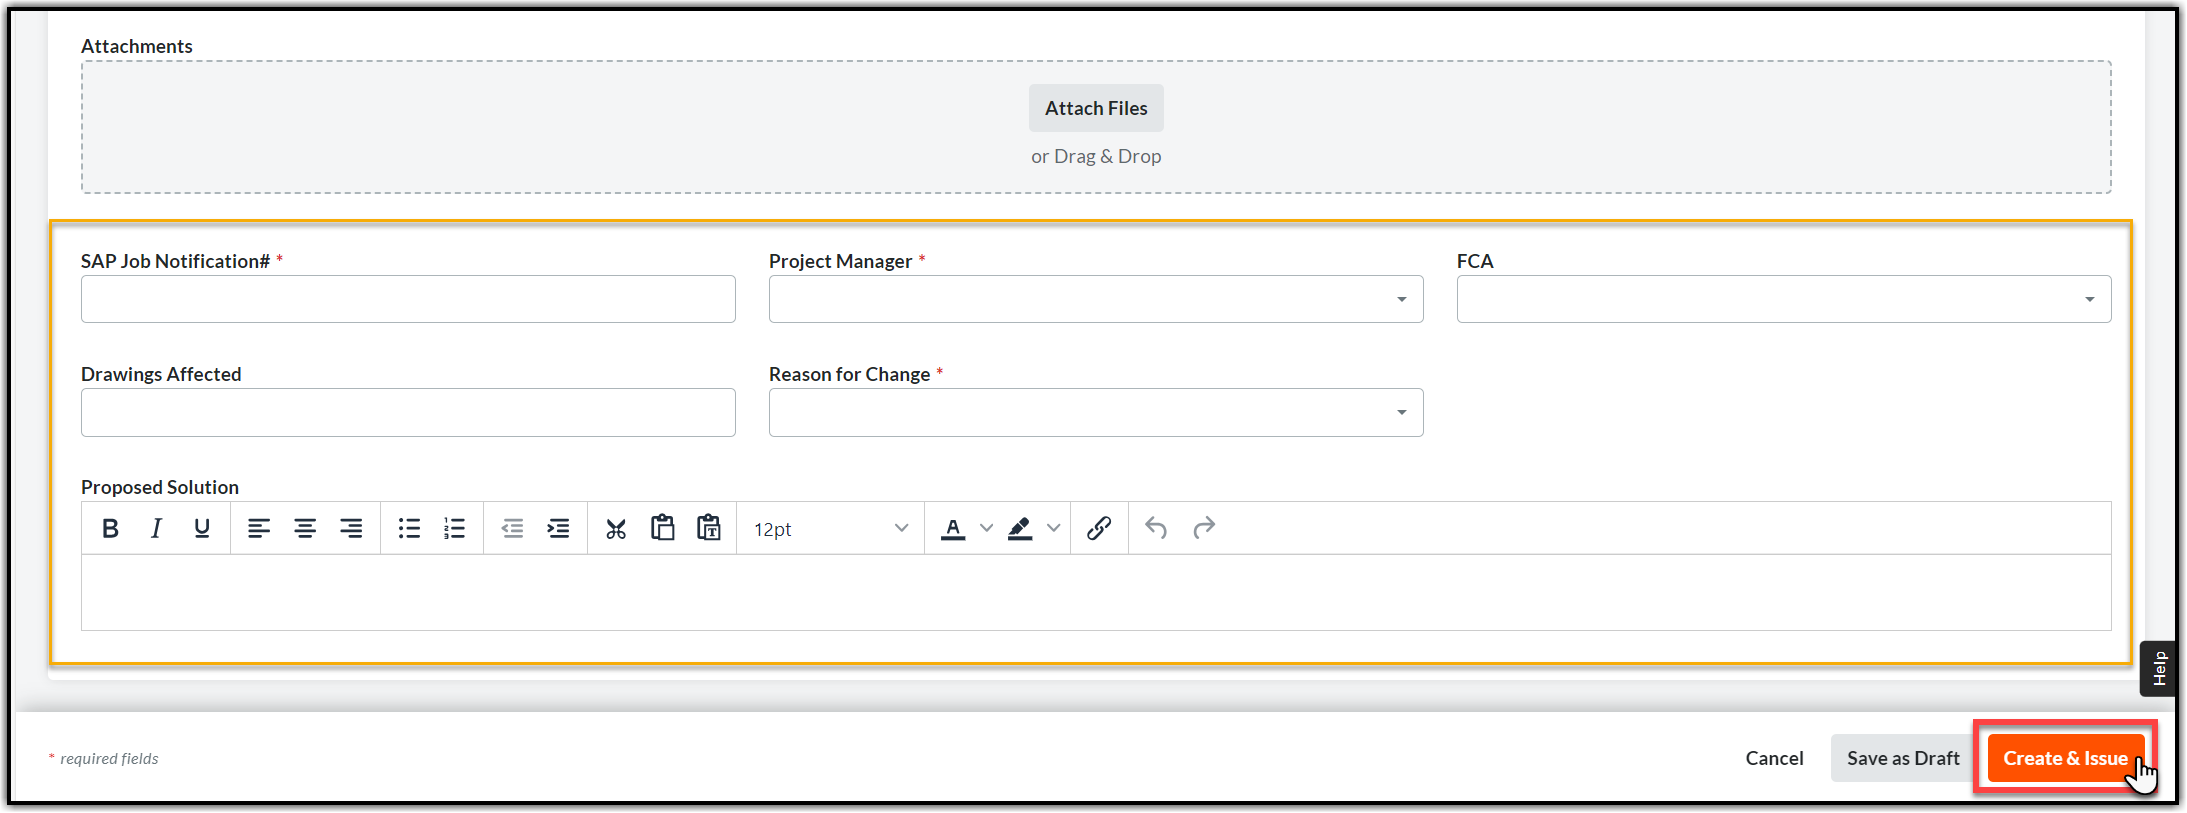
- SAP Job Notification #: The number is located in the job package and SAP.
- Project Manager: Choose from the drop-down
- Drawings Effected: if the change has an impact on drawings or sheets from the Job package (add drawing code/number/title)
- Reason For Change: Choose from the drop-down
- Proposed Solution: Please be descriptive in the decision that was made about proposed solution for the change.

17.4. The creator, assignees, and those on the distribution list will receive email notifications that a new form has been created.
17.5. After all the responses have been provided, as applicable, it is time to close the Field Change Order. Follow the instructions in Section 16.7. to 16.9.
18. RESPONDING TO AND CLOSING THE FIELD CHANGE NOTICE- CMS
This is a new form (Correspondence type) that represents officially agreed upon field changes from the Construction Contractor to the project team. If there is still a question about a potential change that needs review then that can go through the RFI tool as usual, however, once the change itself has been agreed upon, either in the RFI or in the field, then this form will have to be created for official project record. If the change is large enough to have effected design, then the FCN will follow with “IFC to CVM” submittal and “NTP”.1.
FCN (Field Change Notice) will be created by Construction Contractors for Engineers.
FCO (Field Change Order) will be initiated by the Engineering team/ Construction Management for Construction Contractors.
18.1. Option 1: When a new FCN Correspondence is created and issued, an email will arrive prompting you to use a link and open the FCN. Click View Online to open Procore - you will be in the Correspondence area for the project.

18.2. Option 2: Navigate to the Project Tools menu, and the Correspondence tool, choose the corresponding Global Field Change Notice (You can find the correspondence item by its number).

18.3. Add response in Procore in Activity section, you can add your response and attach documents (if needed) using the Attach Files option.
18.4. Responses will be cataloged in a numbered order in same FCN if the status of the form is open. The below screenshot is captured after entering the first response (indicated with an arrow).
Note: All FEWAs will take place in Smartsheet and are not outlined in this manual.
18.5. If the FCN requires engineering change to be made, there will be a new IFC to CVM Submittal issued. Follow the steps outline in Section 15
18.6. After all the responses have been provided, as applicable, it is time to close the Field Change Order. Follow the instructions in Section 17.7. to 17.9.19. CLOSING OUT A PROJECT - CMS
CONSTRUCTION REDLINES REVIEW PROCESS
19.1. The CMS is responsible for closing out a job by coordinating with all the stakeholders involved. 19.2. Once the job is energized, the CMS will create Construction Redlines Submittal workflow for the Contractor to submit Construction Redlines Package for review. The process varies based on the type of work being performed and the duration of this according to the MSAs also differs for Overhead work and Underground work, please refer to the MSA in question when creating each Submittal. Note: The Construction Redlines Review process varies for each of Distribution, Transmission and Substation instances. Please refer to the Appendix section to know about each variation in detail. In this section we will only focus on the common processes and the tools used.19.3. From Project Tools in the top menu bar, select Submittals.
19.4. Click +Create orange box on the top right corner and select Submittal.

19.5. Complete the required fields in the General Information section using the information below.

- Title: Enter the Job Notification Number and add “Construction Redlines Review” after the Job Notification.
- Submittal Type: Select the appropriate Submittal type from the drop-down based on the type of work.
- Responsible Contractor: Select the primary contact of the Construction Contractor.
- Received From: This is always you or the person on behalf of whom you are creating the Submittal.
- Submittal Manager: This should be you. The Submittal Manager will be responsible for closing the Submittal.
- Status: Keep the default as ‘Open’.
- Distribution List: Select members who should be notified of the Submittal (Optional).
- Description: Add any notes for the Contractor. You can also mention if there is any specific information or additional documents that you are expecting as a part of the Construction Redlines package.
- SAP Job Notification#: Find this number in the job package or in SAP.
- Trade: Please select from Civil, Electric or Scada based on the job.
19.6. Refer the tables in Section 3 and create a multi-step workflow under the Submittal Workflow section based on the Submittal type. In Step 1 select the primary contact of the Contractor company. Change the default Role from ‘Approver’ to Submitter.

19.7. Add more steps as per the guideline of workflow (Appendix) based on the Submittal type. Keep the default Role as ‘Approver’ in all the steps. Click the Create and Send Emails orange button.
Note: Some Procore instances use Submittal Templates – you do not have to fully create the workflow if this is the case. Choose the correct Submittal template and add the users needed to proceed.

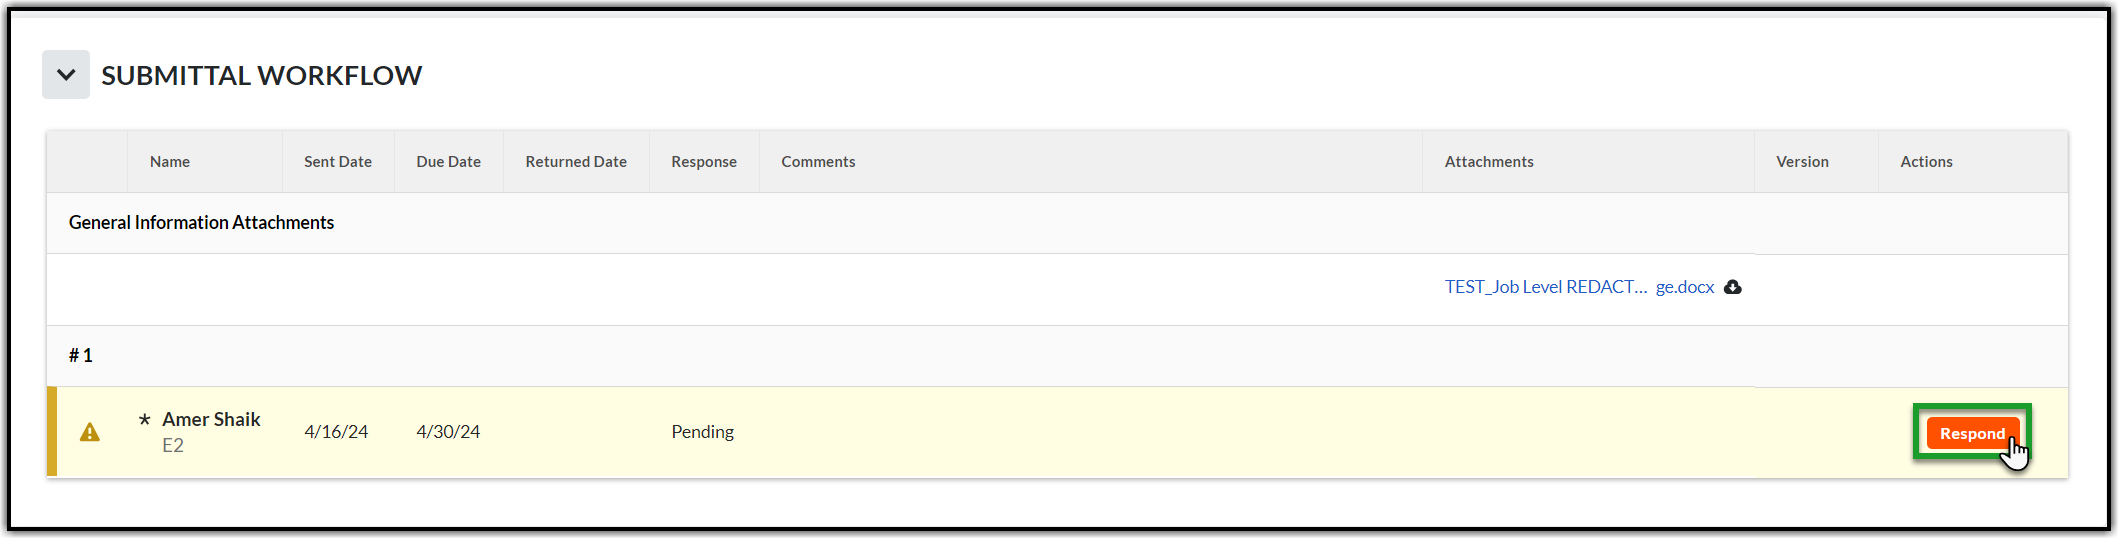
19.8. Responding to the Submittal - As an Approver
Responding to the Submittal as an approver will move the workflow towards completion. There must be one Submittal for each Job Level and each work type. The packages will not be combined. Each Submittal will arrive via email notification with a link to the project and the Submittal.
19.8.1. An email will arrive prompting you to use a link. Click View Online to open the Submittal directly.
19.8.2. Alternatively, instead of using the email link, Navigate to the Project Tools menu and select the Submittals tool.
19.8.3. Choose the corresponding Submittal (You can find the Submittal item by its Number provided in email) and click View to open the Submittal.

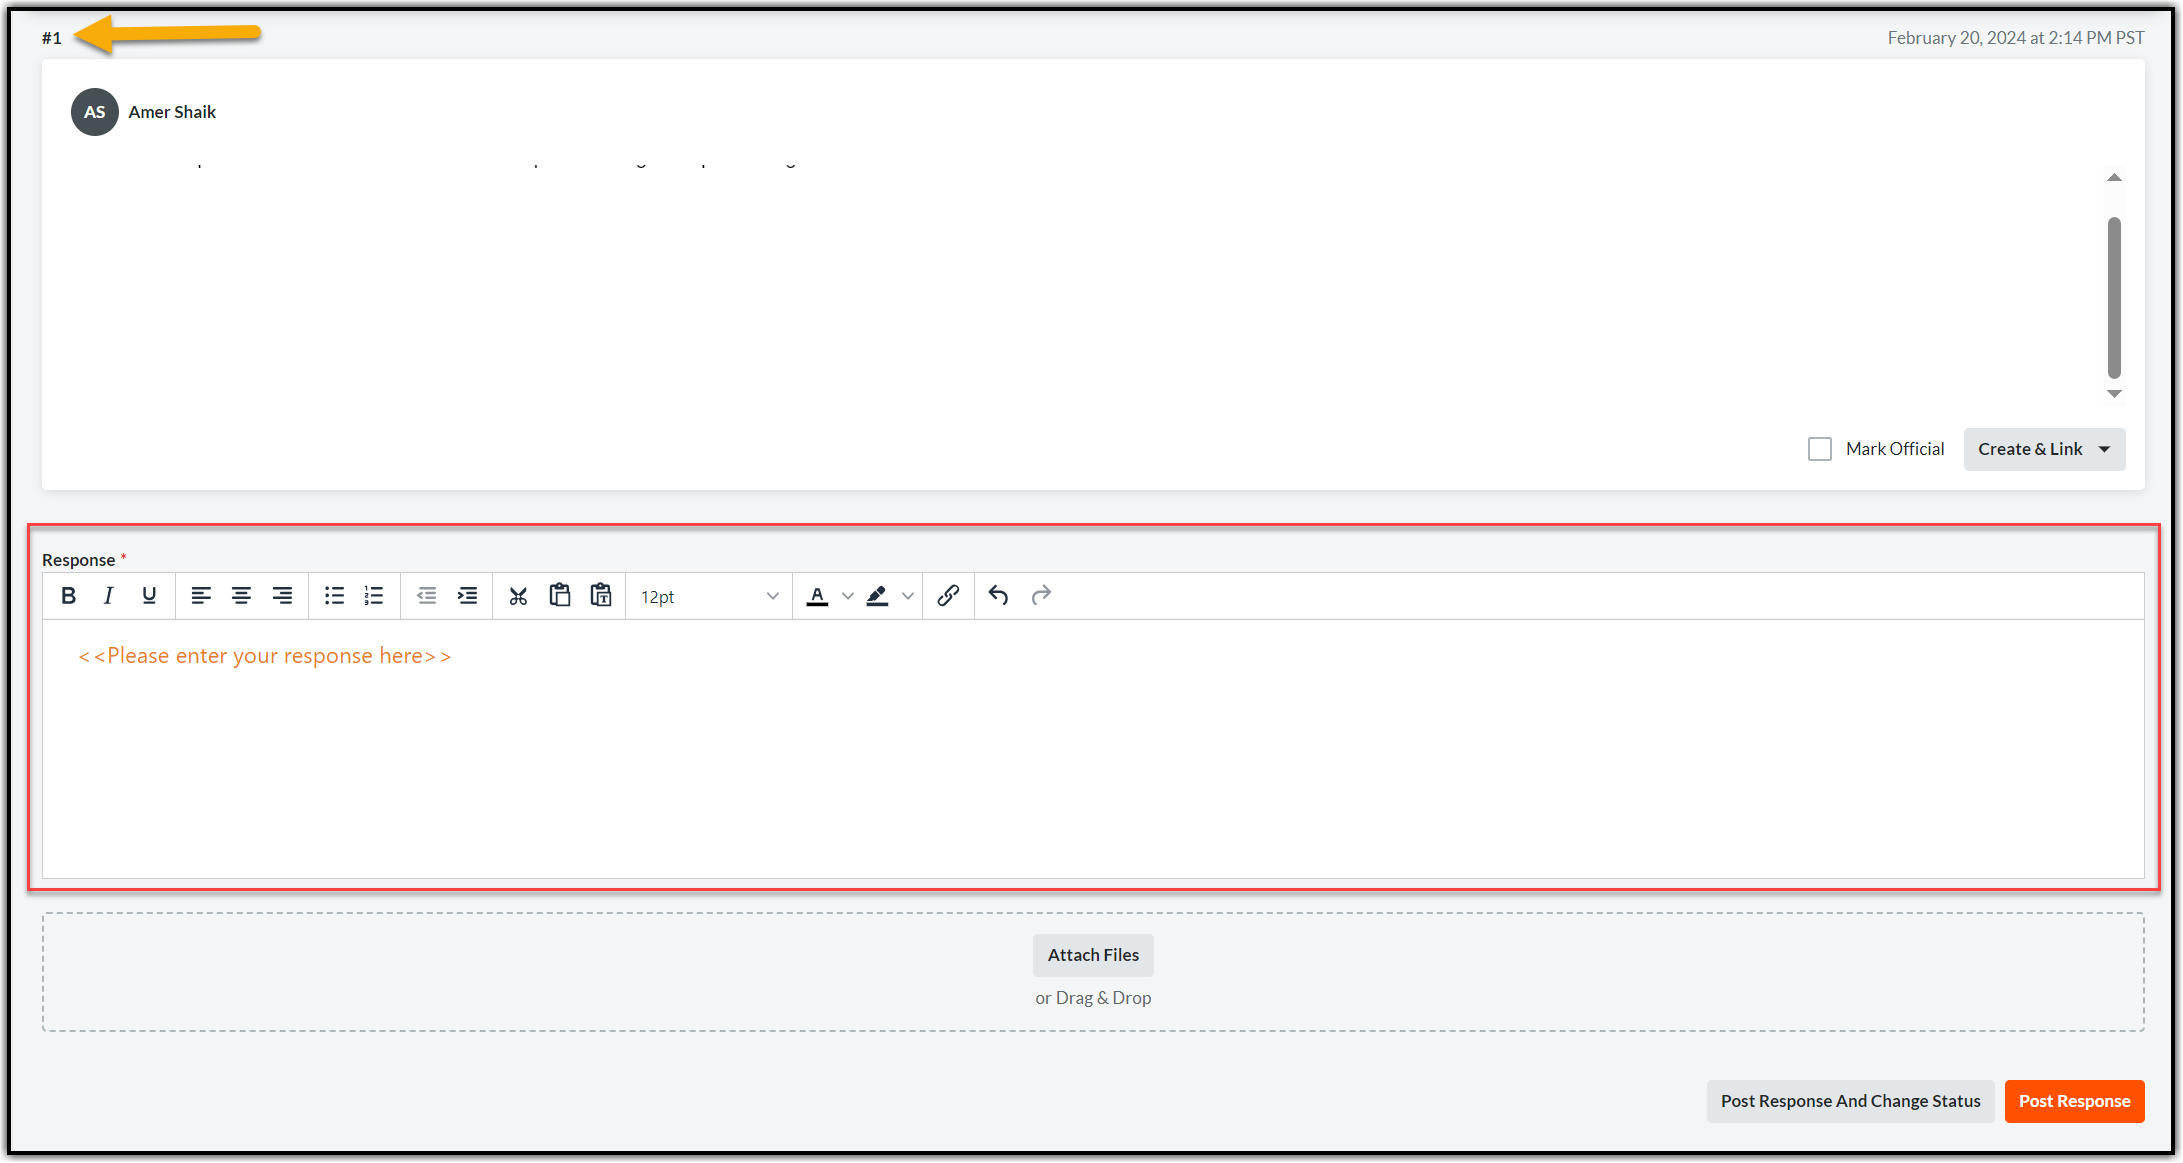
19.8.4. The yellow banner indicates that the Ball is in your court. Review the Construction Redlines submitted by the Contractor and click Respond orange button on the right side of the page to provide appropriate response (you should see Edit Response or Respond option to respond).

19.8.5. A popup window will appear. Click Attach Files (if applicable) or skip this step and the next step (28.8.5 to 28.8.6) and click Next.

19.8.6. Select Documents in the left pane. Navigate to the Correct Job Level, Stage 5 Folder, and Construction Redlines subfolder in the Documents tool and select the Construction Redlines documents you uploaded in the previous steps. Click Attach and then click Next.

Note: You must follow the SDG&E document naming convention while naming your Construction Redlines Package file.
19.8.7. You will be in the Respond window. Choose an appropriate response. Enter any special notes for the Contractor related to the documents in the Comments section (if any). Click Preview.

19.8.8. Once you click Preview, the next window will display the next steps in the Submittal process. Click Respond to finalize Submittal response and move the Submittal to the next step.

19.8.9. If the Construction Redlines need to be revised:
19.8.9.1. If the Construction Redlines have errors, and cannot be approved, the Submittal should be marked as “Revise and Resubmit” (Refer to step 28.8.7.) by stating the reasons in the comments section to resolve any issues.
19.8.9.2. A Submittal revision will then be created by the CMS, and you will then resubmit the Construction Redlines in the revised Submittal indicated by Revision Number 1 (if it is the first revision). Open the Submittal that was not approved, click the Ellipsis menu (three dots icon on the right corner of the page) next to Edit and select Create Revision from the dropdown.

19.9. Closing the Construction Redlines Submittal Tool
19.9.1. Open the corresponding Construction Redlines Submittal via the link in email (refer section 28.8.1.) or by navigating to the Submittals page (refer section 28.8.2.). Click Close & Distribute on the Submittal. You should be on the Close & Distribute Submittal popup.

19.9.2. Select members who should be notified of the closing of the Submittal in To and CC fields. Check the Create revision upon close and distribution box if you wish to create a revision else leave it unchecked. Enter any closing message. Select the official response from the FCA/CM in Workflow Responses and click Distribute orange button.

Note: If you check the Create revision upon close and distribution box then you must select the official response in Workflow Responses from the FCA/CM. In this case the Distribute orange button will change to Distribute and Create Revision button.

19.9.3. All the members in To and CC will get notified of the distribution via email with Distribution Response and other high-level details related to the closing of the Submittal.
20. CONSTRUCTION CLOSE-OUT- CMS
Construction Redlines Submittal notification
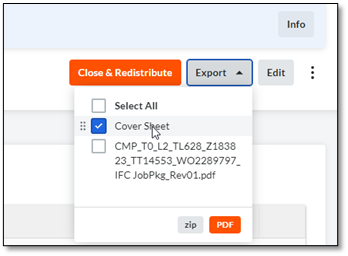
20.1. After the FCA approves the Construction Redlines, the CMS will receive a Submittal notification. Go into the Submittal and Print out the Submittal Coversheet.
20.2. Copy the Approved Final Construction Redlines to the Stage 6 - As-builts Folder.
20.3. Upload the Printed Cover Sheet with the Construction Redlines into SAP (workstream to SAP).
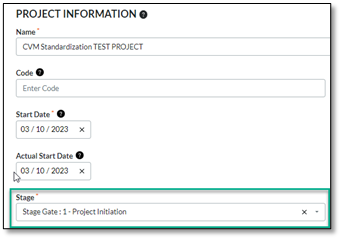
20.4. Close-out project in SAP/CPD (reference CPD procedure).
20.5. Go back into the CVM Data - Construction Readiness Tool and update the Status to Closed. Click Save.
20.6. If the project was created by CVM, please update the Project Information Details for Stage Gate to Stage 6 – Closeout. Update Admin screen to close out project.
20.7. Only complete this step if all work orders have been closed out in CVM Data - Construction Readiness Tool. Also, make sure to double check that all Submittals are closed. Go to the Admin tool in Procore to Update the Job Stage to Completed.
Note: If the Project was not created by CVM then skip the above steps.
21. PROJECT CANCELLATION
There are two methods for cancelling a Project in Procore:
21.1. If the Project was Created by CVM – once notified by the CSPM that the job has been cancelled, they will update the project Stage Gate, Project Description and mark it inactive.
21.2. If the project was created by an Upstream Department - There will be communication sent to the Project Manager that the job has been cancelled. It is then for the Project Manager to update and complete any cancellation activities per their workstream.
22. APPENDIX 1 - THE CVM PROCESS EXCEPTIONS
| Group | CVM Process Exceptions |
|---|---|
| ESH |
All the above CVM Standardization Process changes are applicable with a few exceptions that are outlined in the document below. The CMS should refer to this document while working on the projects in ESH instance. CVM Process Exceptions for ESH.pdf |
| DPM | The upstream department will leave the Job Package in the Stage 4 – Preconstruction folder for the CVM to retrieve. The CMS should make the redactions and place this Redacted Job Package in the Stage 5 – Construction folder. |
23. APPENDIX 2 - CONSTRUCTION REDLINES PROCESS REVIEW VARIATION - DISTRIBUTION
23.1. Tools
Forms Tool:
There are three Form templates that are used for completing the Construction Redlines Review process (CVM - Construction Redline Coversheet, Joint Utility Form, Yard Asset Release).
Submittal Tool:
There are three Submittal types that are used as a part of the Construction Redlines review process depending on the type of work performed.
Overhead (OH): This type of work may be a two steps due to the inclusion of the QAQC Process.
(Global) – QAQC Construction Redlines Review: Submittal used to engage the QAQC team for a formal SDGE review and Punchlist Generation.
(Global) - OH Final Construction Redlines: Submittal to deliver the Final deliverables listed in the Construction Redline Coversheet.
Underground (UG): This type of work will have one submittal for final delivery, as there is no SDG&E QAQC review.
(Global) - UG Final Construction Redlines: Submittal to deliver the Final deliverables listed in the Construction Redline Coversheet.
23.2. Construction Redlines Review – StepsHere is the overview of steps to be followed and workflows applied in the Submittal tool for each Submittal type:
23.2.1. The OH Construction Redlines Review Process:
Preliminary Submittal -
Step 1: The CMS creates and issues the Preliminary Submittal, requesting the Contractor to submit the Construction Redlines.
Step 2: The Contractor submits the Construction Redlines.
Step 3: The QA/QC reviews the Construction Redlines and issues the PCI report in the same Submittal. Uploads the PCI report to Punch List subfolder in the Documents tool.
Step 4: The CMS closes the Submittal and creates the Final Submittal where the Contractor will be the Submitter and FCA will be the approver.
Final Submittal –
Step 1: The Contractor receives the Final Submittal and submits the final Construction Redlines including the corrected items in the PCI Report (if applicable).
Step 2: The FCA reviews the Construction Redlines for completeness/accuracy and provides final sign-off.
Step 3: The CMS ends the review process - closes and distributes/uploads the Construction Redlines.
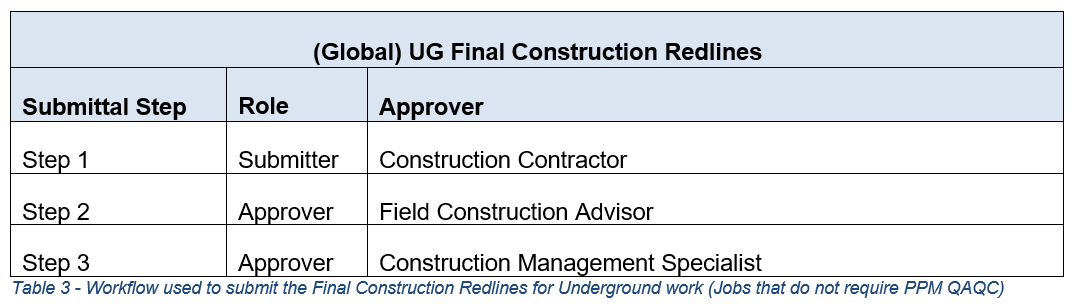
23.2.2. The UG Construction Redlines Review Process:
Final Submittal –
Step 1: The CMS creates and issues the Final Submittal, requesting the Contractor to submit the Construction Redlines.
Step 2: The Contractor submits the Construction Redlines.
Step 3: The FCA reviews the Construction Redlines for completeness/accuracy and provides final sign-off.
Step 4: The CMS ends the review process - closes and distributes/uploads the Construction Redlines.
23
.3. Guideline of WorkflowWorkflows based on Construction Redlines Submittal Type:


Note: Depending on which instance you work in – these might be kept as Submittal templates.
24. APPENDIX 3 - CONSTRUCTION REDLINES PROCESS REVIEW VARIATION - TRANSMISSION
24.1. Tools
Forms Tool:
There are two Forms templates that are used for completing the Construction Redlines process (Construction Redlines Coversheet, Yard Asset Release).
Submittals Tool:
There are three Submittal types that are used as a part of the Construction Redlines Review process depending on the type of work performed.
Overhead (OH): This type of work will have Preliminary and Final Submittals.
The Submittal type assigned to Preliminary Submittal is: (Global) – QAQC Construction Redlines Review
The Submittal type assigned to Final Submittal is: (Global) - OH Final Construction Redlines
Underground (UG): This type of work will have one Final Submittal.
The Submittal type assigned to Final Submittal is: (Global) - UG Final Construction Redlines.
Correspondence Tool:
There are three Correspondence types that are used as a part of the Construction Redlines Review process for the OH type of work.
The designated Correspondence type assigned in Procore is: (Trans) - Post Construction Inspection
24.2. Construction Redlines Review – StepsHere is the overview of steps to be followed and workflows applied in the Submittal and Correspondence tools:
24.2.1. The OH Construction Redlines Review Process:
Preliminary Submittal -
Step 1: The Contractor creates the Submittal and submits the Construction Redlines.
Step 2: The PMO will review by downloading the files from the Documents tool (if applicable)
Step 3: The FCA reviews the Construction Redlines for completeness/accuracy and provides sign-off.
Step 4: The CMS opens Correspondence 1 for QA/QC Coordination which results in the Post Construction Inspection (PCI) report.
Step 5: The CMS will go on to create Correspondence 2 to upload the review comments on the PCI report from the Engineering team.
Step 6: Following the internal reviews the CMS will create third and final Correspondence 3 to share the PCI Report with the Contractor.
Step 7: The Contractor will respond to the Correspondence 3 and schedule the go-back work.
Step 8: The CMS will close the Preliminary Submittal.
Final Submittal –
Step 1: The Contractor creates the Final Submittal and submits the final Construction Redlines including the reconciled PCI Report. The Final Submittal will have Contractor as Submitter, FCA as approver along with PMO (if applicable).
Step 2: The FCA reviews the Construction Redlines and reconciled PCI Report for completeness/accuracy and provides final sign-off.
Step 3: The PMO will reconcile the Final Construction Redlines with Engineers and upload to workstream then to the SAP (if applicable).
Step 4: The CMS ends the review process - Closes and distributes/uploads the Construction Redlines to workstream if there is no PMO.
24.2.2. The UG Construction Redlines Review Process:
Final Submittal –
Step 1: The Contractor creates the Submittal and submits the Construction Redlines. The Final Submittal will have Contractor as Submitter, FCA and CMS as approvers along with PMO (if applicable).
Step 2: The Contractor creates the Submittal and submits the Construction Redlines.
Step 3: The FCA reviews the Construction Redlines for completeness/accuracy and provides sign-off.
Step 4: The CMS will decide what to do next - Pass it on to PMO (if applicable) or Close or Distribute.
Step 5: The PMO will reconcile the Final Construction Redlines with Engineers and upload to workstream then to the SAP.
Step 6: The CMS ends the review process - Closes and distributes/uploads the Construction Redlines to workstream if there is no PMO.
24.3. Guideline of Workflow
Following are the workflows based on the work type:
24.3.1. Underground (UG) Work Type:
Only the “UG Final Construction Redlines Review” Submittal type is involved for Underground work. Please ensure you choose the correct Submittal type, and apply the correct workflow based on the table below.
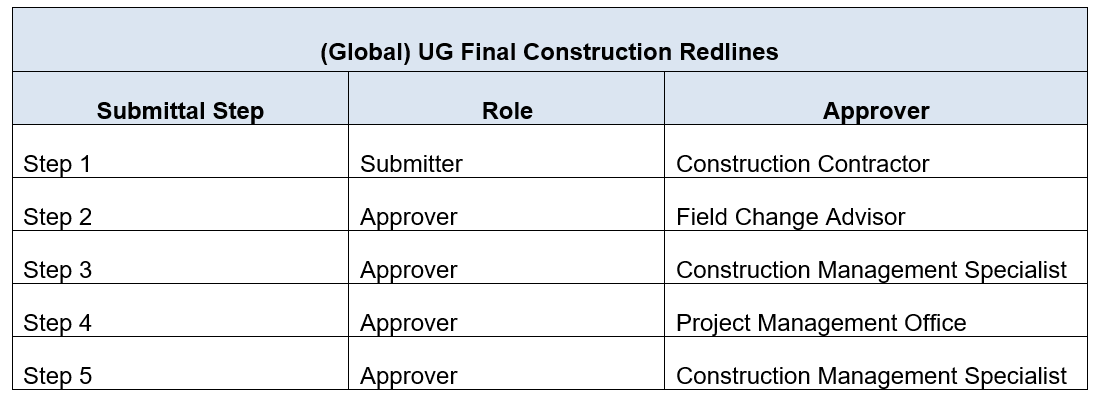
Note: If the PMO is not involved in the Project/Program – then Steps 3 and 4 will not be applicable and you should jump straight to Step 5.
24.3.2. Overhead (OH) Work Type:
For Transmission Overhead work, the process involves two separate tools - The Submittal tool, and the Post Construction Inspection Correspondence in the Correspondence tool in Procore in multiple steps. There are two Submittals and in between there are up to three Correspondences that are used for internal approvals.
Overall, to finalize the Construction Redlines closing process, there are five levels to complete:

Note: The CMS will create all forms in this process. The duration for each Submittal is driven by the MSAs for each type of work, please follow those correctly to ensure the project is fully executed on time.
24.4. Five Levels to Complete the OH Construction Redlines Process
24.4.1. Level 1: Submittal 1- (Global) - QAQC Construction Redlines Review
Create the Preliminary Submittal i.e., Submittal 1 using the Submittal type (Global) - QAQC Construction Redlines Review.
Note: When submitting Preliminary Redlined Construction Redlines documents, all referenced work order packages, such as OH Distribution, UG Distribution, SCADA, or any other relevant referenced WOs associated with the Transmission Overhead WO will be submitted in one binder and only under the Transmission Overhead WO project. PCI reports will be generated by QA/QC and transmitted to the Contractor only in the Transmission OH work order.
Note: Navigation to Overhead (OH) Project - Enter the Work Order (WO) number in the Project Search option on the top left corner of the Portfolio page and click the Search icon. You can find the WO in either the Name field or the Project Number field.

24.4.2. Follow the below workflow while creating the Preliminary Submittal:
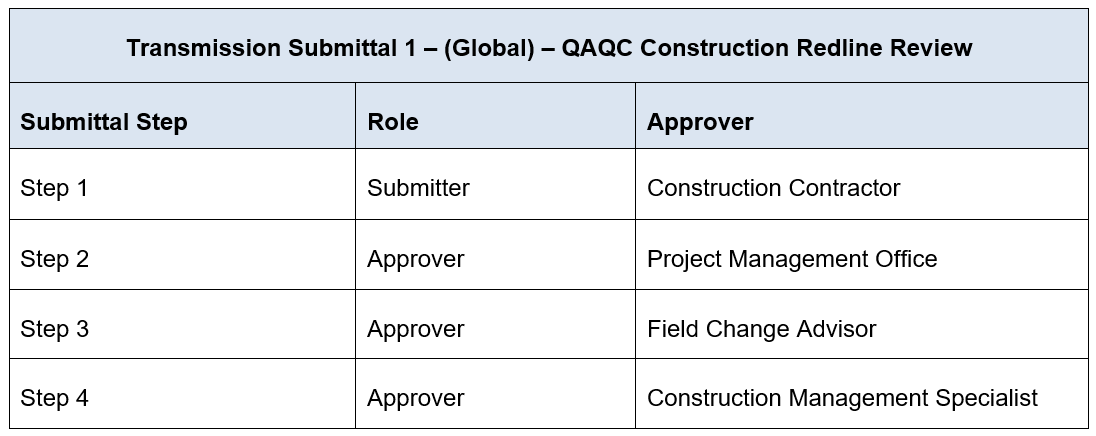
Note: If the PMO is not involved in the Project/Program – then Step 2 will not be applicable and you should jump straight to Step 3.
24.4.3. Level 2: Correspondence 1 - Initial PCI Report
Note: Correspondence 1 will be created at the same time as the above QA/QC Submittal to produce the PCI report.
24.4.3.1. CMS will create this Correspondence 1 using the Correspondence tool and assign it to QA/QC, Construction Manager and Field Construction Advisor (Assignees field).
24.4.3.2. Add the Construction Management Specialist to the Distribution Member field.
24.4.3.3. QAQC inspects the project job package and produces PCI Report. Once they have created the PCI Report they will upload it to the Documents tool and attach it to the Correspondence.
24.4.3.4. CVM will review the report, if there are no questions or revisions to be made, move on to Correspondence 2.
Workflow:
CVM > QAQC > PCI (Punchlist) > CVM
24.4.4. Level 3: Correspondence 2 PCI Report with Comments
Following the initial review that took place in Correspondence 1 – the Engineering group may need to be engaged for review. This will be done through an email sent across to the PMO teams, Internal Designers, or Internal Engineers. The CMS will provide all updates to this Correspondence (Correspondence 2) based on that email communication. If there are no engineering items to address, proceed to Correspondence #3 – Final PCI Report.
24.4.4.1. CVM will attach a revised PCI report, that includes any items that need to be reviewed by the Engineering teams and assign it to the Engineering team and Field Construction Advisor (Assignees field). For visibility the distribution list should be QA/QC advisors or appointed inspectors for both the electrical and structural teams and other Construction Management Specialists.
24.4.4.2. The CMS will gather all the notes from the Engineering team and submit them into the Correspondence on the Engineering team's behalf.
24.4.4.3. CVM will update the Correspondence with all responses from Engineering teams for consistency and concurrence.
Workflow:
CVM > ENG > PCI (ENG. Punchlist) > CVM
24.4.5. Level 4: Correspondence 3 Final PCI Report
Following both internal reviews (as applicable) the CVM team will create the third and final Correspondence to provide the PCI report to the contractor.
24.4.5.1. CVM to upload PCI Report with CVM and Engineering/Design comments to the Documents tool for Contractor in the Punchlist subfolder and assign the Correspondence to Contractor (Assignees field).
24.4.5.2. The PMO will be added to the Distribution Member for this form.
24.4.5.3. The Contractor will review the PCI Report.
24.4.5.4. The Contractor will identify disputed items and CVM will respond within the Correspondence. If there are no questions or disputes the Contractor will acknowledge the receipt of the PCI Report and schedule go-back work.
Note: Once the Correspondence has been closed – if there are additional questions or items to be disputed, those must follow the standard RFI process.
Workflow:
CVM > Updated PCI (Punchlist) > Contractor > CVM
24.4.6. Level 5: Submittal 2 - (Global) - OH Final Construction Redlines
24.4.6.1. Follow the below workflow while creating the Preliminary Submittal:
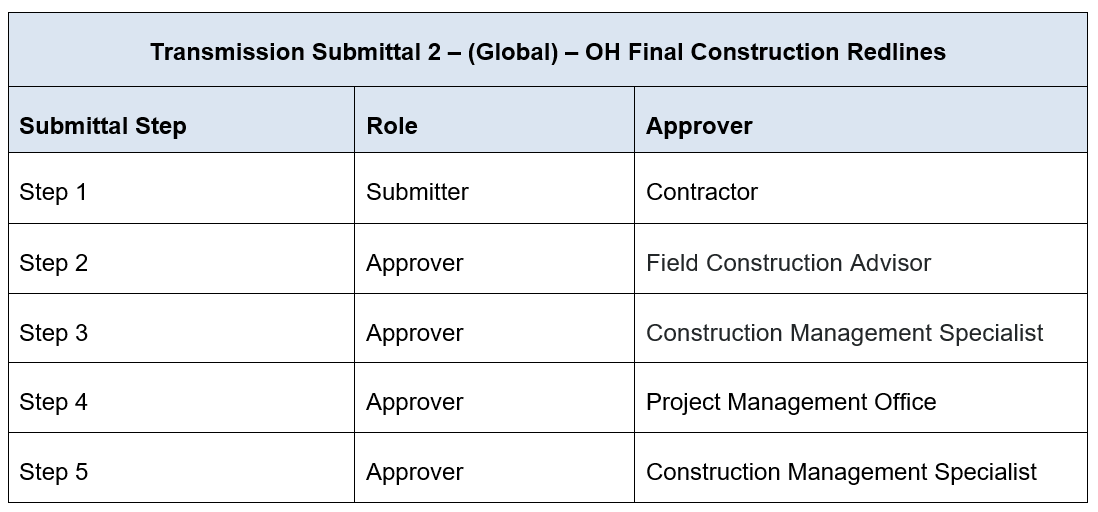
Note: If the PMO is not involved in the Project/Program – then Step 4 will not be applicable and you should jump straight to Step 5.
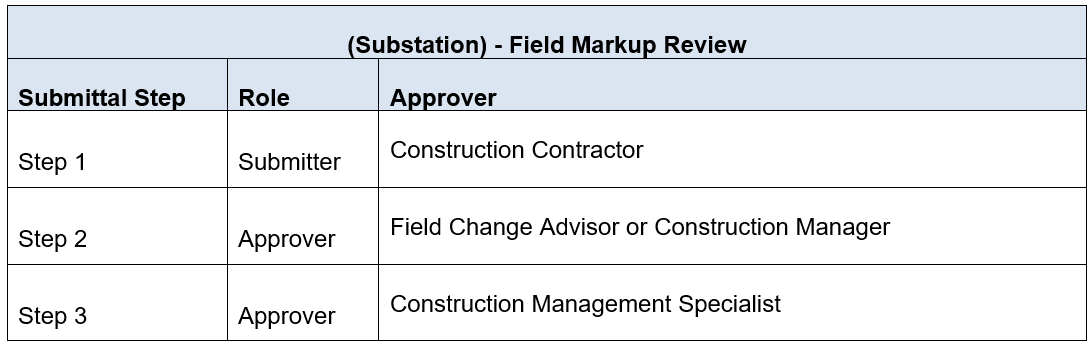
25. APPENDIX 4 - CONSTRUCTION REDLINES PROCESS REVIEW VARIATION - SUBSTATION
25.1. Tools
Forms Tool:
There is a Form template used for completing the Construction Redlines Review process (CVM - Field Markups Construction Transmittal).
Submittal Tool:
There are two Submittal Types that are used as a part of the Construction Redlines Review Process – Preliminary and Final.
The designated Submittal types assigned in Procore are:
Preliminary Submittal - (Substation) - Field Markup Review
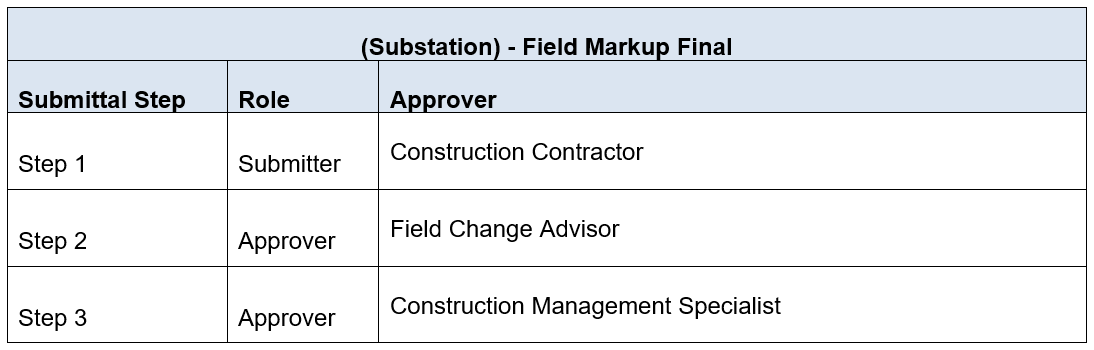
Final Submittal - (Substation) - Field Markup Final
Punch List Tool:
This tool is used if there are any correction items identified during the Construction Redlines Review process.
25.2. Construction Redlines Review - Steps
Here is the overview of steps to be followed and workflows applied in the Submittal tool for each Submittal type:
25.2.1. Preliminary Construction Redlines Review Process
Step 1: The Contractor creates the Submittal and submits the Construction Redlines.
Step 2: The CMS (Submittal Manager) will create the workflow within the submittal and pass it on to the reviewers.
Step 3: The FCA/CM reviews and approves the Submittal. Creates punch list items (if corrections are needed) in Punch List tool, (The Punch List can be linked by Related Items to the Submittal for reference if needed).
Step 4: The Contractor will receive notification of the corrections in the Punch List tool (If applicable).
Step 5: The CMS closes and distributes the Preliminary Submittal.
25.2.2. Final Construction Redlines Review Process
Step 1: The Contractor creates the Final Submittal and submits the Final Construction Redlines including the corrected items in Punch List (if applicable).
Step 2: The CMS (Submittal Manager) will create the workflow within the submittal and pass it on to the reviewers.
Step 3: The FCA reviews the Construction Redlines for completeness/accuracy and provides final sign-off.
Step 4: The CMS ends the review process - closes and distributes/uploads the Construction Redlines.
25.3. Guideline of Workflow in Submittal
25.3.1. Workflow to be applied to Preliminary Field Markup Submittal.
25.3.2. Workflow to be applied to Final Field Markup Submittal.