Create a Punch List Item (iOS)
Also available on ![]()
![]()
Objective
To create a punch list item using the Procore app on an iOS mobile device.
Things to Consider
Steps
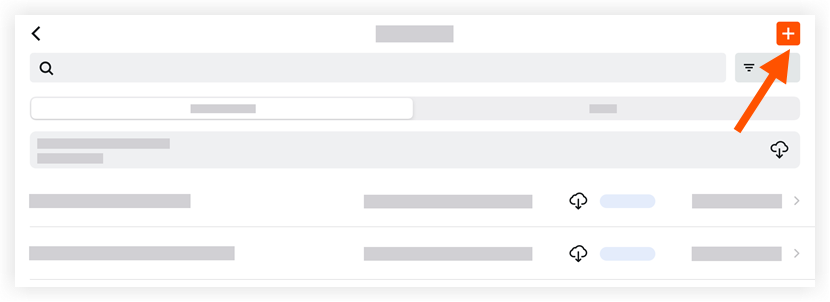
You can perform this action from the Quick Action menu on the app's Dashboard, or landing page. Tap the + icon, and tap Create Punch Item.
- Navigate to the Punch List tool using the Procore app on an iOS mobile device.
- Tap the plus
 icon.
icon.
- Tap Manual Input.
- Tap a template from the list of punch list item templates. See Create a Project Level Punch Item Template.
Note: You can also tap Create Punch Without a Template to create a new item. - Tap into a field to enter the following information:
- Title: If not using a punch list template, provide a descriptive title for the item.
- Attachments:
 Camera: Tap to take a new photo to add to the punch list item.
 Library: Tap to select an image from your device's photo library or Procore Photos. After you select the photos, click Add or Done.
 Files: Tap to add files from your device to the task.
- Due Date: Select a date from the calendar for the punch list item to be due.
Note: The 'Due Date' field is automatically populated based on the default number of days specified on the Punch List tool's Configure Settings page. See Configure Advanced Settings: Punch List. The due date also respects which days are set as 'working days' for the project. See Set Project Working Days. - Location: Use the location drop-down menu to select a location associated with the item. Either select from the predefined locations, or Add a Multi-tiered Location to an Item. This location may be as general as the site location at the first tier or as specific as where on the site the contractor will be working at the second tier. You can add a punch list item to a drawing to indicate the exact location of the Punch List item.
- You may also scan a location's QR code to enter a location. Tap the QR button in the top right. Point the camera of your device to the QR code to scan it. Procore will scan it automatically and add the location to the inspection.
- Punch Manager: Select a Punch Manager who will oversee the item throughout its entire lifecycle.
Note: If no Punch Manager is selected, Procore will automatically list the item's Creator as the Punch Manager. - Assignees: If the template doesn't have a default assignee, or if you aren't using a template, select the subcontractor or related contact from your directory to whom you want to assign the item. Assignees will need to have 'Admin' or 'Standard' level permissions to see the punch list item and receive the email notification.
Note: Users with 'Standard' permission on the Punch List tool will only be able to assign 'Admin' to the item. - Final Approver: Select a Final Approver who will have the authority to close the item.
- Type: Types help categorize items into related areas or divisions. Select the appropriate type for the item.
Note: Users with 'Admin' permission on the Punch List tool can create punch list item types from their computers. See Configure Advanced Settings: Punch List. - Trade: If the template doesn't have a default assignee, or if you aren't using a template, select the applicable trade from the drop-down menu. Trades are configured from your computer at the Company level. See Add or Delete Trades.
- Description: Include a detailed description of the item, such as the specific issue and possible resolutions.
- Tap Create to create the item.