View Models (iOS)
Also available on ![]()
![]()
Objective
To view models that exist in a project's Models tool using an iOS mobile device.
Things to Consider
- Required User Permissions:
- 'Read Only' or 'Admin' permissions to the Models tool.
- Additional Information:
- If you want to view models in offline mode, they will need to be downloaded in the app first by tapping 'Download' on each model. See Download or Remove Models from a Device (iOS).
Prerequisites
- At least one model must have been published to the Procore project. See Publish a Model to Procore.
- You must be using a compatible iPad or iPhone with enough free storage. For information on device requirements, see What type of device is recommended for viewing models in the Models tool?
Video
Steps
- Navigate to the Models tool using the Procore app on an iOS mobile device.
- Tap the model you want to view.
Note: If the model is not currently downloaded to your device, tap Download. - View the model. The following functions are available:
To Navigate Around the Model
- Hand Gestures: Use basic hand gestures on your device's screen to navigate around the model.
- Pinch or spread to zoom in or out.
- Drag in any direction to move around the model.
- Drag two fingers left or right to move horizontally.
- Drag two fingers up or down to move vertically.
- Press or hold an area of the 2D drawing to move to that location.
Note: Tap once to expand the 2D drawing.
- Joysticks: Interact with the three joystick controls for more precise control of your viewing perspective.
Note: Tap Settings to turn the joysticks on or off using the toggle switch.- Walk: Drag and hold the joystick to the left or right to adjust your view horizontally. Drag up or down to move vertically.

- Up/Down: Drag the joystick up or down to more vertically.
- Look: Drag the joystick in any direction to navigate around the model.

Note: Tap the icon if you want to look around you as you move the iPad.
- Walk: Drag and hold the joystick to the left or right to adjust your view horizontally. Drag up or down to move vertically.
To Return to a View
- Tap Home
 to return to the Home Viewpoint.
 - Tap Undo
 to return to the previous state.
Note: This will remember all previous settings, including hide/show and camera location.
To Adjust Settings
- Tap Settings
 if you want to change the viewing settings for the model.
 - Adjust settings by tapping a toggle ON
 or OFF
  as necessary. See Settings: Models (iOS) for more detail on each setting.
To Adjust Views
- If viewpoints are available, tap Views to open a specific section within the model.
Note: Viewpoints created in Navisworks® can be imported into the mobile viewer when creating or editing a model from the Procore plugin. See Publish a Model to Procore.
To Use the Section Tool
- Tap an object.
- Tap Section. See Use the Section Tool on a Model (iOS).
To Show or Hide Objects
- Tap Objects
 if you want to show or hide objects.
- Under Model Files, tap the toggle ON or OFF to show or hide objects.
- You can also hide specific objects while viewing the model. Tap on an object and choose from the following:
- Hide: Hide only the selected object.
- Similar: Hide the object and all similar objects.
To View Properties for an Object
- Tap the object you want to view information for.
- Tap the Info
 icon.
icon. - A Properties window shows the object name and properties.
To Create 2D Views
2D views can be created for walls, ceilings, and floors. Currently, only Revit® objects are compatible with 2D views for ceilings and floors.
Note
You can only create 2D views for models that have had grids exported from the Procore plugin in Revit®. Models with exported grids have a grid- If you are a user with 'Admin' level permissions, check to ensure the gridlines are showing up correctly:
- Tap the Settings menu, and tap the toggle for Gridlines to the ON
 position.
 - Validate that the grids are lined up correctly. If the grid appears off, see Why aren't my grids aligned in the Models tool?
- Tap the Settings menu, and tap the toggle for Gridlines to the ON
- From the 2D drawing, tap and hold on the location you want to view, and then release.
- Tap a wall, ceiling, or floor object to select it.
- Tap the 2D View
 icon.
icon.
This opens the 2D View mode. The following actions are available:- Zoom in and pan around as necessary to see dimensions automatically appear. More detail becomes available as you zoom in closer.
- If there are multiple grid angles in the project, 'Unique Grid Angles' is shown on the bottom of the screen.
- If you need to switch grid angles, tap Switch.
- Tap Depth
 to view the depth of the object.
- Use the arrows in the Depth menu to slice into the object.
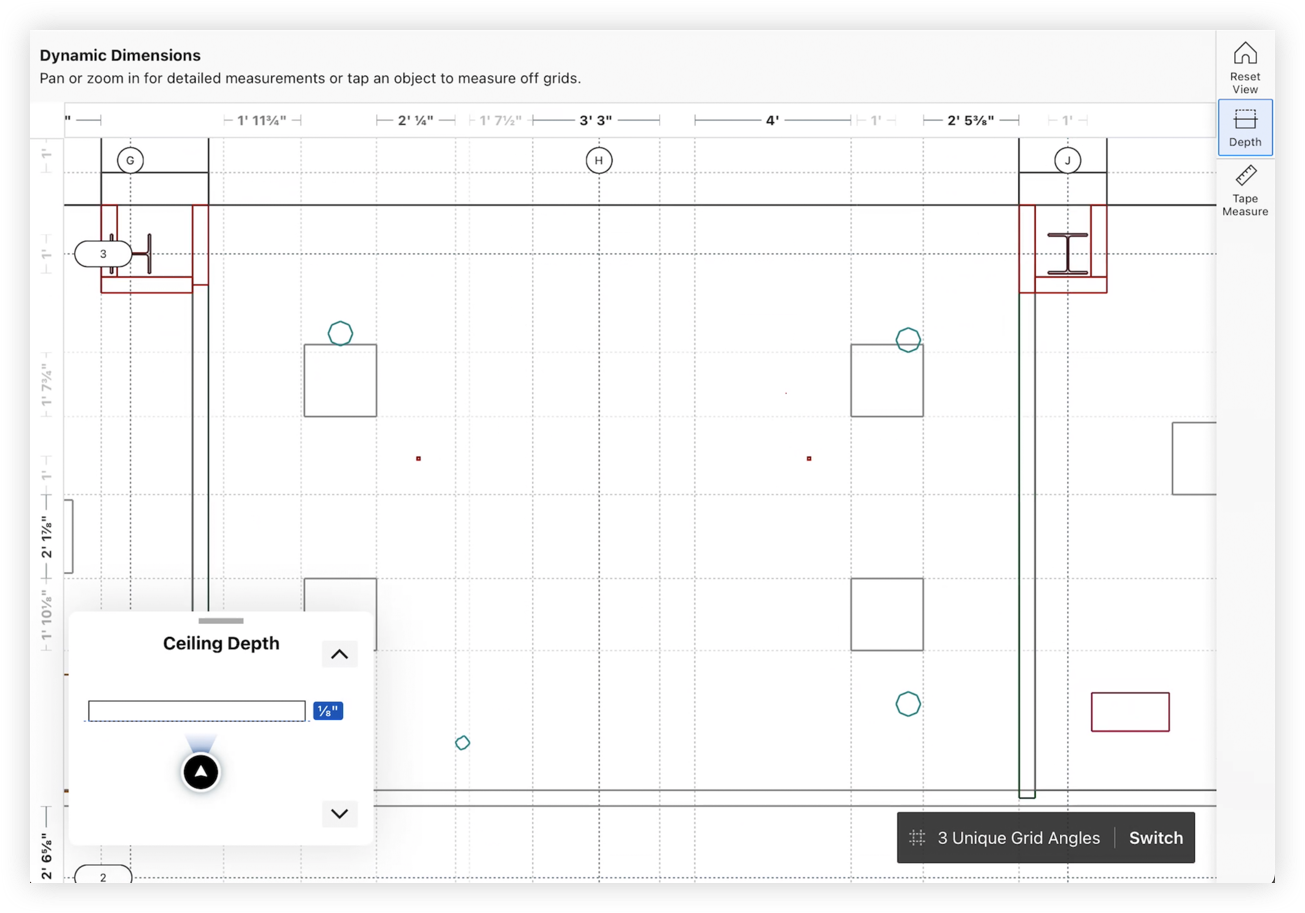
- Use the arrows in the Depth menu to slice into the object.
- If you want to go to an area in the 3D model, press and hold on an area in the 2D view to navigate to the corresponding area in the 3D model.
Note: This feature is not available for walls.- The camera will automatically angle downward for floors, and upwards for ceilings.
- A section plane will be applied to the 3D model at the surface of the floor or ceiling. However, the section can be removed if needed.
- If needed, create a coordination issue or observation from the model. See Create Coordination Issues from a Model (iOS) and Create Observations from a Model (iOS).
- If you want to save the 2D view as a PDF to share or print, tap the share
 icon and select any option that is available for your device.
Note: The PDF includes an approximate scale to calibrate measurements.
To Measure Distances
- Tap Measure. See Measure Distances on a Model (iOS).
- If you are in the 2D view for a model, tap Tape Measure. See Measure Distances on a Model (iOS).
To Create Items
- Tap Create
 if you want to create an item on the model.
 - Tap Coordination Issues or Observation. See Create Coordination Issues from a Model (iOS) or Create Observations from a Model (iOS).
To View Active Collaborators
When multiple users are viewing a model, you can choose to navigate to their current location in the model to simultaneously see what they are seeing. Any users who are currently viewing the model will be shown on the model in real time. Each user's name will appear above a blue dot ![]() that marks their current location.
that marks their current location.
Note: There must be at least two people viewing the same model for this option to appear. In addition, the toggle for 'Show Collaborators' must be turned ON in the Settings menu. See Settings: Models (iOS).
- Tap the Active Collaborators
 icon.
icon. - The names of all users currently viewing the model are shown.
- Tap Navigate To next to a user to jump to their current view in the model.