Configure Advanced Settings: Daily Log
Objective
To configure advanced settings for the Daily Log tool.
Things to Consider
- Required User Permissions:
- 'Admin' level permissions on the project's Daily Log tool.
- Additional Information:
- Certain areas of the Daily Log tool can be customized through the use of configurable fieldsets that are managed in the Company level Admin tool. See Which fields in the Daily Log tool can be configured as required, optional, or hidden?
- Through a configurable fieldset, you can mark certain fields in the project's Daily Log tool as required, optional, or hidden. See Create New Configurable Fieldsets.
- You can also create your own custom fields for the Manpower log that can then be added to a fieldset to use on the project. See Create New Custom Fields.
- Certain areas of the Daily Log tool can be customized through the use of configurable fieldsets that are managed in the Company level Admin tool. See Which fields in the Daily Log tool can be configured as required, optional, or hidden?
Video
Steps
- Navigate to the project's Daily Log tool.
- Click the Configure Settings
 icon.
icon. - Click on the page you want to edit.
Project Settings
- The following settings are available to edit:
- Show Created By On Log Entries: Mark the checkbox to add a column to each entry that displays the name of the person who created each entry.
- Set Manpower Logs Hours to Zero on Copy: Mark the checkbox so that the 'Hours' and 'Workers' values on a copied manpower log are set to zero (0).
Note: If this setting is not enabled, the copied manpower log entry will include the number of hours and workers from the previous entry. - Default Distribution: Use the drop-down menu to add users to the Daily Log's default distribution list.
Note: These members will be notified when a daily log is marked as 'Complete' and distributed. - Show ‘Missing Companies’ Banner for Manpower and Daily Construction Report: Clear the checkbox if you do not want a banner (noting that companies may be missing from the day based on the prior day's entries) to be displayed on the Manpower and Daily Construction Report logs. See Create Pending Entries for Missing Companies.
Note: Disabling this setting only removes the banner, it does not remove the Missing Companies feature from the project.
- Daily Log Configuration
- Manpower Categories
- Delay Log Types
Daily Log Configuration
Most log types are enabled by default on a new project, however, you can configure which logs you want to have available in the project's Daily Log.
Note: The logs will appear on the Daily Log tool page in the order in which they appear in this list. You can change the order of these logs by dragging them into a new order. See Can I rearrange the order in which my daily log sections appear?

The following settings are also available in this section:
Hide Weather Data
Mark the checkbox if you do not want to include weather data from the National Weather Service in the PDF exports for the logs.
Collaborator Entry
Mark the 'Collaborator Entry' checkbox across from a log to allow collaborators with granular permissions to create entries for that log. See Grant Granular Permissions in a Permission Template and Create Daily Log Entries as a Collaborator.
The following logs support collaborator entries:
- Manpower
- Notes
- Delivery
- Daily Construction Report
- Visitors
Note: The granular permission for "collaborator entry' has to be on a global permission template OR a project permission template before the option is available in the Daily Log configuration settings.
Additional Manpower Log Settings
- Default hours: Enter a number that will be automatically populated in the Manpower Log's Hours field.
Note: The 'Hours' field is editable, so it is recommended that you add the number of hours that most people will be working on the jobsite for faster daily log entry. - Include Employees in 'Company' Dropdown: Mark the checkbox if you want to be able to select individual employees to add to Manpower entries. In order for users to be displayed on this list, they must be marked as an employee of your company. See How do I add someone as an employee of my company?
Manpower Categories
To create a new manpower category for the Daily Log tool:
- On the Daily Log Settings page, scroll to the Manpower Categories area.
- Enter a name for your new manpower category in the New Manpower Category box.
- Click Create.
- If you want to create a color code for the category, enter an HTML color code in the box or click a color on the color wheel.
- If you want to associate one or more of your vendor/company records with the manpower category, select a vendor from the drop-down list.
- Click Save Changes.
You will be able to filter your results for these categories in the Daily Log Manpower Log Report.
Delay Log Types
Delay types configured here will display as options to select when creating a delay entry on the Daily Log.
To add a new delay type to use on the project:
- Enter the name of the delay you want to add.
- Click Create.
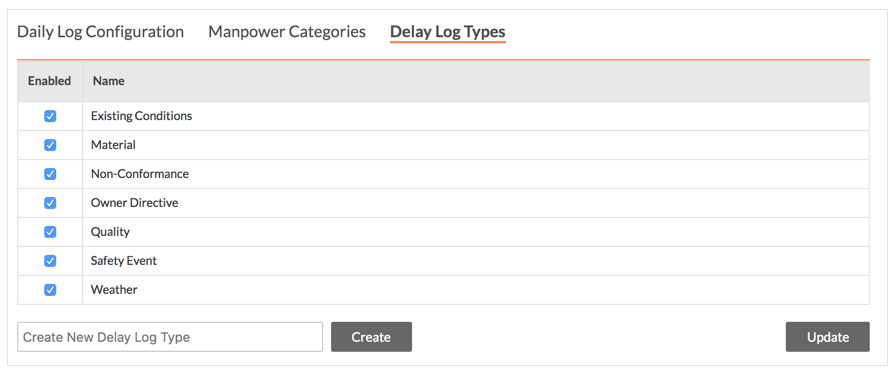
Note: Delay types cannot be edited or removed from this page, but they can be set to inactive by clearing the checkbox.
To disable or enable a Delay Log type:
- Clear the checkbox next to the type you want to set disable.
OR
Mark the checkbox next to the type you want to enable.
Permissions Table
- Click the Permissions Table page.
Note: By default, user permissions are inherited from a permission template assigned to the user during account creation. See Manage Project Permissions Templates. You can grant or revoke user access to the tool by continuing with the next step. - Grant or revoke user access permissions as follows:
- To grant a user access permission to a tool, place a green checkmark
 in the Read Only, Standard, or Admin column. The system automatically places a red checkmark
  in the remaining columns.
 - To revoke a user's access permission to the tool, place a green checkmark in the None column. The system automatically places a red checkmark in the remaining columns.
Note: If an option is grayed out, that user's permissions cannot be changed at the Project level.
For a complete list of tasks associated with each permission level, see the Daily Log Permissions Matrix.
- To grant a user access permission to a tool, place a green checkmark