Edit Tiered Locations
Objective
To edit tiered locations.
Background
Locations give you the ability to link different Procore items (RFIs, Submittals, and more) to specific locations on a job site. This helps project team members to identify the exact location(s) on a job site where a defect was observed, where materials are to be installed, or where a project change order occurred.
You can edit locations as needed.
Things to Consider
- Required User Permissions:
- 'Admin' level permission on the project's Admin tool.
OR - 'Read Only' or 'Standard' level permissions on the project's Admin tool with the 'Manage Locations' granular permission enabled on your permission template.
- 'Admin' level permission on the project's Admin tool.
- Limitations:
Important! Any changes to the locations in your project are updated in every place that references that location. For example, if your project has an existing single-tier location called “East Wing Men’s Bathroom” and you want to rename the first tier “East Wing” and create a second-tier within the East Wing named, “Men’s Bathroom,” any items in Procore that had been tied to the single-tier location will be automatically set to use the new "East Wing" first-tier location. If you want your items to point to the second tier location, you will need to manually edit that information in one of the supported tools. For a list of supported tools, see What are multi-tiered locations?
Steps
Take the following steps based on how your locations hierarchy was created and which tool you are using:
- Manually Created or Imported (Admin Tool)
- Generated from Drawings (Admin Tool)
- Generated from Drawings (Drawings Tool)
Edit Manually Created or Imported Locations
- Navigate to the project's Admin tool.
- Under 'Project Settings' in the right pane, click Locations.
- Locate the location or tier that you want to edit.
- If you want to use the search feature, highlight the location or tier that you want to search within. Then start typing the location or tier name to find the desired match.
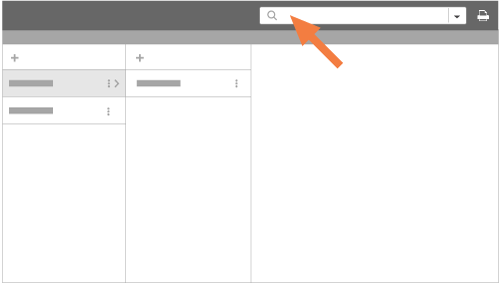
- Click the icon with the vertical dots and then choose Edit from the shortcut menu.
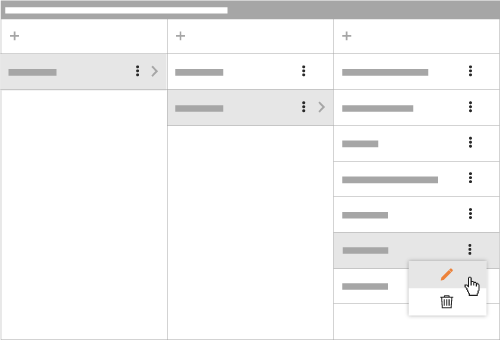
- Type over the existing entry to change the location name.
- Click the green checkmark.
This saves your changes automatically, so you can navigate away from the page when done editing.
Edit Locations Generated from Drawings from the Admin Tool
- Navigate to the Project level Admin tool.
- Under the 'Project Settings' menu, click Locations.
- Click Edit Location Hierarchy.
- Select Skip Drawings and Edit to edit existing locations.
- Select a location from the list to view the associated drawing, location boundaries, and heat map.
- To edit the name, click the vertical ellipsis
 next to a location. Select Edit, then click Edit Name.
- Click Location Name.
- Enter the name of the location.
- Click the checkmark to confirm.
- To edit the boundary, click the location name on the list OR the boundary on the map.
Note: This puts you in edit mode.- Click and hold the dots at the corners of the location's shape. Move the dots to change the boundary using a drag and drop operation.

- Double click, click outside the boundary, or press ENTER to save the location's boundary.
- Click and hold the dots at the corners of the location's shape. Move the dots to change the boundary using a drag and drop operation.
- To move locations using a drag and drop operation, click the Tree View.

- Click the select
 icon.
icon. - Click the location you want to move.
OR
To select multiple locations, click and drag your cursor over the locations, or press and hold the Shift key and click the desired locations. - Drag and drop the selected locations over the new parent location.
- Click the select
Edit Locations Generated from Drawings from the Drawings Tool
- Navigate to the Drawings tool.
- Click Locations and select Edit Locations, then Quick Edit.
- Select a location from the list to view the associated drawing, location boundaries, and heat map.
- To edit the name, click the vertical ellipsis next to a location. Select Edit, then click Edit Name.
- Click Location Name.
- Enter the name of the location.
- Click the checkmark to confirm.
- To edit the boundary, click the location name on the list OR the boundary on the map.
Note: This puts you in edit mode.- Click and hold the dots at the corners of the location's shape. Move the dots to change the boundary using a drag and drop operation.
- Double click, click outside the boundary, or press ENTER to save the location's boundary.
- Click and hold the dots at the corners of the location's shape. Move the dots to change the boundary using a drag and drop operation.
- To move locations using a drag and drop operation, click the Tree View.
- Click the select icon.
- Click the location you want to move.
OR
To select multiple locations, click and drag your cursor over the locations, or press and hold the Shift key and click the desired locations. - Drag and drop the selected locations over the new parent location.
- Click the select