Add People to Resource Planning
Objective
To add people for Resource Planning.
Background
For projects using Resource Planning and Resource Tracking tools, you can manage your resources by adding them to Resource Planning. The people you add here can be used for resource assignments, as well as in the Crews, and the Timesheets tools.
You have three options when creating people in Resource Planning: 'User', 'Assignable', or 'Assignable User'.
Note
|
Assignable User
|
User
|
Assignable
|
Things to Consider
- Required User Permissions
- For projects using Resource Planning and Resource Tracking tools, users and contacts MUST be added to Resource Planning.
- For the best experience, data syncing should be enabled with this feature. If it is disabled, please contact your Procore Customer Success Engineer or Point of Contact to have it turned on. See What people information is synced between Resource Planning and the Procore Company Directory?
- All people added to Resource Planning from the Directory are created as 'Users' and the applicable Resource Planning user type (Assignable, Assignable User, or User) is applied to their Resource Planning profile.
- If data syncs are enabled:
- People added in Resource Planning are automatically added to the Company Directory as users of your company or contacts.
- People added to Resource Planning in either the Company Directory or Resource Planning tool are visible in both tools, as long as the person is a 'User' and not a 'Contact'.
- Changes to Resource Planning information for users in both tools are automatically updated between the Company Directory and Resource Planning.
- When adding from Resource planning, you can choose to sync all people, or just users (people added in Resource Planning as a 'User' or 'Assignable Users').
- People added in Resource Planning as a 'User' or 'Assignable User' are created as users in the Company Directory and are added as employees of your company.
- People added as 'Assignable' are created as contacts in the Company Directory. However, if there is a matching user record in your Directory, they will be linked to the 'User' instead.
- If data syncs are disabled:
- People added in the Resource Planning tool must be independently created as a 'User' in the Company Directory. The profiles are then linked based on a matching employee email address after you click the 'Resource Planning' tab in the user's Company Directory profile.
- Users added in the Company Directory can be added to Resource Planning from the Directory, and are linked.
- In the Company Directory, data in the 'Resource Planning' tab is updated in both the Directory and Resource Planning tools. However, shared fields that are in the 'Personal Information' section of the Directory are not updated between the tools. For a list of fields that require enabled data syncing, see What people information is synced between Resource Planning and the Procore Company Directory?
Prerequisites
Steps
You can add people to Resource Planning from the Company Directory or from the Resource Planning tool. If you add people from the Resource Planning tool, you must still complete steps in the Company Directory.
- Add People from the Directory (Recommended)
OR - Add People from Resource Planning
- Add People to the Procore Company Directory. This process differs based on data syncs:
Option 1: Add People to Resource Planning from the Directory
Note: Users must already be created in the Company Directory. See Add a User Account to the Company Directory.
- Navigate to the Company level Directory tool.
- Click the Users tab.
- Click View next to the user and click the Resource Planning tab.
OR
Click Edit next to the user and click View Resource Planning. - Click Add this User to Resource Planning.
- Complete the form.
- Groups. Select the person's access to Groups in the Resource Planning tool.
- Job Title. Select the person's job title from the drop-down list.
- Type. Select whether the person should be a 'User', 'Assignable', or 'Both'.
- User. A 'User' is a person who can login to Procore. Users alone can NOT be assigned as resources for Resource Planning projects.
- Assignable. An 'Assignable' person is someone who can be given a resource assignment, but cannot login to Resource Planning.
- Both. A person who is 'Both' can login to Procore, and be given a resource assignment.
- Permission Level. Select the person's permission level for the Resource Planning tool. See Create Permissions Templates for Resource Planning
- Optional: Phone Number. Enter the person's phone number.
- Enable Email Messages. Move the toggle
 ON to enable or
  OFF to disable.
 - Enable SMS Messages. Move the toggle ON to enable or OFF to disable.
- Click Add User.
Option 2: Add People to Resource Planning from the Resource Planning Tool
- Navigate to the Company level Resource Planning tool.
- Click People and select People List.
- Click Create.
- Complete the form.
- First Name. Enter the person's first name.
- Last Name. Enter the person's last name.
- Status. The person's user status.
- Groups. Select the person's access to Groups in the Resource Planning tool.
- Job Title. Select the person's job title from the drop-down list.
- Employee ID. Enter the person's employee ID.
- Type. Select whether the person should be a 'User', 'Assignable', or 'Both'.
- User. A 'User' is a person who can login to Procore. Users alone can NOT be assigned as resources for Resource Planning projects.
- Assignable. An 'Assignable' person is someone who can be given a resource assignment, but cannot login to Resource Planning.
- Both. A person who is 'Both' can login to Procore, and be given a resource assignment.
- Permission Level. Select the person's permission level for the Resource Planning tool. See Create Permissions Templates for Resource Planning
Note: This field is required if the person is added as a 'User' or 'Both'. - Email. Enter the person's email address.
Note: If creating a user, email is required. - Optional: Phone Number. Enter the person's phone number.
- Enable Email Messages. Move the toggle ON to enable or OFF to disable.
- Enable SMS Messages. Move the toggle ON to enable or OFF to disable.
- Click Create.
- Optional: Click Edit to add additional information about the user.
2a. Add People to the Procore Company Directory
Adding people to Procore is different depending on whether or not you have data syncs between Procore and Resource Planning enabled. Follow the below instructions based on your data sync set up:
Adding People with Data Syncs Enabled
If data syncs are enabled, people who are 'Users' or 'Assignable Users' are automatically added to the Company Directory. You must send an invite from the Company Directory so the user can set their password in Procore.
Alternatively, if you completed a one-time data upload for Resource Planning, you need to invite your users to Procore so the user can set their password in Procore.
- Navigate to the Company Directory tool once Resource Planning and Procore have synced.
- Click Users.
- Locate the person you want to invite.
- In the 'Invitation' column, click Invite or Re-Invite.
After a user accepts their invitation and sets a password, they can log in to Procore and access Resource Planning.
Adding People with Data Syncs Disabled
If data syncs are disabled, users are managed separately in Resource Planning and Procore. To access Resource Planning, users must have passwords set in both systems for the same email address. These steps are to add the new Resource Planning user to the Company Directory in Procore.
- Navigate to the Company level Directory tool.
- Click Add User.
- Complete this data entry:
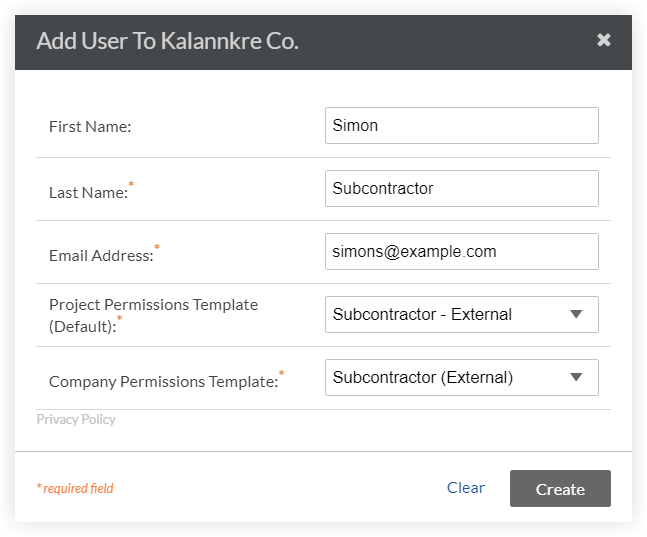
- First Name. Enter the new user's first name.
- Last Name. Enter the new user's last name.
- Email Address. Enter the new user's email address.
Note: This email address must match the email address added to Resource Planning. - Project Permissions Template (Default). Select one of the options from the drop-down list.
Note: To learn more about project permissions templates, see Manage Project Permissions Templates. - Company Permissions Template. Select one of the options from the drop-down list.
Important
To access the Resource Planning tool, users must also have 'Read Only' level permissions or higher to the Resource Planning tool. This is set by creating and applying permissions templates in Procore's Permissions tool, and applying it here. See Create a Company Permissions Template
- Click Create.
You are redirected to the user's profile in the Company level Directory where you can update their company information, personal information, and other project settings as described below. - Mark the checkbox for Is Employee of [Customer Name].
- Locate the 'Company Permissions Templates' section and enable Ready Only permissions or higher for the Resource Planning Tool.
- Optional: Update any additional information for the person you are adding.
- Click Save and Send Invitation to Procore.
After a user accepts their invitation and sets a password, they can log in to Procore and access Resource Planning.