Manage Rows & Columns on the Subcontractor Invoices Tab
General Availability in Select Markets (United States)
 Procore Pay
 Objective
To manage the rows and columns on the Subcontractor Invoices tab in the Company level Payments tool.
Background
You can show, hide, group, sort, or size the columns in tables that appear in the Subcontractor Invoices and Disbursements tab of the Company level Payments tool, Depending on the tab you are using, you'll notice different table settings, options, and column configurations. However, the basic table functions operate similarly.
Things to Consider
- Required User Permissions
- Additional Information:
- To learn about the different tabs in the Payments tool, see About the Company Payments Tool.
Prerequisites
Steps
Manage Filters
To learn how to work with filters, see Search for and Apply Filters on the Subcontractor Invoices Tab.
Manage Table Settings
You can show/hide columns using the Table Settings options in the Payments tool. First, click the Table Settings ![]() icon on the top-right side of the data table. This reveals the Table Settings pane on the right side of the web page. To close the pane, click the 'x' in the top-right corner.
icon on the top-right side of the data table. This reveals the Table Settings pane on the right side of the web page. To close the pane, click the 'x' in the top-right corner.

Configure Columns
To choose the columns to show and hide, click the Table Settings ![]() icon on the top-right side of the table. This reveals the Table Settings pane on the right side of the web page. Under the Configure Columns area, move the toggle to the right to turn the column display ON. Procore's default setting is to show all available columns. To learn about the available columns in each tab, see About the Company Payments Tool.
icon on the top-right side of the table. This reveals the Table Settings pane on the right side of the web page. Under the Configure Columns area, move the toggle to the right to turn the column display ON. Procore's default setting is to show all available columns. To learn about the available columns in each tab, see About the Company Payments Tool.

Other options in the Table Settings area include:
- To hide a specific column, move the toggle to the left.
- To show a specific column, move the toggle to the right.
- To show all of the available columns, click the Show All link.
- To close the panel, click the Close (x) icon.
Manage Columns
Adjust Column Width
To adjust the width of a single column, hover your cursor over the right border of a column heading until the resize handle ![]() icon appears. Then drag the handle to the left or right to set the desired column width. If you press the SHIFT key while holding down the resize handle, a blue outline appears over the active column to help you see your column adjustment.
icon appears. Then drag the handle to the left or right to set the desired column width. If you press the SHIFT key while holding down the resize handle, a blue outline appears over the active column to help you see your column adjustment.

Sort Columns
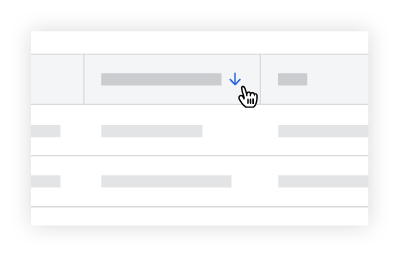
To sort the table's data by a specific column, click any column heading to reveal a BLUE arrow to adjust the sort order of the contracts table.
| Icon | Sort Order | Additional Information |
|---|---|---|
| Ascending | To reset your columns, hover your cursor over the right side of a column heading until the vertical ellipsis |
|
| Descending |
Group Columns
Some columns let you group your table's data. Columns that can be grouped contain a grouping option in the Overflow Menu.
Column Grouping Options
The options in the Select a Column to Group drop-down list lets you apply these grouping options to your table.
| Column Name | Column Grouping Option | Details |
|---|---|---|
| Invoice Status | Groups invoices by the available statuses | To learn about the available statuses, see What are the default statuses for Procore invoices? |
| Company | Groups invoices by company | This option corresponds to the 'Contract Company' set on the commitment's associated with your company's invoices. See Create a Commitment. |
| Project | Groups invoices by project | This option corresponds to the 'Name' field under 'Project Information' in the General tab of the Project Settings in each project's Admin tool. See Change the Name of a Procore Project. |
| Billing Period | Groups invoices by billing period | This option corresponds to the billing periods in your company's Procore projects. Billing periods are created in the Project level Invoicing tool. See Manage Billing Periods. |
| Contract | Groups invoices by each commitment contract | This option corresponds to the purchase orders and subcontracts created in the Project level Commitments tool. See Create a Commitment. |
Additional Grouping Options
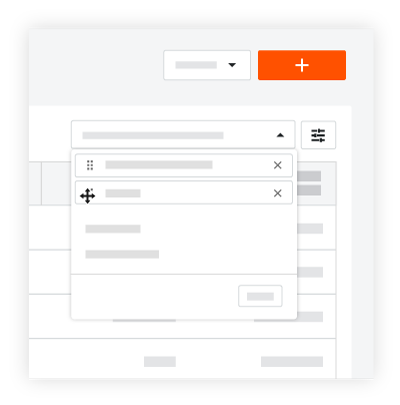
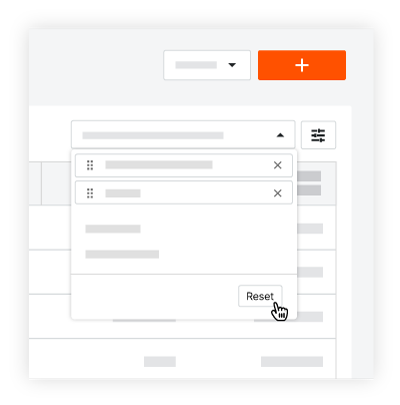
After you apply your grouping options, a drop-down menu appears above the table. This menu lets you add, remove, arrange, and reset your table's groupings.
- To change the row group order, grab a group label by its Reorder Grip
 and drag it into the desired position.
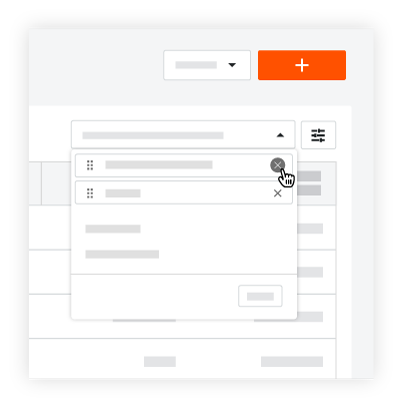
- To remove a single option, click the 'x' next to the option to remove.
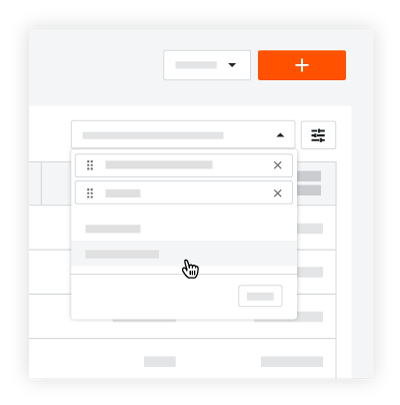
- To apply an available grouping option, click an option highlighted in GRAY.
- To restore the default settings, click Reset in the drop-down menu.
Overflow Menu
To open a drop-down menu with additional column options, click the vertical ellipsis ![]() to reveal an Overflow menu with the options detailed below.
to reveal an Overflow menu with the options detailed below.

The Overflow menu includes these options:
- Group by Project
- Pin Column
- Autosize this Column
- Autosize All Columns
- Sort By This Column
- Reset Columns
Group by Project
To keep data columns in the table organized by Procore project, select the Group by Project option
Pin Column
To keep data columns in the table from moving when you scroll, you can pin a column to freeze it in place. To do this, hover your cursor over the right side of a column heading unit the vertical ellipsis ![]() appears. Next, click the vertical ellipsis
appears. Next, click the vertical ellipsis ![]() and choose Pin Column. Then choose one of these options:
and choose Pin Column. Then choose one of these options:
- To pin a column on the left side of the table, choose Pin Left.
- To pin a column on the left side of the table, choose Pin Right.
Tip
- Procore pins columns to the left or right side of the page in the order columns are pinned.
- You can rearrange your pinned columns by dragging and dropping a column into the desired position.
- You can pin columns to both the left and right side of the table.
- To remove all pins, choose No Pin.
Autosize this Column
To automatically set the width of a column to match its contents, click the vertical ellipsis ![]() and select the Autosize This Column option from the drop-down menu.
and select the Autosize This Column option from the drop-down menu.
Autosize All Columns
To automatically set the width of all columns in the table to best match the contents, click the vertical ellipsis ![]() and select the Autosize All Columns option from the drop-down menu.
and select the Autosize All Columns option from the drop-down menu.
Sort By This Column
To automatically set the sort order of the column, click the vertical ellipsis ![]() and select Sort By This Column. Then choose one of these options:
and select Sort By This Column. Then choose one of these options:
- To sort the table by the selected column listing entries in ascending order, choose Sort Column Ascending.
- To sort the table by the selected column and list entries in descending order, choose Sort Column Descending.
- To remove the ascending/descending sort order, choose Column Not Sorted.
Reset Columns
To reset the table's columns to Procore's default settings, hover your cursor over the right side of a column heading until the vertical ellipsis ![]() appears. Then click the vertical ellipsis
appears. Then click the vertical ellipsis ![]() and select the Reset Columns option from the drop-down menu. This resets all of your column settings to the default settings.
and select the Reset Columns option from the drop-down menu. This resets all of your column settings to the default settings.