Add a Sage 300 CRE® Job to Procore
Objective
To create a new project in Procore from an existing job in Sage 300 CRE®.
Background
A 'Job' in Sage 300 CRE® is equivalent to a 'Project' in Procore. If you first created a job in Sage 300 CRE®, you may use the steps below to add it to Procore. This creates a new Procore project that contains all of the relevant job information. Project data that is synchronized between the two systems include the following:
- Project Cost Codes
- Project Categories
- Job Cost Data (See the "Job Costs" subtab.)
Important! Each cost code must be assigned a category, otherwise you will receive an error message when you try to add the Sage 300 CRE® job to Procore.
Things to Consider
- Required User Permissions:
- 'Standard' level permission on the ERP Integrations tool plus ONE of the following:
- 'Admin' level permissions on the company's Directory tool.
OR - The user must be granted the 'Create New Project' privilege. See Allow Users to Create New Projects.
- 'Admin' level permissions on the company's Directory tool.
- 'Standard' level permission on the ERP Integrations tool plus ONE of the following:
- Limitations:
- Additional Information:
- If you choose to import a job from Sage 300 CRE® in order to create a new Procore project, you can select the project template that you want to apply to your new project in the 'Integration Settings' page for the ERP Integrations tool. See Configure Advanced Settings: ERP Integrations for Sage 300 CRE®. To learn more about project templates, see Configure a Project Template.
- It is recommended that you always perform the import before creating any commitments (i.e., subcontracts or purchase orders) in Sage 300 CRE®.
Steps
- Navigate to the company's ERP Integrations tool.
- Click the Jobs subtab.
- In the 'Filters' menu, click Ready to Import.
This reveals a list of all the unsynced jobs that exist in Sage 300 CRE® but have NOT be added as to your company's Procore account as projects.
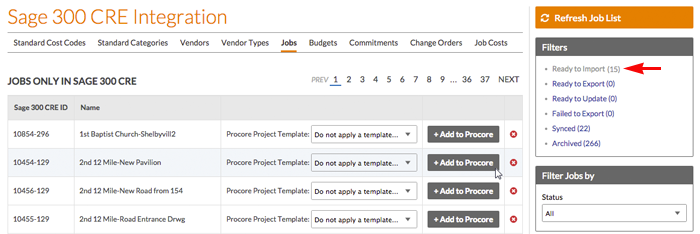
- Review the Job information as follows:
- Sage 300 CRE® ID. Ensure that the Job ID in Sage 300 CRE® is accurately reflected here. This will become the 'Project ID/Number' in Procore.
- Name. Ensure the Job Name in Sage 300 CRE® is accurately reflected here. This will correspond to the 'Project Title' in Procore.
- Procore Project Template. If you want to apply an existing project template to the new Procore project, select a template from the list. If you do not want to apply a template, choose 'Do Not Apply A Template....'. Note: The selections in this list are created in the Portfolio tool. See Configure a Project Template.
- For each project line item, accept or reject the project:
- To accept the job and import as a new Procore project, click Add to Procore.
- To reject the job and prevent it from being imported into Procore as a new project, click the RED (x).