Outlook - User Guide
Available Actions
Steps
Save an Outlook Email to the Emails Tool in Procore
- Log in to Outlook.
- Select an existing email.
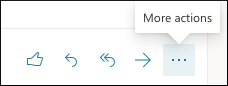
- In the 'ribbon' of the message, click the ellipsis
 icon to open the 'More actions' menu.
- Choose Procore for Outlook.
Note: You must have the Outlook 'Reading Pane' option selected in order for the Procore for Outlook button to be enabled and available. - In the 'Procore for Outlook' panel, click Save to Emails Tool.
- Optional: Add one or more tags to the email.
- Confirm your action by clicking Save to Procore.
Note: Any existing email attachments are also saved to Procore. - A success message appears indicating that your email has been saved to Procore.
Save Outlook Email Attachments to the Documents Tool in Procore
- Log in to Outlook.
- Select an existing email that includes at least one file attachment.
- In the message ribbon, click the ellipsis icon to open the 'More actions' menu.
- Choose Procore for Outlook.
Note: You must have the Outlook 'Reading Pane' option selected in order for the Procore for Outlook button to be enabled and available. - In the 'Procore for Outlook' panel, click Save to Documents Tool.
- Enter a file name for the attachment.
- Choose the Documents folder where you want to save the attachment.

- Click Save to Procore.
- A success message appears indicating that the attachment has been saved to Procore.
Quickly Create items in Procore from Outlook
You can use the Quick Create functions to quickly create items in Procore:
Photos
Upload attached image files from an Outlook email directly to the Procore Photos tool.
- Log in to Outlook.
- Select an existing email that includes at least one image file attachment.
- In the message ribbon, click the ellipsis icon to open the 'More actions' menu.
- Choose Procore for Outlook.
Note: You must have the Outlook 'Reading Pane' option selected in order for the Procore for Outlook button to be enabled and available. - Click Photo.
- Enter the following:
- Album. Choose the Procore album to store the image in.
- Trade. Select the appropriate trade.
- Private. Mark this checkbox to make the photo private in Procore.
- Attachments. Enter a file name for the photo.

- Click Save to Procore.
A success message appears indicating that your file has been saved to Procore.
Note: To view your uploaded file in Procore, click View in Procore.
RFIs
Complete the following steps to create a draft RFI directly from Outlook.
- Log in to Outlook.
- Select an existing email that includes at least one image file attachment.
- In the message ribbon, click the ellipsis icon to open the 'More actions' menu.
- Choose Procore for Outlook.
Note: You must have the Outlook 'Reading Pane' option selected in order for the Procore for Outlook button to be enabled and available. - Click RFI.
- Enter the following information:
- Subject. Enter the subject of the RFI.
- Question. Enter your question.
- Assignees. Assign the RFI.
- RFI Manager. Select the RFI's manager.
- Received From. Select the person the question was received from.
- Attachments (Optional). Enter a file name for the attachment.
- Click Create Draft RFI.
A success message appears indicating that your RFI has been saved to Procore.
Note: To view your RFI in Procore, click Continue Editing in Procore.
Correspondence
Complete the following steps to create a 'Draft' correspondence item directly from Outlook.
- Log in to Outlook.
- Select an existing email that includes at least one image file attachment.
- In the message ribbon, click the ellipsis icon to open the 'More actions' menu.
- Choose Procore for Outlook.
Note: You must have the Outlook 'Reading Pane' option selected in order for the Procore for Outlook button to be enabled and available. - Click Correspondence.
- Add the following information as applicable:
- Correspondence Type: Select a correspondence type.
- Title: The subject line from the email is automatically entered as the item's Title, but you can enter a different name for the correspondence item.
- Description: Enter a description for the correspondence item.
- Assignees: Enter one or more users to be designated as assignees for the correspondence item.
- Distribution Members: Enter one or more users to be included in the distribution list for the correspondence item.
- Private: Mark this checkbox to make the correspondence item 'Private'. 'Private' correspondence items are only visible to their creator, the user listed in Received From, the users listed in Assignees, the users listed in Distribution, and users with company or project level 'Admin' permissions.
- Attachments: Any attachments included in the email are automatically included as the correspondence item's attachments. You can remove any irrelevant attachments, but you cannot add new attachments when creating the item.

- Click Create Draft Correspondence.
A success message appears indicating that your Correspondencee item has been saved to Procore.
Note: To view your Correspondence item in Procore, click Continue Editing in Procore.
Tasks
Complete the following steps to create a new Task directly from Outlook.
- Log in to Outlook.
- Select an existing email that includes at least one image file attachment.
- In the message ribbon, click the ellipsis icon to open the 'More actions' menu.
- Choose Procore for Outlook.
Note: You must have the Outlook 'Reading Pane' option selected in order for the Procore for Outlook button to be enabled and available. - Click Task.
- Enter the following details:
- Title
- Description
- Private
- Status
- Category
- Due Date
- Attachments

- Click Create Task Item.
A success message appears indicating that your Task has been saved to Procore.
Note: To view your Task in Procore, click Continue Editing in Procore.
Change Events
Complete the following steps to create a new Change Event directly from Outlook.
- Log in to Outlook.
- Select an existing email that includes at least one image file attachment.
- In the message ribbon, click the ellipsis icon to open the 'More actions' menu.
- Choose Procore for Outlook.
Note: You must have the Outlook 'Reading Pane' option selected in order for the Procore for Outlook button to be enabled and available. - Click Change Event.
- Enter the following details:
- Title
- Description
- Status
- Scope
- Type
- Attachments

- Click Create Change Event.
A success message appears indicating that your Change Event has been saved to Procore.
Note: To view your Change Event in Procore, click Continue Editing in Procore.
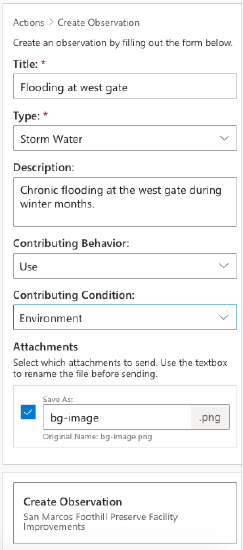
Observations
Complete the following steps to create a new Observation directly from Outlook.
- Log in to Outlook.
- Select an existing email that includes at least one image file attachment.
- In the message ribbon, click the ellipsis icon to open the 'More actions' menu.
- Choose Procore for Outlook.
Note: You must have the Outlook 'Reading Pane' option selected in order for the Procore for Outlook button to be enabled and available. - Click Observation

View My Open Items
You can conveniently view and access your Procore Open Items from Outlook.
- Log in to Outlook.
- Select an existing email that includes at least one image file attachment.
- In the message ribbon, click the ellipsis icon to open the 'More actions' menu.
- Choose Procore for Outlook.
Note: You must have the Outlook 'Reading Pane' option selected in order for the Procore for Outlook button to be enabled and available. - Click My Open Items.
- Your open items are categorized by type. Click the link next to an item to its view details.
