Configure Settings: Submittals Tool
Objective
To customize the Submittal tool's configuration settings for a project as a user with 'Admin' level permissions to the Submittals tool.
Things to Consider
- Required User Permissions:
- 'Admin' level permissions on the project's Submittals tool.
Video
Steps
- Navigate to the project's Submittals tool.
- Click the Configure Settings
 icon.
icon. - Click one of the links described below:
- Submittal Settings. To configure general settings for the features and default behavior of the Submittals tool, click Submittal Settings. Then see Configure the Submittal Tool's Settings below.
- Submittal Responses. To create custom submittals responses, click Submittal Responses. Then, see Create Custom Submittal Responses below.
- Submittal Import. To download your project's submittal import template. See Prepare Submittals for Import to the Procore Imports App.
- Submittal Workflow Templates. To configure your project's workflow templates for the approval process. See Manage Submittal Workflow Templates.
- Replace Workflow User. You can replace a user in the Submittal Workflow in bulk across all submittals that they have a 'Pending' response for.
- Permissions Table. To set end user permissions for the Submittals tool, click Permissions Table. Then see Set User Permissions for the Submittals Tool below.
Configure the Submittal Tool's Settings
- On the Configure Submittal Settings page, click Submittal Settings.
- Under Submittal Settings, configure these settings:
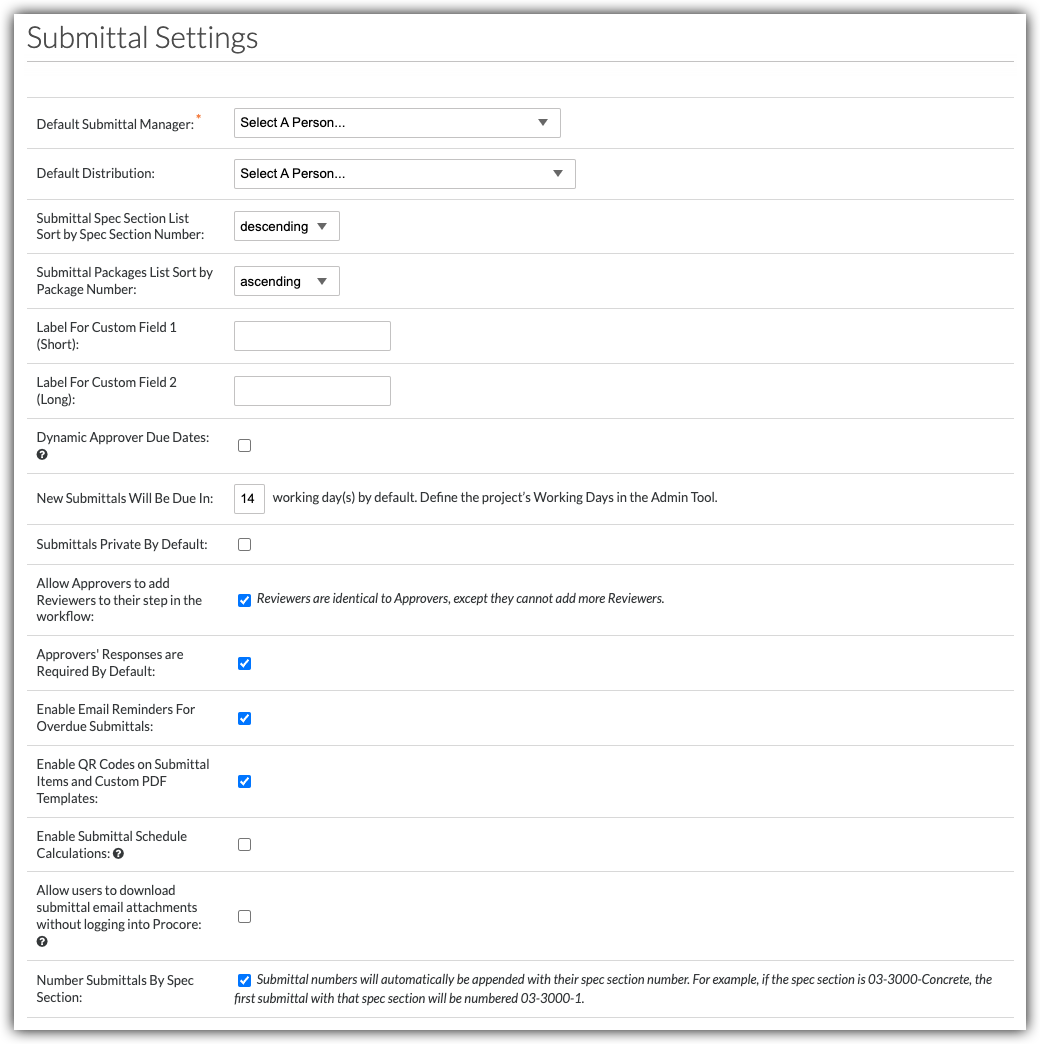
- Default Submittal Manager
Select the person that you want to designate as the submittal manager for new submittals from this drop-down list. - Default Distribution
Select all of the contacts to include on the tool's email notification distribution for new submittals. - Submittal Spec Section List Sort By Number
Select 'Ascending' or 'Descending' from the list. The default setting is descending (e.g., 999 to 1). -
Set the Sort Order for Submittal Package Items
Select 'Ascending' or 'Descending' from the list. The default setting is ascending (e.g., from a to z). -
- To add a short text field, type the desired field label in the Label for Custom Field 1 (Short) box. For example, type: Commitment Number
- To add a long text field, type the desired field label in the Label for Custom Field 2 (Long) box. For example, type: Notes
The short text field is used for short data entry. The long text field lets users enter long strings of text (e.g., messages) and also provides users with basic formatting tools.
Note: Custom Field 1 has a character-limit of 255 characters.
- Dynamic Approver Due Dates
Place a mark in the check box to give Procore the ability to adjust the approver due date setting. To keep the feature OFF, leave the check box clear. To learn about this setting, see What are dynamic approver due dates? - New Submittals Will be Due In
Enter a number of days in the text box. The default setting in Procore is 14 days.
Note: The due date respects which days are set as 'working days' for the project. See Set Project Working Days. -
Submittals Private by Default
Place a mark in this checkbox to make submittals private by default. In Procore, marking submittals as private limits the audience to users who are assigned 'Admin' level permissions to the Submittals tool, members of the submittal's distribution list, and reviewers assigned to the submittal workflow. By default, this checkbox is cleared in Procore, which means that new submittals are visible to users assigned 'Read Only' or above on the Submittals tool.
Note: Users with the 'View Private Submittals Associated to Users within Same Company' granular permission enabled on their permissions template can view a submittal marked 'Private' if another user in their company is the submittal's creator or is designated as the Submittal Manager, a Submitter, an Approver, or a Distribution List member. -
Allow Approvers to Add Reviewers to their Step in the Workflow
This setting is enabled by default and allows Approvers to add other reviewers to the submittal. Reviewers are identical to Approvers, except they cannot add other reviewers. -
Approvers' Responses are Required by Default
Place a mark in this checkbox to make approvers' responses on submittals required by default. By default, this checkbox is marked in Procore, which means that responses from selected approvers are required when approving the submittal. -
Enable Email Reminders For Overdue Submittals
Place a mark in this checkbox to automatically send an overdue notification by email to the Ball In Court user when that person's 'Approver Due Date' on the submittal passes. Email reminders will not be sent once a submittal is 45 days past due. This checkbox is selected by default in Procore. -
Enable QR Codes on Submittal Items and Custom PDF Template
Place a mark in this checkbox to allow QR codes to be generated for submittals. See Generate a QR Code for a Submittal. -
Enable Submittal Schedule Calculations
This setting is disabled by default. When ON, the New Submittal page includes the Submittal Schedule Information area, which takes the end user's data entry in the 'Required On-Site Date' field and automatically calculates the 'Planned Return Date', 'Planned Internal Review Complete Date', and 'Planned Submit By Date'.-
When enabled, the end user can set the feature up as described in Set Up Submittal Schedule Calculations.
-
To learn how this feature works in the Submittals tool, see Calculate Submittal Schedule Information (If Enabled)
-
-
Allow users to download submittal email attachments without logging into Procore
Mark this checkbox to allow users to download a submittal attachment (added in the submittal's General Information or in a workflow step) from the body of an email without logging in to Procore. These download links will expire 14 calendar days from the day the email was sent. By default, this checkbox is cleared.Note:
- Submittal attachments and attachments that are uploaded in the 'Attachments' field when a submittal is distributed and when a submittal is forwarded do not require users to log in to download the attachment, even if this checkbox is cleared.
- Attachments that are uploaded in the 'Attachments' field when a submittal is forwarded do not require users to log in to download the attachments, even if this checkbox is cleared.
- Attachments accessed by clicking View PDF in the email do require users to log in to download the attachment, even if this checkbox is marked.
-
Number Submittals by Spec Section
When enabled, Submittal numbers will automatically be appended with their spec section number. For example, if the spec section is 03-3000-Concrete, the first submittal with that spec section will be numbered 03-3000-1. -
Beta Enable Reject Workflows
When enabled, submittal responses of either 'Reject' or 'Revise and Resubmit' from a workflow approver automatically route the Ball in Court to the Submittal Manager to determine the next step.- The Submittal Manager will be notified by email that they are now the Ball in Court user due to a 'Reject' or 'Revise and Resubmit' response. When the Ball in Court is routed to the Submittal Manager, they can choose to:
- Close the submittal, and create a revision if desired.
- Return the Ball in Court to the previous step in the workflow.
- Resume the workflow.
- When a workflow is resumed, it will pick up where it left off. For example:
- If the 'Reject' or 'Revise and Resubmit' response was entered on a step with no other approvers, the workflow moves to the next step. If there is no next step, the workflow completes.
- If the 'Reject' or 'Revise and Resubmit' response was entered on a step with with more required approvers who haven't responded yet, the workflow will resume at the same step so the other required approvers can respond.
- When a workflow is resumed, it will pick up where it left off. For example:
important
- When enabled, this feature introduces new behavior for all new submittal workflow responses within a project, including new responses on workflows currently in progress.
- Before enabling this project setting, it is important to assess existing workflows and templates to determine if any changes are needed.
- Workflows that were created with additional Submittal Manager steps to review 'Rejected' and 'Revise and Resubmit' responses will likely no longer be necessary with this feature enabled, and can be removed from the workflow or workflow template.
- This feature also applies to any custom responses mapped to 'Reject' or 'Revise and Resubmit' response types.
- When the Submittal Manager chooses to set the Ball in Court back to a previous workflow step, this action will be recorded in the change history, but is not reportable in reporting tools. If you want to revert to the legacy behavior that always shifts the Ball in Court forward, disable the 'Enable Reject Workflows' setting and save your selection.
- The Submittal Manager will be notified by email that they are now the Ball in Court user due to a 'Reject' or 'Revise and Resubmit' response. When the Ball in Court is routed to the Submittal Manager, they can choose to:
- Default Submittal Manager
- Under Submittal Emails, choose from these options to configure the email notification settings for submittal items:
Note:- These email settings do not apply when sending and resending submittals in submittal packages. See Emails for Submittal Packages.
- To learn more about the actions that trigger an automatic email notification, see When does the Submittals tool send email notifications to Procore users?
- 'Action Required' emails cannot be turned OFF. To learn more, see Why can't I turn OFF the 'Action Required' emails sent from the Submittals tool?
- Remove a mark from the desired check box to prevent the system from sending an automatic email notification to the user(s) designated in each role for each event.
- Place a mark in the appropriate checkbox to give the system permission to send an automatic email notification to the user's designated in the appropriate role for each event.
- Click Reset to Default to restore the system's default settings for Submittal Emails.
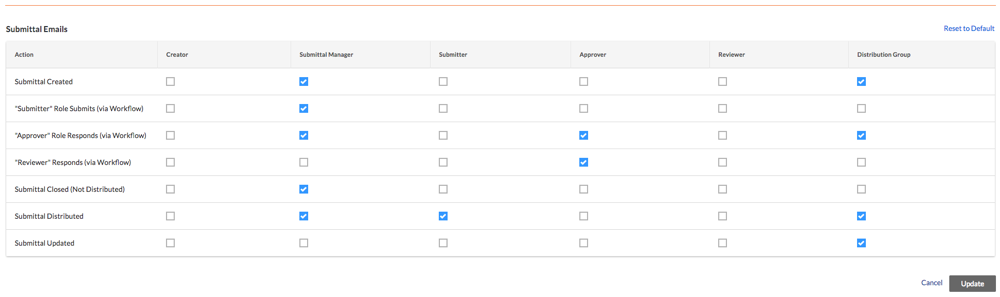
- When finished updating the settings in the Submittal Settings page, click Update.
Create Custom Submittal Responses
- Navigate to the project's Submittals tool.
- Click the Configure Settings icon.
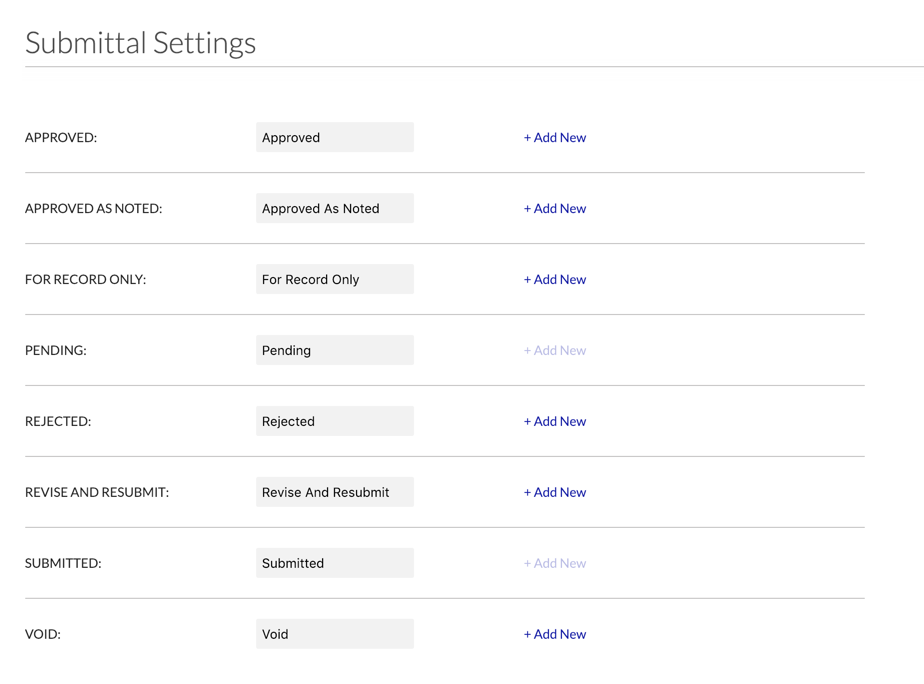
This reveals the ‘Submittal Settings’ page. - Click Submittal Responses. This reveals the list of submittal responses shown below. To learn about each response, see What are the default submittal responses in Procore?
- Locate the submittal response that you want to change.
- Choose from the following options:
Change a Custom Submittal Response
You can change an existing response to a custom value for all eight (8) of the default submittal responses in Procore. See What are the default submittal responses in Procore?
- In the responses list on the 'Submittal Settings' page, type over an existing value.
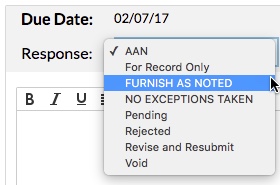
For example, type AAN in place of ‘APPROVED AS NOTED’ as shown below.
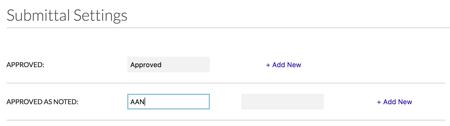
The system automatically saves your changes when you click out of the box. A GREEN banner appears at the top of the page when the update is saved. To see how this looks in the web application, see Where do custom submittal responses appear?
Add a New Custom Submittal Response
You can add up to twelve submittal responses for six (6) out of the eight (8) default submittal responses in Procore. For three (3) of the responses (i.e., FORWARDED FOR REVIEW, PENDING, and SUBMITTED), the system limits you to only one (1) custom response. See What are the default submittal responses in Procore?
- In the responses list on the 'Submittal Settings' page, click +Add New.

- In the box that appears, enter a new response. For example, in place of APPROVED, you might want to add responses for both ‘FURNISH AS NOTED’ and ‘NO EXCEPTIONS TAKEN’.

The system automatically saves your changes when you click out of the box. A GREEN banner appears at the top of the page when the update is saved. To see how this looks in the web application, see Where do custom submittal responses appear?
Delete a Custom Submittal Response
If you want to delete a custom response, click the RED 'x' that appears next to the item.
Note: You can only delete the custom responses that have been added to the system. Each of the eight (8) default responses requires at least one (1) response (which you may customize, but cannot delete).

When the system deletes the response, a confirmation banner appears at the top of the page.
Where Do Custom Submittal Responses Appear?
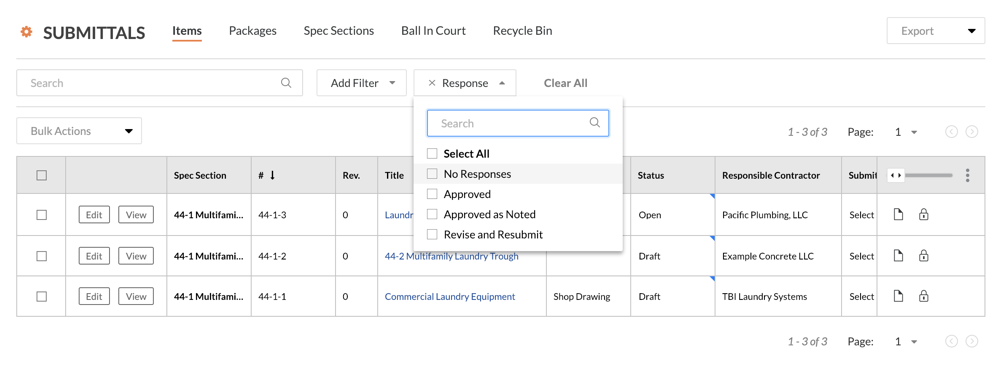
After customizing your responses, they will appear as selections in various drop-down lists in the Submittals tool. The primary areas include:
- Responses. In the Submittals tool, this list appears in the 'Requires Your Attention' for users who are designated as the Ball in Court (BIC) person on a submittal.
- Add a Filter. This list appears at the top of the Submittals tool (next to the Search field) and lets users filter the list of submittals by the response.
Replace Workflow User
You can replace a user in submittal workflows in bulk across all submittals that they have a 'Pending' response for. When you replace workflow users:
- Only workflows where the current user's response is in a Pending status will be replaced by the new user.
- If a current user has already responded in a workflow, they will NOT be replaced by the new workflow user.
- The new workflow user will only receive new workflow emails. They will not receive any workflow emails previously sent to the current user.
Important
This action will NOT replace users in any workflow templates. To replace users in a workflow template, you’ll need to edit the template manually.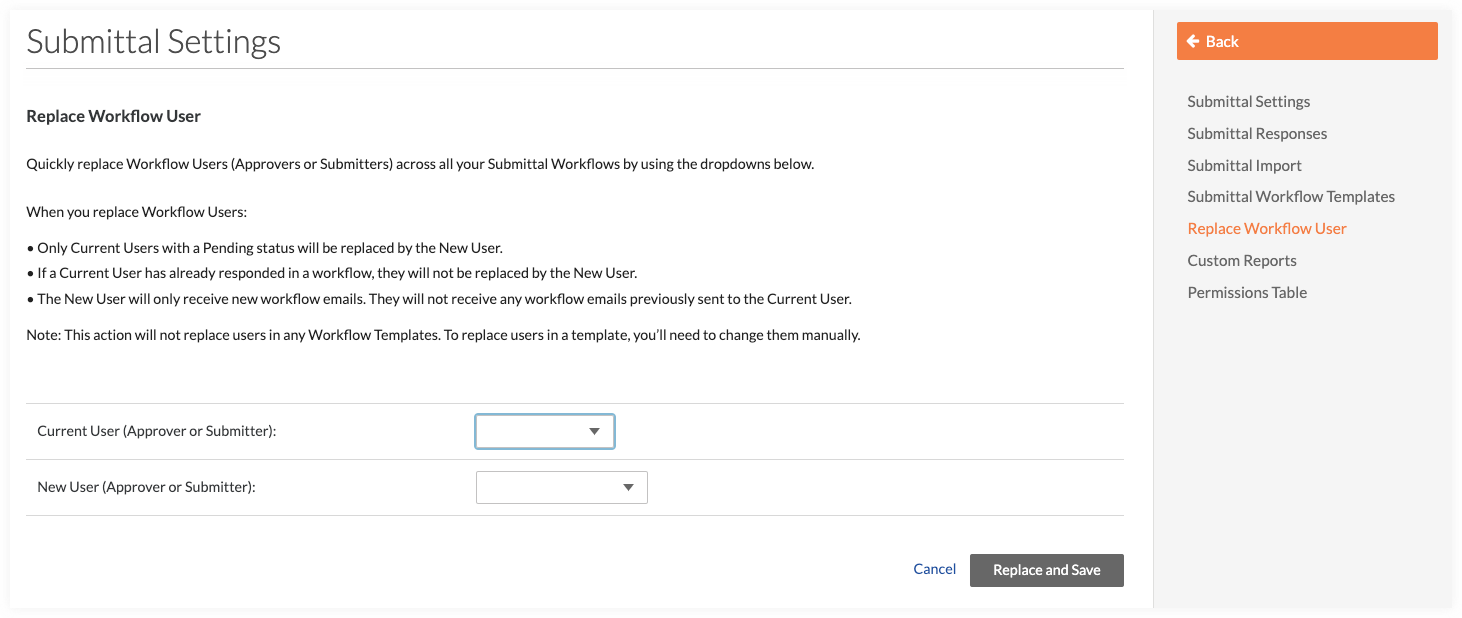
Set User Permissions for the Submittals Tool
Note
In addition to having 'Admin' level permission for the Submittals tool, 'Admin' level permission to the project's Directory tool is also required to view the permissions table.If you have a small number of users without permission templates assigned to them, you might choose to manage user permissions to the project's Submittals tool using the steps below. If you have a large number of users, we recommend that you manage user permissions on Procore's project tools using permission templates. See Manage Project Permissions Templates.
- Navigate to the project's Submittals tool.
- Click the Configure Settings icon.
- Click Permissions Table.
- Set each user's permission for the Submittals tab according to your preferences.
 Access
 No Access
Note: To view a complete list of available tasks by permission level, see Permissions.
- Click Back when you are finished updating the user permissions.