Accept or Reject a Project for Export to Sage 300 CRE®
Objective
To accept or reject a new project created in Procore as an accounting approver. Upon acceptance, the project is then exported from Procore and added to Sage 300 CRE® as a new 'Job.'
Background
If a user sends a Procore project to the ERP Integrations tool for acceptance by an accounting approver, the approver has the option to 'Accept' or 'Reject' the project for export to Sage 300 CRE® as follows:
- Accept. An 'Accept' response exports the project from Procore and creates a new 'Job' in your Sage 300 CRE® system.
OR - Reject. A 'Reject' response removes the project from the ERP Integrations tool's 'Ready to Export' list and places it into an editable state in the project's Admin tool for updating (see Add or Edit a Project).
If there is at least one (1) item awaiting accounting acceptance in the ERP Integrations tool's 'Ready to Export' view, users who have been granted the privilege detailed above will receive one automated email notification perday (e.g., with the Subject Line "ERP Integrations Daily Summary) until all of the in the 'Ready to Export' view have been accepted or rejected.
Things to Consider
- Required User Permissions:
- Prerequisites:
- A user must create the Procore project in the Portfolio tool and then send it to the ERP Integrations tool for acceptance by an accounting approver. See Add a Procore Project to Sage 300 CRE®.
Steps
Review Projects in the 'Ready to Export' List
- Navigate to the company's ERP Integrations tool.
Notes:- If the ERP Integrations tool configured for Sage 300 CRE®, the Sage 300 CRE® Integration page appears.
- If the project does not appear in this tab, see Why is my Procore project missing for the ERP Integrations tool?
- Click the Jobs tab.
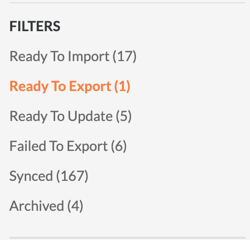
- Under Filters, click Ready to Export.
- Continue with one of the following:
Accept the Project
- Review the project information in the Jobs tab.
Note: To view the project information in more detail, click the hyperlink in the 'Project Name' field. You must have access permission to the project in order to use this hyperlink.

- Choose Accept.
- Enter the Sage Job ID in the box provided.
Notes:- If your entry does not exactly match the format and sytax of the 'Job ID Format' that was configured for your company by your Procore point of contact, an error message will appear and the data will not be exported. For troubleshooting information, see Why is an error message appearing when I export Procore data to Sage 300 CRE®?
- Your company's Procore Administrator (or Sage 300 CRE® Administrator) works with your Procore point of contact to define 'Job ID Format' that is required for your system. If you do not know the format and syntax to use, contact one of these individuals or send an email to support@procore.com.
- Click Export to Sage 300.
Note: If the export process is successful, the system moves the project(s) from the 'Projects in Procore Not Synced to Sage 300 CRE®' list to the 'Synced Projects' list. To view this list, click Synced in the 'Filters' menu.- OR
- If the export process fails, an error message appears (see Why is an error message appearing when I export Procore data to Sage 300 CRE?). The system also moves the project(s) from the 'Projects in Procore Not Synced to Sage 300 CRE®' list to the 'Projects in Procore Failed to Sync to Sage 300 CRE®' list. To view this list, click Failed To Sync in the 'Filters' menu.
A user with access to Sage 300 CRE® can now verify the export.
Verify the Export in Sage 300 CRE®
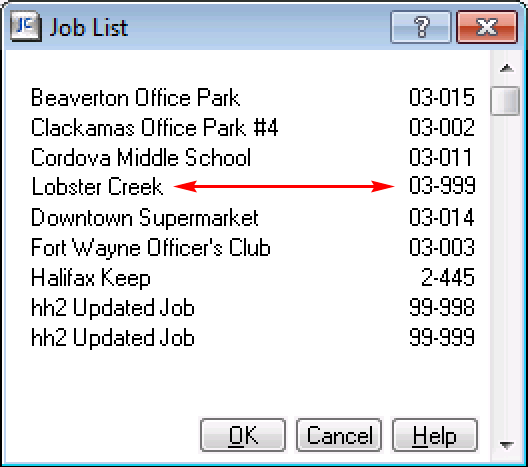
If the export process was successful and the Procore data is now synced with Sage 300 CRE®, a user with access can check the Job List in Sage 300 CRE® to ensure that the job was successfully exported from Procore.
Reject the Project
- Review the project information in the Jobs tab.
Note: To view the project information in more detail, click the hyperlink in the 'Project Name' field. You must have access permission to the project in order to use this hyperlink. - Choose Reject.
- Enter a brief comment to explain why the project was rejected in the Enter a Comment (Optional) field.
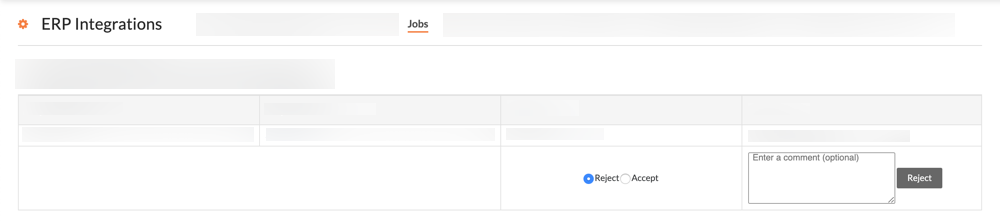
- Click Reject.
The system sends an automated email notification with the subject line 'ERP Project Rejection Notification' to the person who created the commitment and to any users designated as an accounting approver on the project. Procore removes the project from the 'Ready to Export' list and returns it to an editable state in the project's Admin tool, so the user can make the correction and then re-send the project to the ERP Integrations tool for acceptance by an accounting approver. See Add a Procore Project to Sage 300 CRE®.