Which budget views should I add to my Procore projects?
Answer
In addition to your Procore Standard Budget view, Procore recommends setting up the following budget views for your projects:
- Buyout Savings
- Buyout Savings (While in Buyout)
- Change Order Analysis
- Current/Revised
- Real-Time Labor Costing
- Procore Labor Productivity Cost
Notes
- If your company has disabled the Prime Contracts tool, see How do I adjust my budget view when the Client Contracts, Funding, or Prime Contracts tool is disabled in my company's Procore account?
- If your company account is using the ERP Integrations tool (see ERP Integrations), Procore automatically provides you with an 'ERP' budget view for your integrated ERP system. If your ERP integration supports the job cost transaction detail feature, you will need to modify the Procore ERP Budget view. For instructions, see Add the Columns for Job Cost Transaction Syncing to a Budget View for ERP Integrations.
Tip
If your company is using Procore's Field Productivity tools, you can also set up a budget view to perform real-time labor costing. See Add a Budget View for Real-Time Labor Costing.
Buyout Savings
If the project buyout phase is complete, the 'Buyout Savings' budget view shows your project's buyout savings. Project buyout refers to the time period between preconstruction and construction phases of a project when commitments (a.k.a., purchase orders and subcontracts) are issued. Buyout savings refers to situations where the work's estimated costs are higher than the actual market price, with the buyout savings being posted and held in a contingency fund. Typically, project buyout occurs after a contract award to a general contractor and that contractor's awarding of subcontracts. You can use the 'Buyout Savings' view to filter your project's budget by cost type to show only the budget line items to be committed. See Apply the View, Snapshot, Group, and Filter Options on a Budget View.
Note: If the buyout is incomplete on a line item, the 'Committed Costs' amount in the view will be reflected as buyout savings. See Buyout Savings (While in Buyout).
- Navigate to the company's Admin tool.
- Under Project Settings, click Budget.
- Click Set up New Budget View.
- Under Standard Views, highlight Procore Standard Budget.
- Click Create.
- Type the following in the View Name box: Buyout Savings
- Type a description for your new view in the View Description box.
- Under Column Configuration, click Configure Columns.
- Ensure that all the default column checkboxes remain selected
- Modify the Committed Costs column as follows:
- Under Source, highlight Committed Costs.
- Click Edit.
- Remove the mark from the Commitment Change Orders checkbox.
- Click Save as New or Update.
- Create a Buyout Savings column as follows:
- Click Create > Calculated.
- Type the following in the Column Name box: Buyout Savings
- In the Format list, ensure Currency is selected.
- In the Pick a Column list, select:
- Original Budget
- minus (-)
- Committed Costs
- Click Create.
- In the column list, remove the mark from all column checkboxes.
- Place a mark in the following column checkboxes only:
- Sub Job
- Division
- Cost Code
- Category
- Original Budget
- Committed Costs
- Buyout Savings
- Click the (x) to close the Configure Columns window.

Buyout Savings (While in Buyout)
You can use this budget view instead of the one above if buyout is not complete on certain line items.
- Navigate to the company's Admin tool.
- Under Project Settings, click Budget.
- Click Set up New Budget View.
- Under Standard Views, highlight Procore Standard Budget.
- Click Create.
- Type the following in the View Name box: Buyout Savings
- Type a description for your new view in the View Description box.
- Under Column Configuration, click Configure Columns.
- Ensure that all the default column checkboxes remain selected
- Modify the Committed Costs column as follows:
- Under Source, highlight Committed Costs.
- Click Edit.
- Remove the checkmark from the Commitment Change Orders checkbox.
- Click Save as New or Update.
- Create a Buyout Savings Intermediate column as follows:
- Click Create > Calculated.
- Type the following in the Column Name box: Buyout Savings Intermediate
- In the Format list, ensure Currency is selected.
- In the Pick a Column list, select:
- Original Budget
- minus (-)
- Committed Costs
- Click Create.
- Create a Buyout Savings column as follows:
- Click Create > Calculated.
- Type the following in the Column Name box: Buyout Savings
- In the Format list, ensure Currency is selected.
- In the Pick a Column list, select:
- (Buyout Savings Intermediate
- multiplied by (*)
- Committed Costs)
- divided by (÷)
- Committed Costs
Notes:- If the Committed Cost is equal to zero ($0), Procore shows the Buyout Savings value as 'N/A.'
- If the Committed Cost is not equal to $0, Procore shows the Buyout Savings.
- Click Create.
- In the column list, remove the checkmark from all column checkboxes.
- Place a checkmark in the following boxes only:
- Buyout Savings
- Original Budget Amount
- Committed Costs
- Click the (x) to close the Configure Columns window.

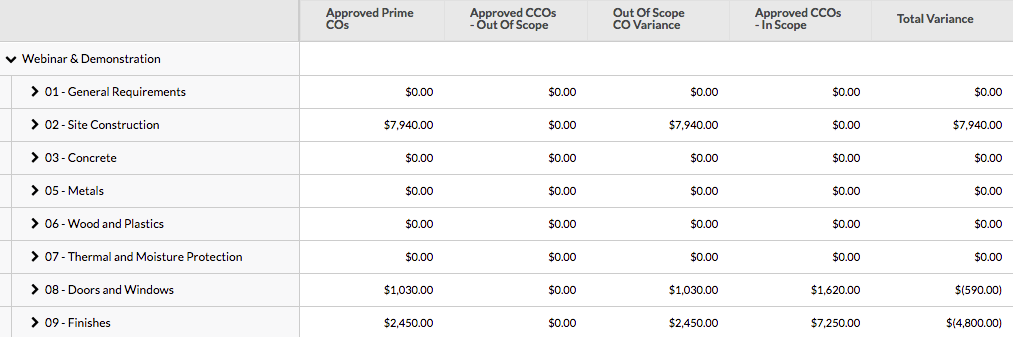
Change Order Analysis
You can compare how much money you're making/losing off Out-of-Scope change orders, and how much money you're losing off of In-Scope change orders.
Note: This view only works if you are using the Change Events tool.
- Navigate to the company's Admin tool.
- Under Project Settings, click Budget.
- Click Set up New Budget View.
- Under Standard Views, highlight Procore Standard Budget.
- Click Create.
- Title the view Change Order Analysis.
- Click Configure Columns.
- Rename the Approved COs column
- Click into Approved COs and click Edit.
- Name the column Approved Prime COs.
- Click Update.
- Create the Approved CCOs - Out of Scope column.
- Click Create in the top right corner and select Source.
- Name the column Approved CCOs - Out of Scope.
- Select Commitment as the column source.
- Select the checkbox Commitment Change Orders.
- Select the box next to "Approved" under Status.
- Select the checkbox next to "Out of Scope."
- Click Create at the bottom of the module.
- Create the Approved CCOs - In Scope column.
- Click Create in the top right corner and select Source.
- Name the column Approved CCOs - In Scope.
- Select Commitment as the column source.
- Select the checkbox next to Commitment Change Orders.
- Select the checkbox next to "Approved" under Status.
- Select the checkbox next to "In Scope."
- Click Create at the bottom of the module.
- Create the Out of Scope CO Variance column.
- Click Create in the upper right corner and select Calculated.
- Title the column Out of Scope CO Variance.
- Enter the following calculation: Approved (Prime) COs - Approved CCOs-Out of Scope.
- Click Create at the bottom of the module.
- Create the Total Variance column.
- Click Create in the top right corner and select Calculated Column.
- Title the column Total Variance.
- Enter the following calculation: Out of Scope CO Variance - Approved CCOs In Scope.
- Click Create at the bottom of the modal.
- Remove the checkmark from all column boxes except:
- Sub Job
- Division
- Cost Code
- Category
- The columns that you just created.
- Click the (x) to close the Configure Columns window.
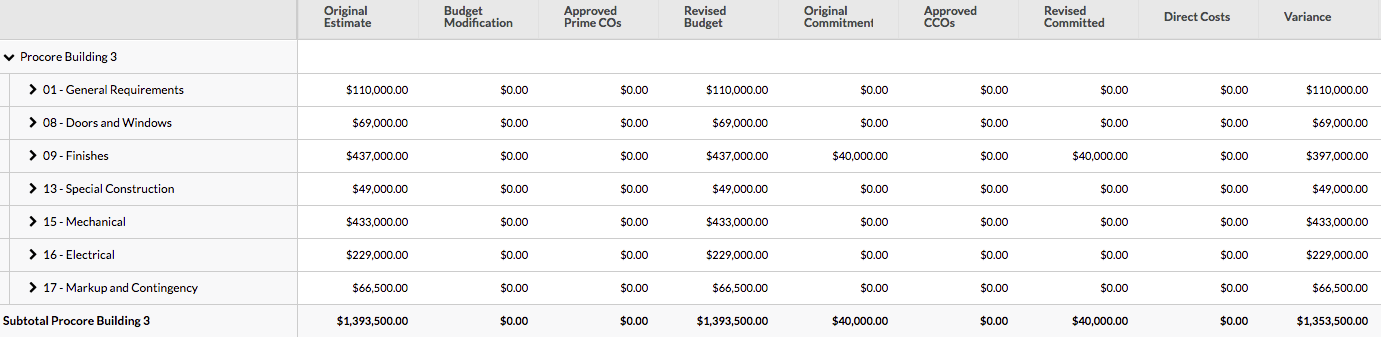
Current/Revised
This is similar to the "normal" budget; however, all Pending, Projected, and Forecast columns are removed. The Over/Under for this view will show you the over/under for current amounts.
- Navigate to the company's Admin tool.
- Under Project Settings, click Budget.
- Click Set up New Budget View.
- Under Standard Views, highlight Procore Standard Budget.
- Click Create.
- Title the view Current/Revised.
- Click Configure Columns.
- Create the Current Over/Under column.
- Click Create in the top right corner and select Calculated column.
- Name the column Current Over/Under.
- Enter the calculation Revised Budget - Committed Costs - Direct Costs.
- Click Create at the bottom of the module.
- Deselect the following columns in the left.
- Pending Cost Changes
- Pending Budget Changes
- Projected Costs
- Projected Budget
- Projected over Under
- Forecast to Complete
- Exit the window to save your changes.

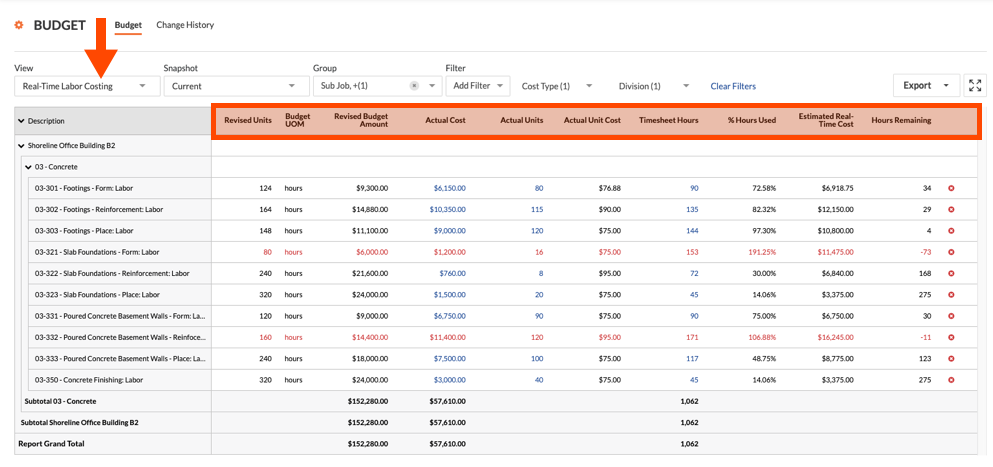
Real-Time Labor Costing
For companies using Procore's Field Productivity tools and who want to use Procore's real-time labor costing capabilities in the Budget tool, Procore recommends setting up a budget view named 'Real-Time Labor Productivity' and adding the following columns. For step-by-step instructions about setting up the individual columns, see Add a Budget View for Real-Time Labor Productivity.
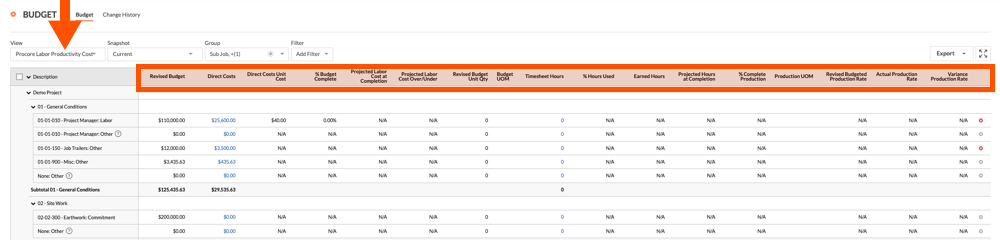
Procore Labor Productivity Cost
For companies using Procore's Project Financials and Field Productivity tools, Procore recommends setting up a budget view named 'Procore Labor Productivity Cost' budget view. This is a pre-built view that you can quickly add to a project. It allows users to input production quantities (see What are production quantities?) to your project's budget. For instructions, see Set Up the Procore Labor Productivity Cost Budget View.